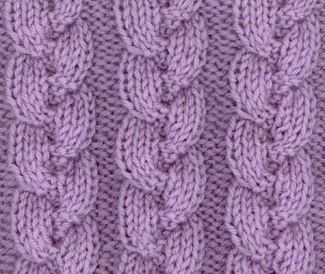
How to knit a braid pattern. Knitting braids without an additional knitting needle
Indeed, such a pattern as “braids” is very similar to a popular women's hairstyle. It looks equally beautiful on a children's scarf, as well as on women's pullovers. Braids look very cute and will decorate almost any thing. Can be used for a braid on its own, as a separate element, or in combination with other suitable patterns.
If a person wants to create such a beauty himself, but does not know how to knit a braid with knitting needles for beginners, then let him take an auxiliary knitting needle, add threads to it, and also have some free time and patience.
So, you have chosen a product to knit, and there is a “braid” in the pattern. First of all, you need to know some tips that will help you master:
- You definitely need a special knitting needle, then knitting a pattern for a braid will be much easier. At the same time, such a tool is also useful for creating a pattern called a “harness.”
Special knitting needles for knitting braids with your own hands
- The pattern in the braid will have a neat appearance if the auxiliary knitting needle is smaller than the main one.
- You need to study the drawing in advance.
- The width of the braid depends on the number of loops and the thickness of the selected threads. If a large width is chosen, then the threads should be taken fluffier and thicker. If the diagrams indicate that the braid is narrow, it is advisable to use cotton ones.
- When choosing a braid as a pattern for your product, it is worth knowing that the fabric will become and also narrow during knitting. This should be taken into account when counting how many loops are needed and selecting threads.
- If you don’t have a special knitting needle and it’s impossible for a number of reasons to purchase one, then a large knitting pin will do. Well, or an ordinary stocking room will successfully replace both. In any case, go to the seller and tell him that you are just learning how to knit a braid, and he will help you find the right item.
- The braids have 2 directions, for the correction of which an auxiliary needle is needed. The main thing is to position it correctly. If it is placed behind the canvas, then the direction of the braids will be to the right. When she is in front, then to the left.
A double braid is the easiest pattern to make with your own hands and also for beginners. Its appearance consists of two weaves. In this case, the design of the pattern can be changed in appearance by changing the distance between the main pattern up or down. To understand this in more detail for beginners, you should make a sample, in which our example and braid knitting pattern will help you.
Double braid - knitting pattern
First we will tie a simple and beautiful braid. We count the loops, from them we need to subtract 2 edge loops for symmetry, the remaining number should tend to be divided by 12. We must understand that the first rows are formed by the pattern, and then we will knit the weaves ourselves. So, here is a braiding pattern for beginners, read carefully and follow it step by step.
- We knit the first row like this: first there are three front loops, then 3 purl ones. When making fabric this way, we will finish the row with purl loops.
- We do the second row and all other even rows as seen in the figure, that is, knit stitches under knit stitches, and, accordingly, purl stitches with purl stitches.
- Now we will conduct a knitting master class, with the braid tilted to the left. Don't forget to leave our knitting needle in front of the canvas. We knit the row in this way: first purl 3, then knit 3, remove three loops on an auxiliary needle, purl 3, return the 3 removed and knit. At the end of the row we knit 3 purl loops.
- We knit the fifth row exactly like the first.
- Next we make the 7th row. Now we will have a slope on the right. We remove the knitting needle behind the fabric. The loops are in this order: first we remove 3 loops on the knitting needle, knit 2 loops, purl the removed loops, knit them again. At the end we do 3 purls.
- We knit the ninth row like the first and repeat our pattern.
- If it’s not entirely clear, you can look at the photo.
This beautiful pattern of braids will look very voluminous. You can see how to knit a voluminous braid with knitting needles in the photo. The pattern will be embossed, which is obtained due to the fact that the front and back loops will be combined in a different way, and the front ones will prevail.
Double braid knitting pattern
To make a new sample, we pick up the loops again, leaving 4 for the edge loops - they are necessary for symmetry. The number of loops should be divisible by 11. We knit rapport in this way: first 2 purl stitches, and then 9 knit stitches. We use rapport to create the first row, the third, as well as 7 and 9. We finish the row with two loops on the wrong side.
Here are instructions on how to make the fourth row: two knit stitches, then knit stitches under the knit stitches, and under the purl stitches we knit the purl stitches. 5 is used for braiding your own braids. We make it like this: first purl 2, take a secondary needle, transfer 3 loops to it, throw the fabric in front, purl loops from the three thrown over, 3 knit loops. At the end there are 2 purl loops. We make the 11th row like this: purl 2 loops, knit 3, purl 3 loops, return the removed loops and knit. At the end we will make three knit stitches.
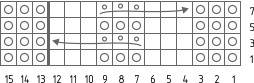
Triple wide braids are also called “royal braids”, which perfectly decorate a blouse, and in general, other things made independently. This product has a back and front stitch.

Triple braid pattern with diagram
For a triple braid pattern, the number must be a multiple of 30. To create such a beautiful pattern, we perform the following steps:
- Our first row is completely front row.
- The second row and the rest of the even rows are completely purled.
- We remove 5 on the knitting needle, placed in front of our canvas, then 5 knit stitches, 10 knit stitches, again we remove 5 on the knitting needle, but now we leave them behind the canvas. 5 facial. We knit 5 loops on the knitting needle.
- Row 5 and the next row 7 are completely knit.
- We knit the ninth row like this: we have 5 knit stitches, slip 5 onto a knitting needle, transfer them to work, then 5 knit stitches, removed knit stitches, 5 loops, and place the extra pizza in front of the fabric. Then knit 5 stitches and remove the knit stitches.
- Row 11 is completely front row.
- We do the 13th row as the first.
- We repeat.
Of course, someone will think that braid patterns in knitting are a difficult task, and knitting them is difficult. However, it is worth spending a little time, gaining a little experience to create a pattern, and only then the pattern will be very easy for you. Other options for making patterns with braids, according to the diagram, can be seen in the video.
Unusual beautiful braids can also be knitted using knitting needles.
The simplest knitted relief pattern is braids. It is used in the manufacture of hats, blouses, jumpers, and skirts. Despite the unusual nature of weaving, the pattern is completed quickly, without problems, the main thing is to understand the specifics of throwing loops and stick to the patterns we offer.
How to knit simple braids
In the process of knitting a pattern with braids, you will need two regular knitting needles and one auxiliary knitting needle, similar to a large fish hook. If you don’t have one on your farm, use a holding pin.
Tip: choose yarn taking into account the numbers of working tools.
- Cast on 24 loops, eight will go to the braid and the same number to the edges and form the first row - k8, p8, k8. The next line is purl 8, knit 8, purl 8. Knit 11 rows in this way, alternating purl stitches with knit stitches.
- 12th row – 8 purl. p., four middle ones - transfer to the hook.

- Make four more loops, and return four to work by knitting them with your face.
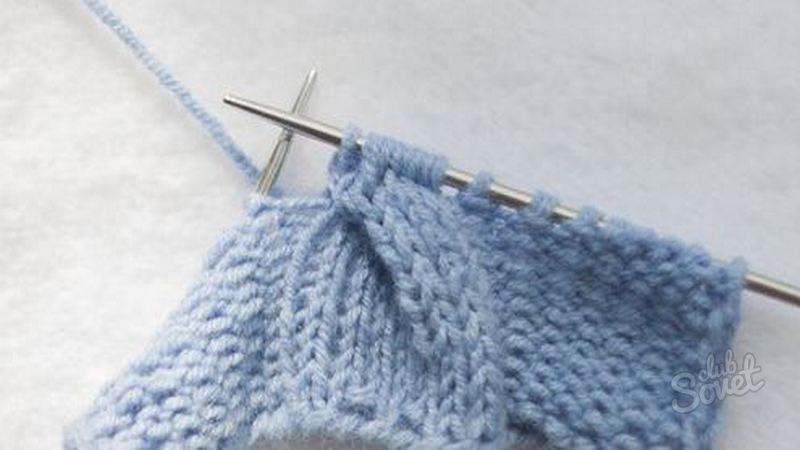
- Complete the row with purl stitches.

- Next - *11 rows according to the pattern + weave pattern* and repeat from* to* until you understand how the braids are created.
How to knit voluminous braids
To make a voluminous braid, it is better to take wool threads or mohair yarn.
- Cast on as many loops as the number could be divided by 11. Add 2 loops to the edge. Do odd rows (1, 3, 7, 11) according to the pattern - *p1, knit 9, purl 1*
- Even rows - according to the picture. Starting from the 5th row, a braid began - * purl 1, then drop 3 loops on the hook and leave behind the fabric. Knit the next three loops with the front ones, the three thrown off with the wrong side, three more with the face and one edge stitch*.
- Row 9 – *P1, knit 3, three for an additional tool. Again - 3 purls, knit the three discarded ones with the face, 1 edge *. Play the rapport to the edge and the intersection of the braid will begin to emerge.
- From the 13th row - repeat the pattern from the 5th to 12th row.

Such braids will help decorate a men's sweater, thick wool jacket or winter scarf.

How to knit royal braids
The “royal braid” pattern is very beautiful, unusual, and universal. Let's knit a test pattern with a wide motif (set - 30 loops):
- 1, 5, 7, 11 rows - all front, second and all even - purl;
- 3rd row – 5 stitches on an additional knitting needle, knit 5 stitches, knit 5 stitches for the braid. Again, send 5 sts to the third needle, knit 5, knit 5 dropped;
- Row 9 – *Knit 5, 5 stitches slip onto the third needle, knit 5, 5 stitches removed – knit*, repeat ** to the edge. The beginning of knitting, as in the first row, occurs on the 13th row.
This pattern will look good on a bedspread, blanket, pillow, and will make a rustic knitted item catchy and stylish.
As you can see, knitting braids with knitting needles is not at all difficult. You just have to adapt to the technology of execution and then even complicated pattern variations will yield to you the first time.
Knitted braid is one of the most common and widely used embossed patterns. Braids are often decorated with knitted sweaters, vests, jumpers, hats and other products. Braids give the products a special, rich look and at the same time are very easy and quick to knit.
When knitting braids, you need to consider several points, namely:
- the relief directly depends on the thread, so if you have a thick, fluffy thread, the braid should be made wider, otherwise the fabric will turn out to be too knotty and the pattern will be distorted.
- for the same reason, if you have a thick thread, the number of rows between the weaves should also be increased, otherwise the pattern will resemble a rope, but not a braid.
Now let's start knitting braids.
We chose YarnArt Cotton Soft thread as an example; it is a fairly soft and thin thread. If your thread is thicker, the braid may look completely different.
First, let's cast on the required number of loops. For clarity, we cast on 24 loops with the calculation of 8 loops per braid and 8 loops along the edges.
Figure 1. Cast on 24 loops.
We knit the braid with knit stitches, and the background for the braid with purl stitches. Our first row is purl, we knit 8 knits, 8 purls, again 8 knits, we remove the first loop without knitting at all, we always knit the last one purl.
Figure 2. First row from the front side.
The second row, front, respectively, vice versa - 8 purl, 8 front, again 8 purl. In this way we knit 11 rows, making the base for the pigtail.
Figure 3. We knit 11 rows.
We knit the twelfth row in a special way. Let's look at it step by step.
First, let's knit the first eight purl stitches.
Figure 4. Knit the first 8 loops.
Now we need another free knitting needle, we used a hook instead of a knitting needle. We will transfer the next four loops to the free knitting needle without knitting them.
Figure 5. Move 4 loops onto an additional needle.
Now we knit the next four loops on a working knitting needle, leaving the hook and loops in front.
Figure 6. Knit the next 4 loops.
Now let's return the loops from the hook to the working needle.
Figure 7. Returning the stitches to the working needle.
Figure 8. Knitting the moved needles.
And finally, we finish the row by knitting the remaining purl stitches.
Figure 9. Finishing the row.
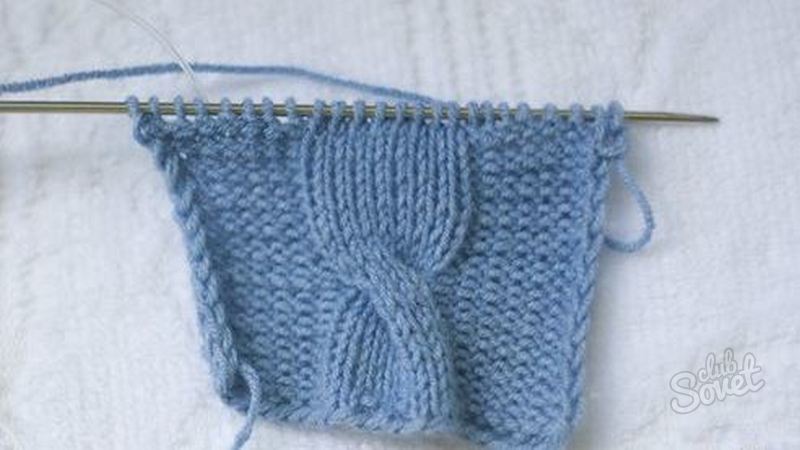
The first braid is ready. Next, we knit 11 again side by side according to the pattern.
Figure 10. Knit 11 rows.
And now we repeat the pattern, making weaves again.
Figure 11. Repeating the pattern.
Figure 12. Knitted braid.


