How to paint a mug with your own hands using acrylic paints. Glass painting master class: Paint a mug and sing along
05/20/2015 | 2796
Olga Voinova 05/20/2015 2796
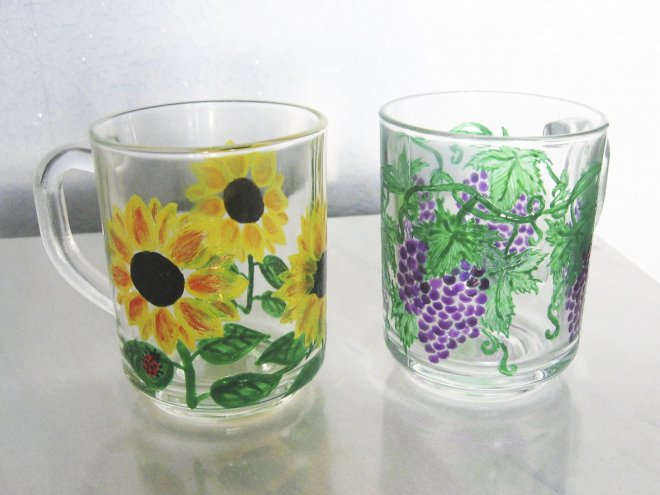
I’ll tell you about my hobby – painting glass mugs. Maybe you'll want to try it too!
Recently I decided to try painting on glass and got so carried away that I started looking for and coming up with new drawing options. Each time it turned out better and more interesting. Painted glassware looks very original. The simplest glass can be turned into a great gift.
Painting glass with baked paints
- To work you will need:
- glass mug;
- alcohol-containing liquid to degrease the surface (you can use dishwashing liquid);
- paints for glass and ceramics (baked);
- contour on glass and ceramics;
- tassels;
- cotton buds;
sponge.
1. First you need to choose a drawing and make a sketch on paper. I look for drawings in books, magazines, and the Internet, but more often I come up with them myself.
2. I insert the drawing and secure it inside the mug, degreasing the outer side on which I am going to draw.
3. Carefully outline the drawing.
First, it is better to practice on a horizontal surface so that the lines are smooth. If it doesn’t work out beautifully right away, it’s okay – it will get better and better every time. If any line turns out to be uneven, do not erase it immediately, but wait until the outline dries, then you can carefully remove the irregular line with a knife and draw again.
4. When the outline is dry, I begin painting the bottom of the mug. I lightly dip the sponge into the paint and press it lightly onto the glass, achieving uniform coloring.
I usually apply two coats of paint to make the color more even. I apply the second layer after the first one has completely (!) dried.
5. Using a cotton swab dipped in alcohol or water, I wipe the areas touched by the sponge. I paint the flowers, putting the finishing touches.
6. After a day, I bake the finished product in the oven according to the instructions indicated on the paint.
You can make a drawing without using an outline. In this case, in my opinion, after baking the pattern turns out to be more durable, as if merging with the glass.
8. I covered the rim of the mug with adhesive tape and cut out stars from it.
9. Use a sponge to apply blue paint to the sky area. When it had dried, I peeled off the stars and painted over these places with golden paint, sprinkling some golden sparkles on top. So that they stick well, I applied another layer of paint.
Glass painting with stained glass paints
Another option for painting glass is to use stained glass paints. They are transparent and can be used to create a pattern that imitates a mosaic made of colored glass.
These paints do not bake, so I use them to decorate dishes and objects that are not used in daily use. You can coat the products with a special varnish - this will make them more durable. In any case, you need to wash it carefully with warm water without detergents.
Glass-candlesticks painted with stained glass paints, as well as electric lamps, look impressive.
1. I draw a drawing on the cleaned surface with an outline.
2. When it dries, I gradually fill all parts of the drawing with stained glass paints.
There are several subtleties here:
- it is better to draw up a drawing so that each area to be filled is not very large, otherwise the paint will spread;
- for the same reason, there is no need to try to paint many areas at once. You need to wait a little after each one for the paint to dry. Moreover, it is better to hold the glass horizontally, turning it in different directions until the paint sets. After this, you can begin pouring the next section.
I tried using water-based and organic stained glass paints. The latter take longer to dry and have a strong odor; you need to work with them in a well-ventilated area.
I wish you all creative success!
When going to a birthday, anniversary, corporate party, wedding celebration or other festive event, everyone thinks about choosing a truly useful and universal gift.
Recently, it has become fashionable to give gifts made with your own hands. One of the original and budget options that both adults and children will like is a mug with a photo. Today, any citizen of our country, without special talents and financial resources, will be able to make a unique gift in a single copy at home specifically for this or that special occasion and for a specific person.
Equipment, tools and attributes necessary for self-production of photo printing on a mug
Today a large number of professional companies and individuals offer services such as applying a logo to a mug, plate and other kitchen utensils and household items. However, any person without special talents and experience can cope with this task. It is enough to know some rules and have the necessary attributes at hand.
To apply a particular image to a mug of any size at home, you will need a high-quality mug (preferably in light colors and without a pattern, ideally white), a printer with sublimation ink, a decal and a heat press. An ordinary porcelain mug will not work as a souvenir. For these purposes, you will need ceramic dishes, preferably from the French brand Luminarc, which can be purchased at almost every home goods store. Ceramic mugs are of high quality, durable, and do not fade or fade over time. Therefore, the gift will last much longer.
Methods for applying a photo image to a mug at home
1. Prepare the mug: rinse thoroughly and wipe dry. Under no circumstances should there be moisture or dust on the dishes. Prepare your heat press and printer by loading it with sublimation ink. Turn on the computer, select the photo you like and print it on the printer. Then carefully place the printed photo in the heat press and wait until the image is completely rolled back onto the cup. During the process, carefully ensure that there are no stains, various roughnesses or other defects on the surface. If the entire procedure is performed correctly, applying a photo using a heat press allows you to obtain a bright and durable design on a mug or other utensils.
2. There is another simple way to apply a photo to a mug using a decal. Buying decals and diaries wholesale and retail is not a problem today. To make a unique gift, take a small plate, fill it with water, place the decal in it and let sit for six minutes. After this, remove the decal from the liquid and carefully apply it to the ceramic dish so that the image tightly covers the surface of the mug. Wait until the surface is completely dry. If all actions are performed correctly, the pattern will be clearly transferred to the surface of the dish. Then place the plate with the decal in a well-heated oven for twelve minutes. After this, take it out and let it cool.
Mugs with inscriptions can become a unique gift if original text is applied to them. If you want to show a special sign of attention with the help of an inscription on, you can try to find a ready-made version with the text you need, or make such an inscription yourself.
How to write an inscription on a mug?
The method of creating inscriptions on mugs is very simple and does not require a lot of time and money. To do this, you only need a special marker that can be used to write on ceramics. It is recommended to choose an inexpensive mug. Expensive products are varnished, so there is a high probability that the inscription will quickly be erased.
The inscription technology consists of the following steps:
- The mug is pre-cleaned and allowed to dry. An additional advantage will be its treatment with alcohol. This will degrease the surface, and the inscription will be applied more easily.
- Then the necessary inscription is created on the surface of the mug with a marker. Before doing this, it is better to first practice on a piece of paper. After applying the inscription, leave the mug for 24 hours to allow the ink to dry.
- To fix the inscription, the product is placed in the oven for 30 minutes, the temperature of which should be 150-170ºC. An important point is that the mug must not be removed immediately after turning off the oven. This may cause the varnish to crack. You can remove the product only after the oven has completely cooled down.
- The strength of the inscription is checked using a wet rag. If it is erased, then the heating procedure in the oven is repeated.
To ensure that your favorite inscription pleases you for a long time, it is recommended not to wash the mug in.
In this way, you can put an inscription on a mug containing birthday greetings, romantic inscriptions on mugs for women, funny expressions.
The technique of applying inscriptions by dot painting is somewhat more complicated. To do this, use a pre-made stencil. It is transferred to the surface of a mug treated with alcohol. Then an inscription is created using acrylic or contour paints, placing small dots with a brush. At the same time, maintain the optimal distance between them so that the drawing looks beautiful. Next, the mug is dried in the oven at a temperature of 150-170ºC.
Mug with an inscription on the bottom
The inscription on the bottom of the mug is applied very simply. This master class can be conducted with young children; it will give them a lot of pleasure and positive emotions.
In order to make an inscription on the bottom of a mug, the following technology is used:

Thus, using these technologies, you can put any inscriptions on the mug that your imagination is capable of.
A gift made with your own hands is distinguished not only by its uniqueness and originality, but also by the warmth of the soul and a reflection of the personality of the one who gives it. When going on a visit, as is our custom, it is not customary to come empty-handed, especially when there is a child in the family. We always try to surprise and interest the baby. So, while going to dinner with friends, I decided to make a small surprise (a painted mug) for the little princess, who is crazy about kittens and all the representatives of this family. Therefore, the topic was chosen without difficulty.
So, for work we need:
- Mug (glass, ceramics) of any color, depending on the pattern you chose. I chose a bright yellow ceramic mug, as bright sunny colors initially convey positive emotions.
- Paints and brushes for painting. Experience shows that those contours and paints that do not require “baking” turn out to be very unstable and dishes painted with them cannot be used for their intended purpose. Therefore, I recommend using special baked paints that can be fired in a regular home oven at a temperature of 150-180 degrees. Such paints give a bright and durable design, and dishes painted with them can be used for their intended purpose for many, many years. For this work I will need black and white acrylic paints and a thin brush.
- Drawing. Before applying the design to the ceramics, I practiced drawing it on paper several times. IN in this case This is a funny cartoon kitten.
1. Wash the mug thoroughly and wipe dry. Soak a cotton swab in alcohol-containing liquid and wipe the mug. The surface must be degreased so that the paint adheres well. If there is no alcohol-containing liquid, the mug can be thoroughly washed with ordinary detergent. This stage is very important.
2. Use a pencil to draw the base of the design and begin to outline with black paint. Those who are confident in using contours can quickly do this by choosing the thickness and volume of the drawing. I used a thin brush to keep the lines alive and smooth.
3. After you have completed the base, we move on to the details: we draw small parts of the body, make reflections and correct inaccuracies, if any.
4. For firing, you can use a regular oven. Place the finished mug in a COLD oven. Set the temperature to 120 degrees and fire the mug for 20 minutes. Then, without opening the oven, increase the temperature to 170-180 degrees and bake for another 20 minutes. After this, you can open the oven slightly, but do not remove the mug until it has cooled completely.
5. Our mug is ready! Now you can safely go on a visit and enjoy tea and funny stories of the “little miracle” that we worked hard for!
We already wrote about how you can paint a mug using a brush and special paints (you can read about this). Today, to decorate the mug, we will use a marker, but not a regular one, but a special one for porcelain. It's easier to work with a marker, and you can create patterns directly by hand. The possibilities are endless! So let's get started.
You will need:
- white porcelain mugs;
- black porcelain marker with fine tip (1 mm);
- a simple pencil (soft - HB or 2B);
- scissors;
- scotch;
- wet wipes;
- white A4 paper and printer.
Apply the contours of the image to the mug
1. Below are several templates with monsters that will be used in the example. You can use them or create your own templates. If you are going to use the templates presented, then print them on a printer in the required sizes. In the example, on one of the cups, only the monster's head is used, so said monster is printed in double size.
2. Choose the monster that you like best and cut out a rectangle with its image.
3. Take your coffee mug and make sure there is no grease or dust on it. Otherwise, wash it thoroughly with detergent and dry it. Make sure the template fits the mug the way you want.
If you are going to use only part of the monster, you can cut off unnecessary pieces.
4. Take a template and a soft pencil. Then, using light pressure, trace the outline of the monster.
5. When you finish tracing the contours, attach the template to the mug and secure with tape. Note, front side the template should face the surface of the mug.
Keep in mind that any image transferred to the mug will be a mirror image of the template. Therefore, if you are going to translate text, you will need to print it on the printer in a mirror image, so that you can then read the normal text, and not gobbledygook.
6. Take a pencil and start shading (or scratching) the back of the template. This will help transfer the outlines of the image drawn earlier onto your cup. When shading, apply a little pressure on the pencil. Make sure you go through all the lines.
7. Carefully remove the template.
When you remove the template, fuzzy lines of the monster's outline should remain on the mug. This is quite enough to use them as a guide.
By the way, a porcelain marker can also be used on glass. In this case, the template is even easier, just attach it on the back side so that you can see the outlines.
We trace the contours and create a drawing
1. Before you start tracing the line, shake the porcelain marker thoroughly and check on a piece of scrap paper that it does not smudge or leave blots.
2. Start tracing lines on the circle. Try to avoid shaking your hands; to do this, just sit comfortably. Please note that the porcelain marker only writes in a vertical position. Therefore, you will have to hold the mug with one hand and draw with the other.
3. If you made a mistake or just lost your hand, don’t worry. While the ink is still wet, you can correct any mistakes. Just wipe it off Right place with a damp cloth. Just make sure the surface of the cup is dry before proceeding.
4. Once the main contours are drawn, you can add a few details at your discretion.
Add a few details to your drawing.
1. Simply add a few lines or dots to your drawing by hand. This will decorate your monster!
2. In addition, you can decorate the handle with horizontal lines. And between these lines add several points.
3. Well, your mug is ready! Now all you need to do is follow the instructions on the marker to allow it to dry and permanently adhere to the mug. Some markers just need to be left to dry for a day or more. Other marker models require approximately 30 minutes of baking time (just use the oven and set the temperature to 180 degrees). Once the ink has set, the mug is ready for use. The marker does not erase when washed even in the dishwasher.
4. Why limit yourself to one mug? Make a set of six or eight mugs! Just use other templates with similar themes. By the way, such a set will be an excellent stylized gift for your friend, to a loved one or a relative.
Draw by hand (design three)
1. It is not at all necessary to draw monsters, animals and people. A mug with simple illustrations looks amazing too. In addition, there is currently a strong trend towards abstract and geometric figures. Below are simple designs that can be easily reproduced by hand without a template.
2. Let's use design number three (from the template above). First, draw vertical dotted lines around the entire cup with a distance of about 1 cm between the lines. If the lines don’t turn out straight, that’s a good thing, as it gives your cup an original designer look.
Draw by hand (design five)
1. Now let's draw design number five from the template above. This design looks best at the bottom, at the base of the mug, and resembles grass. Just start drawing vertical lines of different lengths, remembering to leave some space between the lines. You should not make the lines absolutely straight, this will give your drawing a more organic design.
2. Continue drawing lines around the mug until you reach the starting point. After that, make a dot at the top of each line. It will look like a bud. Pretty easy, right?
Enjoy a cup of coffee or aromatic tea!
You did a great job and created almost a whole range of gorgeous handmade designer mugs.
The image application methods discussed in this example can be applied to other porcelain products (plates, vases, teapots and other porcelain objects). In addition, as We said earlier, such painted porcelain dishes will make a wonderful gift. Simply personalize the china with the recipient's name or a witty quote. And don't forget that porcelain markers can also be used on glass objects.


