How to crochet an elastic band? Detailed description
It is difficult to imagine socks, mittens or gloves, hats without a special elastic band. It is this element that gives the product a finished look and the necessary elasticity. Today we will tell you how to crochet an elastic band, the patterns and descriptions of which have several options.
How to choose a hook and type of elastic?
Let's start our master class with the fact that elastic bands come in several types - transverse, horizontal and embossed. The choice of hook will depend on the knitting density, yarn and the result you want to achieve. Do you need to knit very tightly? Then take a smaller hook. And if you like loose and large knitting, a hook with a large diameter will do.
Cross elastic bands are a kind of attempt to imitate knitting. They can be knitted in several ways - with connecting stitches, single crochets and half double crochets.
Horizontal elastic is most often used when knitting headbands, hats or bracelets. But to create cuffs and collars, this type of edging is used extremely rarely, because the elastic will need to be knitted separately and then sewn to the finished product.
Another type of elastic band is embossed. Of course, this elastic band is not so elastic and elastic, but it looks much more interesting. Let's try together to knit experimental samples of each type of elastic band according to the following descriptions and diagrams.
Cross elastic
The crochet pattern for such an elastic band has its own peculiarity - all the loops in the work are knitted with a half double crochet behind the back half loop of the previous row. This technique can often be found in translations of descriptions of knitting from Japanese and Chinese magazines. In the Land of the Rising Sun, cross elastic bands occupy the highest level of popularity.

Necessary materials:
- hook No. 4;
- yarn.
Process description:

Circular knitting
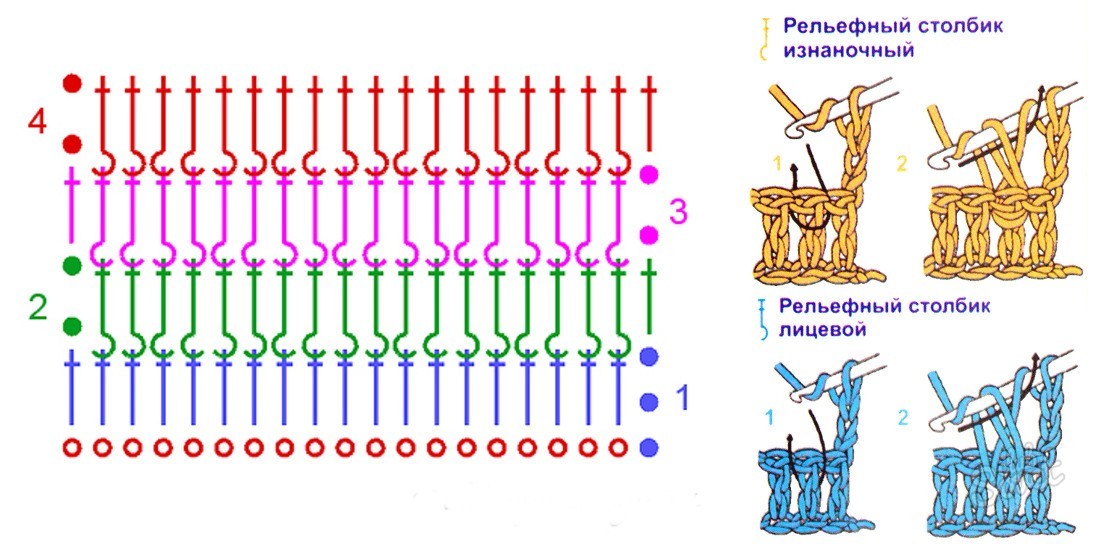
Most often, when knitting in the round, craftswomen prefer to work with embossed columns. This choice of knitting allows you to create a smooth, barely noticeable transition from the cuff to the main pattern of the product and does not require subsequent stitching. The knitting principle consists of sequential alternation of embossed purl and facial stitches. In this example, we showed how to knit an elastic band measuring 2 by 2. But if you need a tighter knitting pattern, alternate the stitch not through two loops, but through one.

Necessary materials:
- hook No. 4;
- yarn.
Process description:

Method of knitting elastic bands with connecting columns
Crochet elastic for a hat is most often crocheted using only connecting stitches. And all because this option is very convenient to use for forming a lapel or lining. In addition, although this sample seems too dense at first glance, it is actually very soft and elastic.

Necessary materials:
- hook No. 3;
- yarn.
Process description:

If you are interested in crocheting and mastering new techniques, you need to learn how to knit an ordinary elastic band. This element is indispensable for knitting mittens, hats, socks and sweaters. The elastic band is designed to ensure that the crocheted fabric is elastic and does not deform when worn.
How to tie an elastic band. Easy way
If you knit an elastic band, then everything is simple, but to knit the same product, but with a crochet, difficulties arise.
In fact, there is nothing complicated, you just need to carefully study the step-by-step recommendations:
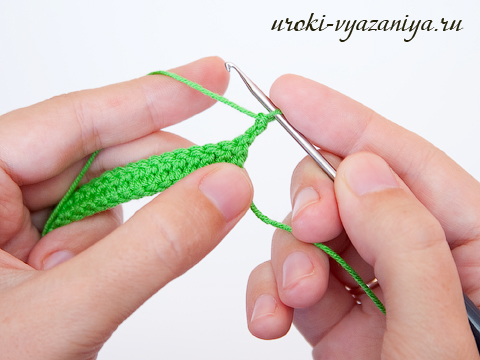
- You will need a skein of thread and a hook.
- Tie a regular chain, it consists of air loops. It is necessary to knit 10 air loops and 1 more (lifting loop).
- Now look carefully at the chain. Each loop consists of 2 walls: front and back. The first one is easy to see because it is closer than the back one.
- There is also a lower broach (thread, or jumper).
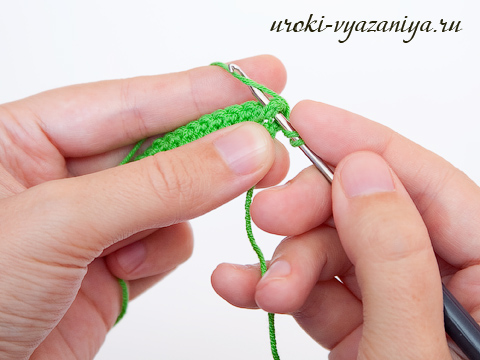
- To learn how to crochet an elastic band, you need to know how to knit a connecting stitch. Knitting an elastic band begins with this. It is necessary to knit a connecting post into the thread (broach) and so on until the very end of the chain.
- You should have a beautiful lace.
- Turn the product: the 1st loop will be air. Then we knit the next row with connecting posts; now we need to knit it for that part of the loop that is located in the background (this is the back wall of the loop).
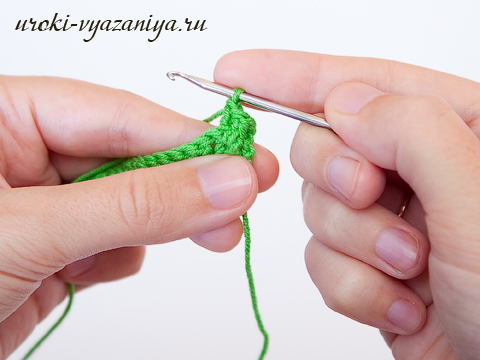
- Knit 10-15 rows in the same way.
- It turned out to be a beautiful cross elastic band. Take this nuance into account when you knit items. Let's say, to crochet a scarf, you need to start casting on loops from the long side of the product.
Crocheted elastic band
To learn how to knit such an elastic band, you need to be able to knit concave stitches and convex stitches (raised, purl/knit). This elastic band turns out more beautiful than a regular one, it holds the shape of the product better and does not have to be knitted lengthwise (a regular elastic band needs to be knitted along the product or knitted separately and then sewn on).
Learning to knit an elastic band:
- knit a chain consisting of 40 chain loops (we cast an even number of loops, this makes it easier to knit an elastic band);
- insert the head of the working tool into the 4th loop from the edge and knit the 1st row with regular stitches (single crochet);
- to make a beautiful elastic band, be sure to knit 2 air loops at the end of the first row;
- turn the product over, next row: the hook must be inserted with front side products for the column of the 1st row;
- Next we knit a convex double crochet;
- to the end of this row you need to knit alternate stitches;
- complete the 2nd row with 2 lifting air loops and after that you can turn the product over to continue knitting the next row;
- The 3rd row of the elastic band is crocheted in exactly the same way as the 2nd, it is necessary to alternate a convex embossed double crochet stitch and a concave one (also double crochet). And so on until the very end. At the end of each row, do not forget to add 2 lifting air loops.
Quite often, products require knitting an elastic band, because elastic is an essential element of many knitted items: sweaters, hats, skirts, mittens, socks, etc. Crochet elastic bands allows you to get a more elastic fabric that can stretch and shrink.
How to crochet an elastic band? Beginning needlewomen often have this question. Knitting an elastic band with knitting needles is very simple. But when crocheting elastic bands, many may have difficulties. This step-by-step lesson, in which I will describe the stages of knitting, will help you understand a lot and you will learn how to crochet an elastic band.
There are several patterns and methods of knitting elastic. Let's look at some of them with examples and photographs.
Embossed crochet elastic band- this is an alternation of embossed front (convex) and embossed purl (concave) columns, the knitting of which we studied in the last lesson (see).
Let's try to knit a 1x1 elastic pattern using this pattern:

We cast on an even number of loops, insert the hook into the 4th loop of the chain from the hook and knit the first row with regular double crochets.

The embossed double crochets correspond to 2 lifting air loops. Therefore, at the end of the 1st row we knit 2 vpp, turn the sample over and start knitting the 2nd row.
Insert the hook from the front side from right to left, under the double crochet of the previous row
and knit a raised double crochet,


and knit a relief purl (concave) double crochet.
At the end of the 2nd row we knit 2 vpp, turn the sample over and start knitting the 3rd row.

Relief rib can be knitted with various alternations of knit and purl relief stitches, for example 1×2, 2×2, 1×3, 3×3, etc.
This is what the elastic pattern looks like with alternating 2 embossed knit stitches and 2 embossed purl double crochets.

Knitted 2×2 ribbing pattern.

You can also knit air loops between the relief columns according to this pattern:

In this case, the elastic will be softer and more elastic.

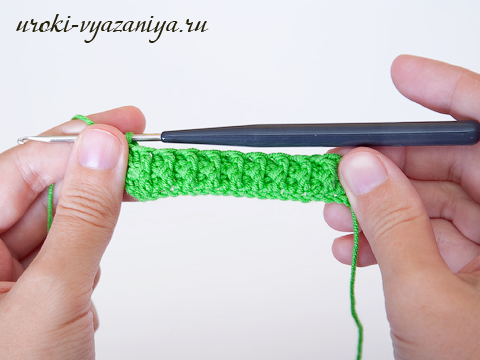
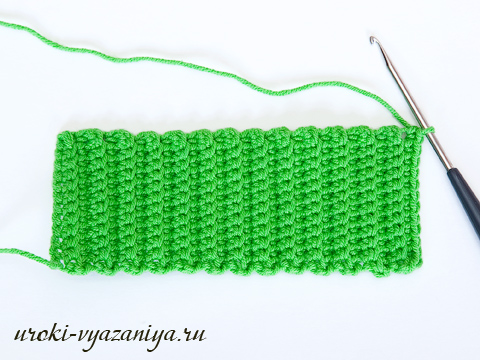
There is another way crochet elastic bands. Collect a chain of v.p. and knit the first row with b/n stitches, then rows of b/n stitches are knitted in the same way, only the hook is inserted not behind both walls of the loop, but all the time behind the back wall (see how to knit behind the back wall of the loop).
The elastic band turns out to be more elastic, however, there is one drawback when knitting such an elastic band; this elastic band is knitted along a chain of air loops, forming horizontal relief stripes,
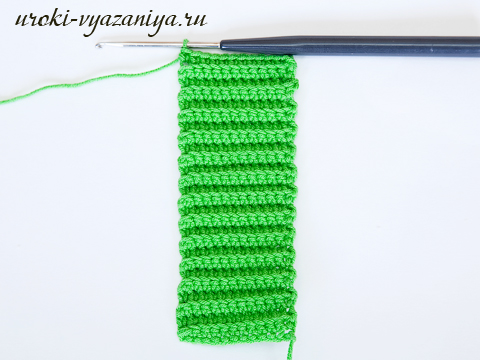
therefore, it is knitted separately from the product, then sewn together.
Quite often, products require knitting an elastic band, because elastic is an essential element of many knitted items: sweaters, hats, skirts, mittens, socks, etc. Crochet elastic bands allows you to get a more elastic fabric that can stretch and shrink.
How to crochet an elastic band? Beginning needlewomen often have this question. Knitting an elastic band with knitting needles is very simple. But when crocheting elastic bands, many may have difficulties. This step-by-step lesson, in which I will describe the stages of knitting, will help you understand a lot and you will learn how to crochet an elastic band.
There are several patterns and methods of knitting elastic. Let's look at some of them with examples and photographs.
Embossed crochet elastic band- this is an alternation of embossed front (convex) and embossed purl (concave) stitches, the knitting of which we studied in the last lesson (see).
Let's try to knit a 1x1 elastic pattern using this pattern:
We cast on an even number of loops, insert the hook into the 4th loop of the chain from the hook and knit the first row with regular double crochets.
The embossed double crochets correspond to 2 lifting air loops. Therefore, at the end of the 1st row we knit 2 vpp, turn the sample over and start knitting the 2nd row.
Insert the hook from the front side from right to left, under the double crochet of the previous row
and knit a raised double crochet,
and knit a relief purl (concave) double crochet.
At the end of the 2nd row we knit 2 vpp, turn the sample over and start knitting the 3rd row.
We knit the 3rd row similarly to the 2nd, alternating a raised double crochet

and embossed purl (concave) double crochet
Knitted 2x2 rib pattern.
You can also knit air loops between the relief columns according to this pattern:
In this case, the elastic will be softer and more elastic.
There is another way crochet elastic bands. Collect a chain of v.p. and knit the first row with b/n stitches, then rows of b/n stitches are knitted in the same way, only the hook is inserted not behind both walls of the loop, but all the time behind the back wall (see how to knit behind the back wall of the loop).
The elastic band turns out to be more elastic, however, there is one drawback when knitting such an elastic band; this elastic band is knitted along a chain of air loops, forming horizontal relief stripes,
therefore, it is knitted separately from the product, then sewn together.
Good luck with your experiments!
If you want to receive the latest articles, lessons and master classes from the site to your mailbox, then enter your name and e-mail in the form below. As soon as a new post is added to the site, you will be the first to know about it!


