How to nail clapboard to a wall - a complete guide
How to nail the lining correctly? The quality of finishing of the room depends on the solution to this issue. A wide variety of clapboard covering technologies allows you to choose the appropriate method for finishing any surface. The article will tell you how to nail all types of lining correctly.
What methods of fastening the lining exist?
Easy to install and a large number of positive properties contribute to the widespread use of this material, despite the constant emergence of new types and methods of covering the surface of the house.
One of the most acceptable properties of wooden panels is the ability to finish a room or the facade of a house with your own hands (see), even for a novice craftsman, after studying the nuances of the work. The main condition before nailing the lining with your own hands is patience and purchasing quality materials.
There are several options for attaching the material.
These include:
- Most simple method fixing the lamellas is the use of small nails and clamps or staples.
- But fastening with clamps can only be carried out on thin panels whose mass is small. Otherwise, the grips may not hold up. With this method:
- the lamella is inserted into the groove located on the previous panel;

A clamp is fixed inside the groove (see) with its help the board is screwed to the sheathing element with self-tapping screws or ordinary screws.
- Tip: Attach one panel to another tightly enough so that there are no gaps and all elements are adjusted to the same size. The last panel must be fitted into the free space, in which case it is cut to the required width and fastened. Fastening with screws
- . This method is used when other methods cannot be used. This is usually how the material is fixed in baths and saunas. A special feature of the method is the need to drill a hole in the board for each screw. In this case, the diameter of the hole is two times smaller than the axis of the screw. When installing panels:
- the screws are screwed in with a screwdriver, recessing each element as much as possible into the wood;

Tip: Due to changes in temperature and moisture, the attachment points will begin to dry out and become more noticeable. To prevent the occurrence of such defects, the lining should be treated with special protective compounds.
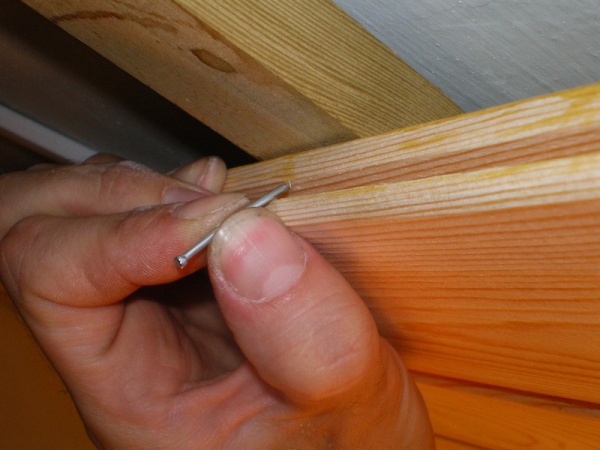
- Using only finishing nails for lining. This is a simple method that does not require other additional devices or fixing elements. But in this case, the panels can often be damaged. The nails are nailed in increments of approximately 30 centimeters, which means that up to 8 nails will be needed for one two-meter-long board, which will amount to a fairly large number of elements for the total area. Instructions for driving them include:
- the nail is carefully pressed into the in the right place, its angle to the panel plane should be 45 degrees;
- the head of the element is recessed into the tree with the help of a blunt hammer, as deep as possible. This will avoid damage to the outer surface of the skin and allow the next lining panel to fit smoothly into the groove of the tongue.
Tip: This method cannot be used for the thinnest lining; hammering a nail may cause the material to split.
- Fastening the slats with screws. This method is used to fix old-style wooden panels that differ slightly from eurolining. Wherein:
- holes are drilled in the panels;
- the head is countersunk and chamfered, which allows it to be hidden;
- use a screwdriver to tighten the fastener until it stops;
- the groove is closed by the subsequent panel.

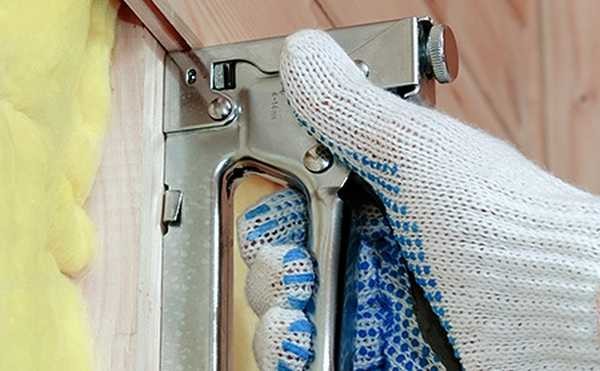
- The easiest way is to use construction staples, which a clapboard stapler helps to install in place. In this case, the staples are inserted into the groove, like nails, at an angle of 45 degrees. The force that the stapler creates allows the staple to be driven in sufficiently tightly and deeply, after which the second panel of material can easily be placed in its place. Then the next board is placed and the process is repeated.
How to nail the lining and what method of fastening and installation to use is decided by the repairman. In this case, it is necessary to take into account all the nuances and features of any of them, the conditions and factors in which the panels will be located after installation.
How to prepare a frame for mounting material
The video in this article will show you how to nail the lining and how best to position it on the surface.
The direction of the panels can be:
- Vertical. In this case, the boards are placed in the direction from floor to ceiling, the room visually becomes narrower and higher.
- Horizontal. The slats are placed from one wall to another, the room looks wider, but lower.
- At an angle or diagonally. This is a more complex method of laying material, and also with increased consumption.
- Combined. A combination of the first three methods in any variant.
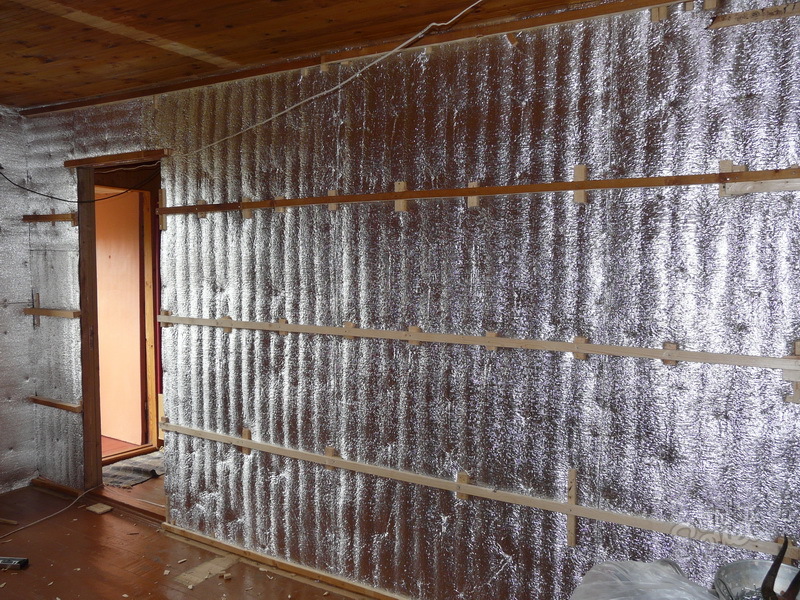
With a perfectly flat wooden surface, the lining can be nailed directly to the wall, which is very rare. In other cases, the lathing is made from planed pine slats with a cross-section of 20x40 millimeters (see), with a pitch of elements up to 50 centimeters.
Tip: Before installation, all wooden parts should be treated with an antiseptic.
- The first rail is installed vertically in the corner of the room, its position is controlled by a plumb line. To install screws, plastic dowels and wooden spacers are used.
- Similarly, another rail is mounted in the opposite corner.
- At the top and bottom of the wall, two cords are stretched between the bars to facilitate installation of the panel at the top and bottom.
- Horizontal elements are fixed: one under the ceiling, and the other closer to the floor, their position is controlled by a cord.
- In increments of 50 centimeters, the remaining slats are installed horizontally.
Advice. To check the correct installation of parts, a cord or rule, which is a flat wooden block, is used, stretched between the outer slats, resting it on horizontal panels located at the top and bottom of the structure.
When the lining is placed horizontally, the slats for the sheathing are installed vertically. For diagonal laying - to the lining at a right angle.
Mounting options
How to nail vertical panels
The installation procedure is as follows:
- Using a jigsaw or a fine-tooth file, cut the lining panel to the required length, which is taken approximately one centimeter less than the height of the room.
- The first strip is placed with the comb towards the corner.
- To fix it, finishing nails for lining are used; their feature is a small diameter and a small head.
In the future, you can do different things:
- The clapboard is nailed with finishing nails in the center of the panel to each batten of the sheathing, and then the heads of the nails, recessed in the wood, are puttied, although it is not necessary to putty.
- Instead of nails, screws with a diameter of approximately 3 millimeters are used.
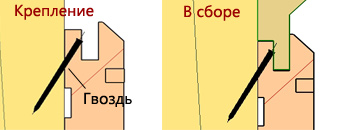
- The lining strips are fixed with nails or screws not in the center, but along the crest. In this case, the hole for the fastener must be carefully drilled. This is due to the small thickness of the ridge, which can cause cracking of the material. The photo shows how to nail the lining into the ridge.

- Nails are hammered or screws are screwed into the grooves of the lining. In this case, the fastener is hidden by the crest of the next strip.
Tip: Drive the nails at an angle, not all the way to the end to prevent damage to the face. To finish nails, you must use a punch or core with a specially blunted end.
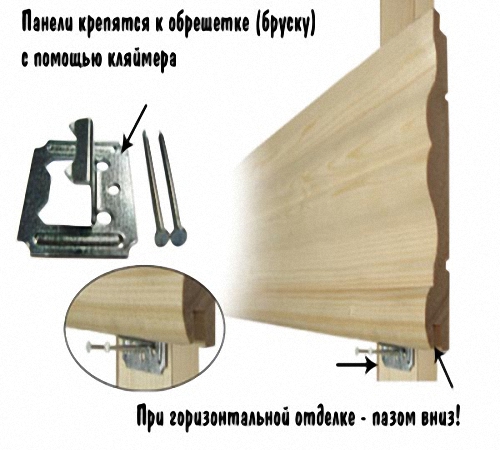
- To fasten the lining, use clamps or metal brackets, which are fixed on the bottom flange of the groove and nailed to the sheathing. The ridge of the next strip is inserted into the groove of the first part and tapped until it stops.
Advice: To protect the groove from damage, the lining should be finished using a piece with a cut groove, which is inserted with a comb into the groove of the panel, and blows are applied to it with a hammer.
- The remaining strips are attached in the same way, with periodic monitoring of the verticality of their location using a plumb line, and if necessary, adjustments are made to the installation of the elements.
- The last strip is cut to the required width and fixed to the sheathing along the edge.
- For the next wall on the first strip, the ridge is cut off. This panel will cover the nail heads located on the last piece of paneling on the previous wall.
- Further installation is carried out in the same way as on the first wall.
How to properly attach strips horizontally
When installing the panels from bottom to top, you can clearly see how and with what nails it is better to nail the lining almost to the top of the wall surface. But having reached the ceiling, the strip needs to be cut to width, which may not look very nice.
In addition, with this method, the gaps between the strips will be visible, which is especially bad when finishing a sauna or bathhouse due to moisture getting into them, which will lead to the rapid loss of the beautiful material appearance.
When installing panels from top to bottom:
- The first strip is fixed under the ceiling.
- The next one is installed with a comb into the groove of the first one from the bottom.
- It is nailed, and thus all the elements are attached.
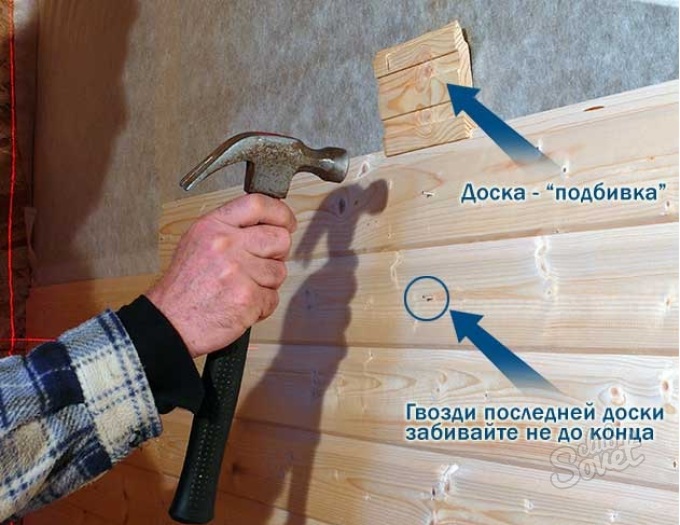
- The last part is cut to width and carefully inserted into the groove on the previous strip. In this case, it is convenient to use a simple lever, which can be a nail puller or a pry bar.
- The gap formed near the floor is covered with a plinth.
How to nail lining diagonally
This method is more often used on ceilings and less often on walls. The technology for installing lining diagonally is different.
In this case:
- Start installing the panel from the corner.
- On each strip, the ends are cut at the required angle according to the template.
- When covering the ceiling with clapboard, it is more convenient to fasten it with clamps on screws, using a screwdriver or a screwdriver with a battery.
After installing the lining panels on the walls and ceiling, it is necessary to decorate the existing corners, which can be:
- Vertical.
- Horizontal.
- Internal. They are closed with a special jute rope or shaped corner strip.
- External ones are decorated with wooden corners nailed with finishing nails.
The correct choice of the method of fastening the lining panels will ensure a high-quality finishing of the house.
Lining is a universal material that is very often used in interior decoration. In the process of work, a choice arises in what way and how to nail the lining. There are several methods for installing lining, which we will consider further.
Lining is a finishing material made from edged boards or plastic.
Depending on the material, the lining can be wooden, plastic or MDF.
Lining is used for finishing the external and internal surfaces of buildings.
Wooden lining differs in its use. Lining made from pine or spruce is used for finishing rooms with stable temperature conditions. Linden or alder lining is used for finishing the interior surfaces of rooms in which there are sharp changes in temperature, for example, baths or saunas. For exterior decoration, larch lining is used, which is not afraid of humidity, sunlight and temperature changes.
Advantages of installing lining:
1. Lining is a universal material that helps you quickly and easily cope with the leveling of walls.
2. Wooden lining is environmentally friendly, harmless and natural.
3. Plastic lining does not allow moisture to pass through, is resistant to ultraviolet radiation and has a wide range of color shades.
4. Installing lining is a simple and not labor-intensive process.
5. The lining, made of wood, fills the room with warmth, comfort and the natural smell of wood.
6. Plastic lining has good noise protection and high thermal insulation.
7. The service life of the lining, with proper wood processing, is about 10 years.
Disadvantages of lining coating:
1. The wood from which the lining is made requires the application of special coatings that protect the lining from moisture.
2. Plastic lining consists of substances that, under the influence high temperature are released into the air.
3. Wooden lining, which is not treated with special solutions, loses its presentable appearance over time and requires replacement.
Types of lining
Depending on the material from which the lining is made, there are:
- wooden lining,
- plastic lining.
Wooden lining is used for installation on both internal and external walls, such structures as:
- residential buildings,
- country cottages,
- dachas,
- gazebos,
- saunas,
- baths, etc.
The main advantage of installing wooden lining is that there is no need for preparatory finishing of the walls: leveling with putty or cement mortar.

The room in which the wooden lining is installed has optimal humidity, since wood has the properties of absorbing moisture at high humidity and releasing moisture at low humidity.
To make wooden lining, edged boards are used:
- ash,
- beech,
- aspen,
- spruce,
- alder,
- cedar.
Wooden lining is divided into four types:
1. “Extra-class” or “zero-class” lining – characterized by an ideal appearance and the absence of roughness on the wood.
2. “A-class” lining - for every 150 cm of such lining there is one knot, there is also one resin pocket and several cracks.
3. “B-class” lining has four knots for every 150 cm, several cracks and resin pockets.
4. “C-class” lining is distinguished by the presence of resin bags, blue spots, stripes, and mechanical damage. This type of lining has a lower cost compared to other classes.

Plastic lining is used for finishing:
- interior spaces,
- building facades,
- roof overhangs,
- ceilings.
Advantages of plastic lining:
- excellent quality characteristics,
- high level of strength,
- easy installation,
- original design and appearance,
- good sound and heat insulation properties,
- UV resistance,
- long service life, which exceeds 10 years,
- ease of care.
Plastic lining is divided into:
- laminated panels that display the structure of wood, metal, granite or marble;
- plain panels of various colors and shades;
- panels with or without seams.
Plastic lining is a universal finishing material that is easy to install, has a large number of different textures and colors and looks good in any type of room.
Depending on the profile shape, the lining is divided into:
- panel-type lining, which is characterized by simplicity and imitation of wooden beams;
- eurolining - has a deep tongue-and-groove connection, the tenon size is increased, this lining design provides additional ventilation and moisture evaporation, eurolining is used for finishing the facade of buildings;
- calm molding - used in interior decoration premises, has a perfectly smooth surface;
- American lining - characterized by grooves on the inside and is installed with an overlap, due to this connection there are practically no seams between the lining, such lining is only made of wood and is used for exterior finishing;
- The block house lining has the shape of convex bars and imitates a wooden building.
1. If there is uncertainty about long-term use, or if the lining is possibly dismantled, fastening should be done using clamps.
2. When installing lining in a sauna or bathroom, secure the lining with screws.
3. Nails will help you securely and quickly install the lining in a room with subsequent repairs.
4. To install domestically produced lining, use screws.
5. The optimal way to install the lining, which will help to install the lining efficiently and save effort and time, is fixing the boards using a stapler.
Tips for calculating plastic lining
Plastic lining is sold in separate panels, the length of which is 600 cm. To calculate the number of panels for installing lining on the ceiling, you should find out the perimeter of the ceiling. The width of the lining is 20 cm. For example, if the length of the ceiling is 6 m and the width is 5 m, then 25 lining panels will be needed.
To make a frame for fastening the lining, a wooden beam with a cross-section of 2x3 cm is used. The standard length of the beam is 200 cm. The beam is nailed along a six-meter wall. The distance between fastening the bars is 100 cm. For 5 m of the ceiling width, 6 bars are needed, but given the length of 6 meters, you need to purchase 18 bars of two meters each.
To attach one block, you need 5 screws and 5 dowels.
Recommendations on how to nail plastic lining
Tools for work:
- hacksaw for working with wood - used for longitudinal cuts of lining;
- jigsaw - helps to make a cross-section of the lining;
- screwdriver;
- building level;
- mounting knife;
- stapler;
- hammer;
- electric drill.
Materials for work:
- screws,
- dowels,
- staplers,
- plinth or profile.
Let's look at the instructions on how to nail the lining to the ceiling:
1. Remove dust and fragile trim from the ceiling.
2. Using a drill, prepare the bars by drilling holes for attaching screws.
3. Before installing the bars, you should coat them with paint or a special solution, which will extend the service life of the bars.
4. Using an impact drill, secure the structure of the bars to the ceiling. Insert the dowels and secure the bars with self-tapping screws.
5. The bars must occupy one plane. If there are large differences in the ceiling, it is recommended to place wooden stands under the bars so that the ceiling is level.
6. After the timber structure is ready, proceed with the installation of the lining.
7. Using a stapler, secure the profile or baseboard to the structure made of wooden blocks.
8. Insert the clapboard into the fixed baseboard. Attach the grooved part of the lining to the block using a stapler.
9. Insert the tenon part into the groove of the previous lining. Attach the clapboard to the timber frame.
10. Repeat for subsequent panels.
11. If the last panel does not match the size of the ceiling, it should be cut and inserted into the baseboard.
12. After installing the plastic lining, you should wash the ceiling with a sponge and warm water.

How to nail wood paneling
Preparing the lining for installation:
- wipe the paneling before installation,
- treat the boards with an antiseptic to prevent the appearance of mold and microorganisms,
- leave the lining for 24 hours to dry completely,
- coat the paneling with varnish.
There are several ways that will tell you how to nail the lining to the wall:
- nail the strip diagonally to the side of the longitudinal tongue;
- hammer a nail into the clip, thereby strengthening the bar from the outside;
- on front side strips, install an offset profile into which the nail should be driven.
Types of fastenings for wooden lining:
- horizontal,
- vertical.

Horizontal installation of wooden lining
The lining should be installed from the ceiling, and then gradually move to the floor. This installation will prevent moisture or debris from accumulating in the grooves of the wooden lining.
Installation of the lining using clamps occurs by installing the boards in a sequential order. The lining is attached to the frame using nails or self-tapping screws.
Tip: To perform a high-quality installation of the lining, you should check the evenness of the wall every half meter.
Before fixing the last board, you should adjust it to the size of the hole that needs to be blocked. This should be done using a circular saw or hacksaw. After fixing the board, the plinth is installed.
Installation of lining, which imitates logs, is carried out by installing boards located with a groove towards the top. Using a panel cutter and a hammer, the boards are knocked together. Thus, it is possible to hide the cracks and joints.
The boards of such lining are attached to the frame slats using self-tapping screws at an angle of 45 degrees. The screw heads are hidden under subsequent boards. To decorate the corner of such a lining, an installation made of treated timber is used. After the work, the surface of the lining is cleaned of dust and, if desired, painted.

Vertical installation of wooden lining
1. Vertical installation of the lining should begin from a corner position. Clamps are attached to the back plank of the groove.
2. The first board is installed and secured with nails, the heads of which are covered by a decorative corner. If there are no corners, you should use a side cutter to get rid of the caps.
3. The lining is installed in the same way as in the case of horizontal installation. Sequentially, the boards are fixed to the frame one after another.
4. The last board is nailed down. Decorative slats are then installed to enhance the visual appearance.
5. When covering the ceiling with wooden lining, work should begin from the window to the opposite wall. This installation allows you to reduce the amount of shadow that appears between the lining boards.
6. For longer use of wooden lining, once every 1.5-2 years carry out preventive treatment of wood with antiseptic, fireproof and waterproof solutions.
How to nail clapboard
This method of installing lining is distinguished by its reliability and fastening strength. The disadvantage of installing lining with nails is the possibility of damaging the surface of the lining with a hammer.
When installing lining, the width of which is 10 cm and the height of 2.5 m, you must use at least 6 nails.
To fasten the lining, you should insert a nail into the groove of the board and hammer it into the fastener as accurately as possible. The hammer will help deepen the nail heads.
This method is relevant if, after installing the lining, additional finishing of the walls of the room will be carried out.
Lining is a popular material for cladding many residential and non-residential premises and to save money cash during installation of the product - this can be done using your own efforts. To do this, you need to familiarize yourself with the basic subtleties of the work, decide on the frame for the lining and installation tools.
Fastening the lining in different ways
What are the stages of installation of this facing material?
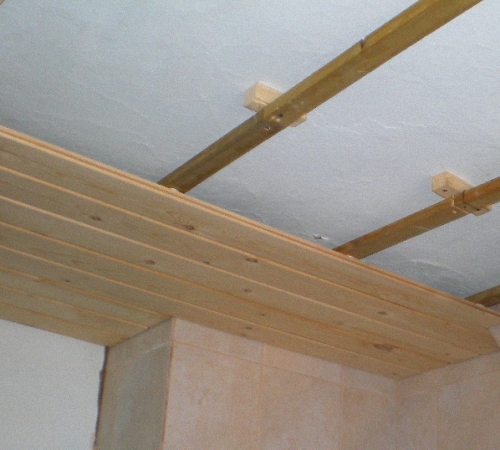
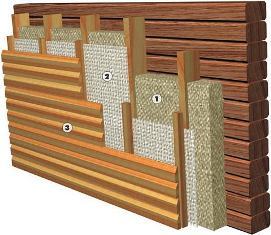
Lathing . It would be a wrong decision to nail the lining directly to the base of the room; for this, experts advise making a frame or sheathing. After all, the surface must be flat, contain an insulating layer, all its elements must be nailed down carefully, at the same level, so that the lining fits correctly and beautifully.
The frame creates an air space between the two layers, ventilation is formed as one of the foundations for high-quality operation of the product. The timber for the sheathing is thoroughly dried and nailed to the walls with dowel nails. You can use corners with vertical holes for a sliding type of construction in wooden house. If the walls in the house are crooked, then you need to fix the frame with dowels, bolts or screws. During the installation process, it is advisable to use a level to carry out horizontal and vertical control of the plane.
Attention: the step between the fixed bars (50*50) should be 40 cm; if you plan to insulate the wall, then the distance will be equal to the insulation layer.
How to nail the sheathing
The frame slats must be installed perpendicular to the lining, they are attached to the wall using screws and sleeves, and can be fixed with dowels. To ensure perfect evenness of the structure, pieces of wood are placed under the slats. A rope is stretched between the outer beams and a level is established along which the remaining elements are located.
Lining installation methods
How to properly nail the lining to the base of the structure? What devices?

There are three ways to attach the lining.
Vertical, the slats are mounted in the center of the working surface, and the frame is covered with clapboard from the corner of the structure. In this case, nails with a small head, as well as staples or screws, are better suited for fastening the board.
Where to begin?

Important: the ridge on the first board is cut off so that the panel can hide the heads of the fasteners on the last strip of the first wall.
Horizontal installation, you need to fasten the lining with the ridge up in order to avoid moisture condensation inside the structure. It is better to install from top to bottom so that there are no visible gaps between the strips of the finishing board.
- First, the lining is mounted near the ceiling, the second is inserted from below into the first groove, secured with nails or self-tapping screws.
- The final board is sawn to the required size and attached to the step of the last strip.
Diagonal arrangement involves installing the first board from the corner, and the ends of the lining are cut according to a given sketch.
There are four ways to fasten the lining
How to nail clapboard
Here you need skill and accuracy to hide the caps of the fasteners; they are placed in the grooves. You can use a thin drill to drill holes for the foot of the nail so as not to split the wood.
How to nail clapboard to a wall with screws
Its essence is that you need to make holes for screws in the strip tenon. After this, the hole is closed with a dowel.
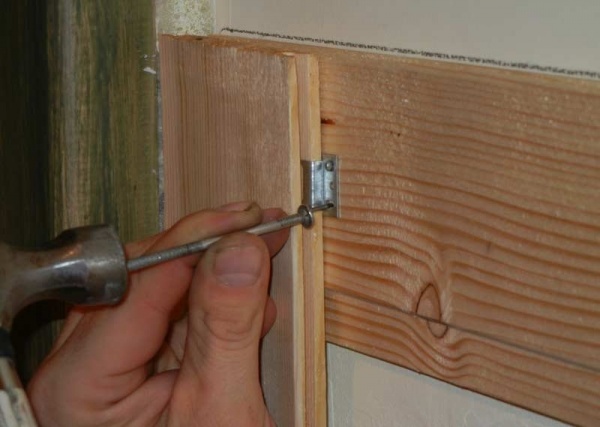
The brackets are attached to the back of the lining and fixed to the wall using nails. A clamp is first attached to the next board, and then it is joined and secured.
How to nail lining with self-tapping screws
If the material is plastic, then self-tapping screws are suitable for it; it is inserted into top part boards, and the cap is flush with the tenon. And so on in order, until the last board.
We line the steam room with clapboard
There is an opinion among experienced bath attendants that when the lining is mounted vertically, the temperature of the boards at the bottom and at the top turns out to be different, this affects the service life of the product. At horizontal position The boards dry out and widen less; this method of cladding also makes the bathhouse more spacious and brighter.
Attention: with this type of fastening, the groove must be directed downward!
But vertical laying of the lining will be suitable for saunas (with dry air and high temperatures). For effective air circulation, holes are made in the boards, and the problem of condensation is solved.
How to nail lining in a steam room correctly and efficiently? Claymer cladding technique. This method allows for easy dismantling in the future when replacing unsuitable plates. A budget option would be nails. The galvanized elements are driven into the fastening slats, and the caps are recessed with a hammer. True, in this case there is a high probability of making a mistake and ruining the material.
To install the lining on shelves and seats, self-tapping screws are used, the surface of the coating is sanded, the facing board is held firmly and looks beautiful. And for the old type of lining, holes are made in the plates, the chamfer goes under the head and the screws are screwed flush into the frame. Using this method, you can attach the plates to the walls of the steam room.
Due to its low price and quality characteristics, wooden lining is one of the most popular finishing materials. This noble, warm and environmentally friendly material is widely used during internal and external works for the arrangement of residential and commercial premises. And due to the fact that the installation of lining does not require special skills or special expensive tools, anyone can cope with fastening wooden planks.
To carry out lining installation work you will need the following tools:- hammer and nails (you can use a screwdriver and wood screws);
- hacksaw or jigsaw;
- construction stapler with staples;
- roulette;
- building level.


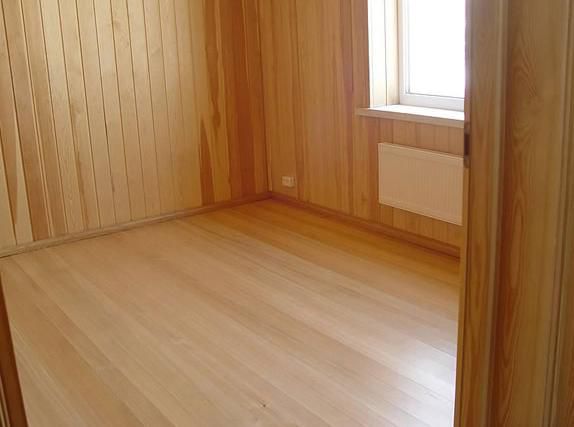
Knowing all this, you can easily secure the lining correctly using any of the methods described above. Correct installation of this beautiful natural material will ensure that the wooden finish will serve you for decades, and you will not soon think about carrying out a new renovation.
One of the main reasons why it is convenient to cover walls with clapboard is because before doing this you do not need to prepare them in any special way: level, putty, plaster. That is, with the help of clapboard cladding you can get an absolutely flat, beautiful wall surface at relatively low material costs. The room will also be well soundproofed and protected from dampness and temperature changes. In a room upholstered with clapboard, it is convenient to maintain constant humidity and temperature.
Lining is used for interior and exterior decoration of premises and is a worthy competitor to artificial finishing materials.
How to attach the lining? The lining, along with the finishing strip, can be applied directly to the walls and ceiling, but provided that they are smooth and made of wood. This happens extremely rarely. Therefore, to level the surfaces, a sheathing is made from slats, and the cladding is then placed on it. If you plan to place the lining vertically, then the sheathing should be made of horizontal slats in increments of 0.5 - 1.0 meter, and vice versa, if you choose horizontal placement of the lining, then the slats should be installed vertically.
The intermediate wall made of sheathing must be level and in the same plane. You shouldn't trust your eye. It is better to use a level and plumb line. With their help, you should ideally align and secure the lower and upper bars. And between them it is good to stretch the mounting threads to indicate the plane of the entire sheathing. The level of the intermediate bars is leveled along the threads.
So, the sheathing is ready. Now you can begin the most important work - installing the lining. To properly nail the lining, you should start working from the corner and methodically move on.
What is best to use for fastening the cladding? In utility rooms where perfect beauty is not required, you can use nails. There are special nails with small heads on sale.
How to nail the lining? To ensure that the wood cladding retains its beautiful appearance, you can hammer nails into the grooves. Then they will hardly be visible.
If you want to give the surface a perfectly pleasant look, use a special bracket. The bracket fits into the groove at an angle and secures the board to the wall. The tenon of the next board easily fits into the groove of the previous board and so on. Instead of staples, you can use galvanized nails. But the heads of the nails should be completely buried in the wood using nail hammers.
There is a method of attaching to clamps. Clamps are special staples made of galvanized steel. Such fasteners are used for installing light lining, because the load on the clamps is high. The bracket is attached to the back wall of the board groove. The other side of the board is fixed with a self-tapping screw. The tenon of the second board is inserted into the groove of the first, already secured. The operation of attaching screws and clamps is repeated for a new board.
Lining made from different types of wood is suitable for different purposes: it is better to cover residential and office premises with lining made from coniferous species(pine). The best lining for a bathhouse is made from aspen (high moisture resistance + low risk of splitting).
The lining is divided into regular lining and eurolining. Conventional lining, depending on its quality, can be class “A”, “B”, “C”. Eurolining also varies in quality and can be “Extra”, “Classic”, “Economy”, class “A”, “B”, “C”
Today, more and more people are choosing eurolining and its imitations. Thus, a house or room covered with clapboard may seem to be covered not with clapboard at all, but with a real log or timber. Let's see what kind of lining there is.
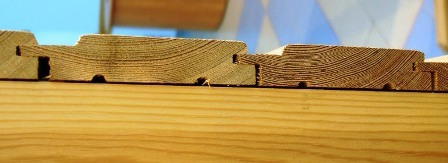
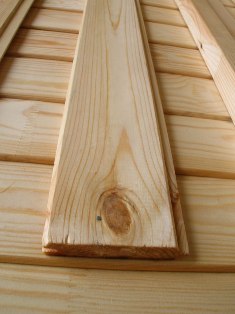
The cladding board is ordinary lining. Initially, freight cars were made using similar boards. The boards were able to fit well together, and the carriages turned out to be solid. Then they liked it - and they began to use the lining in the rooms. Only production technologies, sizes, etc. have changed. For external cladding, take lining with a thickness of 18 mm, for internal cladding - 12-16 mm.
A characteristic feature of eurolining is a deep tongue-and-groove connection. Although profiles may differ. The thickness of the boards is 13, 16 and 19 mm, the width is 80-120 mm, the length is the same everywhere - 6000 mm.
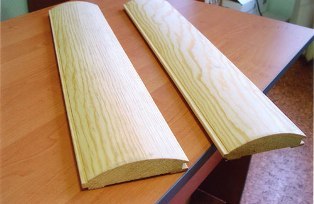
One of the types of eurolining is blockhouse lining. It imitates the surface of a rounded log. If you cover a wall with such clapboard, you will get the feeling that it is a chopped wooden house. The surface of the panel has a semicircular shape.

Another imitation is eurolining “under timber”. The room or exterior walls look as if they were built from timber. Wide panels of this imitation are used for exterior decoration, narrower panels for interior decoration. “Blockhouse” and lining “under timber” are especially useful in frame housing construction. The walls turn out light, beautiful and warm.
Preparing wood for cladding
Before fixing the boards to the wall, I advise you to treat the wood, especially since some wood may especially need it. Over the course of several years of “hanging” on the wall, even eurolining in the room, not to mention ordinary lining, can dry out from slight moisture in the room: white stripes will appear and the original light will be lost.
Sometimes, on the contrary, you want the lining to turn from dark to lighter. And for this purpose, it is not specially treated with protective liquids, and the wood gradually acquires a golden hue. To speed up the “yellowing” process, the lining can be soaked in warm drying oil and dried.
Additional operations to improve the appearance of the lining. De-resining wood (removing resin and greasy stains), especially important for pine. The easiest way is to coat the boards with a 25% acetone solution and rinse in warm water.
Another useful procedure is wood bleaching (when you want to get that same golden hue). At home, use oxalic acid and hydrogen peroxide. The first method is to apply a 20% solution of sodium hydrosulfite, and on top of a 10% solution of oxalic acid. Wash off the composition after 5 minutes. The second way is to coat the boards with a 20% ammonia solution mixed with a 20% hydrogen peroxide solution (1:10 ratio).
The third useful operation for lining is sealing cracks, splits, potholes, etc. This is done using putty, putty, as well as drying oil, wood glue and varnish. Special putties are sold that imitate the color of wood (but you still have to select the color by trying different shades). Cover the putty area after the first varnishing of the coating.
To preserve the color of wood and protect it, various types of alcohol and water stains are produced. Before applying these substances, it will be necessary to do test paints on pieces of lining. The most convenient way to paint the lining is with a flute brush. Before laying on the wall and ceiling, the entire lining is varnished. It is better not to use glossy varnishes - the walls will be too shiny. And take semi-matte alkyd-urethane varnish or acrylic varnish. After applying the first layer of varnish, the surface of the boards is wiped with fine-grained sandpaper. A total of 2-3 layers of varnish are applied, and each time they are wiped with sandpaper.
Preparing walls for installation
Before installing the lining, the electrical wiring in the room must be completely finished, all wires and communications must be installed, and it must also be checked to see how well it all works. Next, you need to make a wiring plan and mark the locations of all sockets, ceiling and wall lights, switches, panels, etc. External wiring often reduces the quality of the interior. So it is better to run the wires under the lining, in metal pipes, with stranded copper wire. And to combat overheating of wires, choose cables with a deliberately large cross-section. So, the plan has been drawn up, all the holes, entrances and exits have been identified.
The lining can be nailed directly to the wall if it is perfectly flat (for example, wooden walls). Usually, for stone and brick walls, you have to do preliminary lathing, and then sew boards on top of them. If the lining is positioned vertically, the wall is covered with horizontal slats at a distance of 0.5-1 m; if the lining is horizontal, then the upholstery is done the other way around.
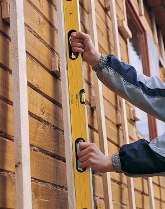
All sheathing slats must be in the same plane. To do this, use a level and plumb line. With their help, the upper and lower bars are set perfectly level and secured to the wall. Between them you can stretch mounting threads, which will mark the plane for the entire sheathing. Align the level of all bars with the thread.
Cladding walls with clapboard
It should be noted that everyone can make their wall warmer and not susceptible to noise by putting insulation (mineral wool, for example) into the cells of the sheathing, covering the wool with a layer of hydro insulation ("vapor barrier" film) and leaving an air gap between the paneling and the vapor barrier. It would be a good idea to coat the sheathing beams themselves with an antifungal primer, and on the side of the wall facing the street to cover the timber with a layer of glassine and plastic film. So, the wall is waiting to be covered.
There are several ways to nail clapboard to sheathing slats. Where beauty is not important (outbuildings, utility rooms), the lining can be nailed anywhere on the board. Of course, it is better not to take large nails, because... they can split thin lining. Carnations with small caps are suitable. In this case, you can not nail the nails in at least one row (do not make straight driving lines), but scatter them in a chaotic order - this way they will attract less attention. The second method - more complex and aesthetically pleasing - is to nail nails into the grooves of the lining.
Here they will be practically invisible.
It is easier to carry out “hidden” installation of eurolining, since its grooves and tenons are longer.
The boards can be secured using a stapler and a special staple. In this case, the bracket fits into the groove at an angle, and the tenon of the next board fits freely into the groove of the previous lining. Instead of staples in this case, you can use galvanized nails, but their heads must be completely recessed into the wood (you will need a hammer).
Fastening with a self-tapping screw is similar. A self-tapping screw is screwed into the tenon of the first lining (it is fixed to the wall) (the head is flush with the surface of the tenon). The groove of the next board is inserted, and its tenon is mounted as well. The last board is secured like the first - using an additional screw, and closed with a dowel.
There is another fastening method - clamps - special brackets made of galvanized steel. Clamps are used mainly for fastening light lining, since the load on the clamps is significant. The clamps are attached to the rear wall of the lining groove. The other side of the first board is fixed with a self-tapping screw. Next, using self-tapping screws or nails, the clamps are attached to the wall. The tenon of the new board is inserted into the groove of the fixed one. Similarly, attach the clamp to the groove of the new board, etc. The last board is again secured with a self-tapping screw.

And finally, about prices.
Lining is sold by square meters, but more often by cubic meters. At first glance, prices may amaze with their height, but if you look at it, 1 cubic meter. the lining contains about 70 sq.m. upholstered surface. So, a simple lining made of aspen will cost about 35 – 49 thousand rubles. per cubic meter (or 550-750 rubles per sq. m.). Eurolining is more expensive: the “Economy” grade is about 8 thousand rubles / cubic meter; “Classic” grade – 17 thousand rubles/cub.m.; “Extra” grade – 50 thousand rubles/cub.m.
They sell a blockhouse separately, depending on the size of the boards and the quality of the wood, the price per square meter of a blockhouse is in the region of 210-1900 rubles/sq.m. m. or 9 – 50 thousand rubles. per cubic meter (the area covered by 1 cubic meter of a blockhouse is less than that of a lining - about 42 sq.m.).
Prices for imitation timber: 180-580 rub./sq.m. or 8 -15 thousand rubles. per cubic meter in the “economy” and “classic” segments. One cube m. of “timber” covers approximately the same amount as a blockhouse – about 42 sq.m.
If you get good at this business, having practiced in sheds and utility rooms, then covering walls with clapboard will seem like an easy task. And the front rooms will be “lined” with wood with shine. If you don’t want to do it yourself, you can invite experts. The average cost of cladding work is 300-450 rubles. per sq.m. and higher.
__________________________________


