Print out stars of different sizes. New Year's star
Stars have always occupied our lives important. Stars give light, warmth, show direction. Someone is born under lucky star, someone makes a wish when a star falls, someone worships them, and someone simply admires them on dark nights. We are all, in fact, children of the stars, because without them we would not exist... This symbol can be found everywhere on Earth. That is why, and also because it is simply beautiful, we will make stars of happiness out of paper.
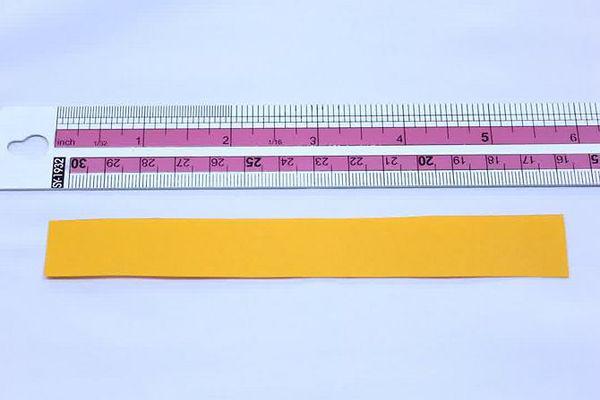
For this we need strips of paper and a little time. The size of the strips is 1 cm x 23 cm or other sizes with a similar width to length ratio (1:23). Of course, the width can be greater, for example, if you use A4 paper, then with a strip length of 297 mm, its width can be made 11-12 mm.
To determine the size of the future star, you need to multiply the width of the strip of paper by 1.67.
Here are some ready-made calculations (width | length | star size):
- 1,0 | 23,0 | 1,67
- 1,1 | 25,3 | 1,84
- 1,2 | 27,6 | 2,00
- 1,5 | 34,5 | 2,50
Making a star
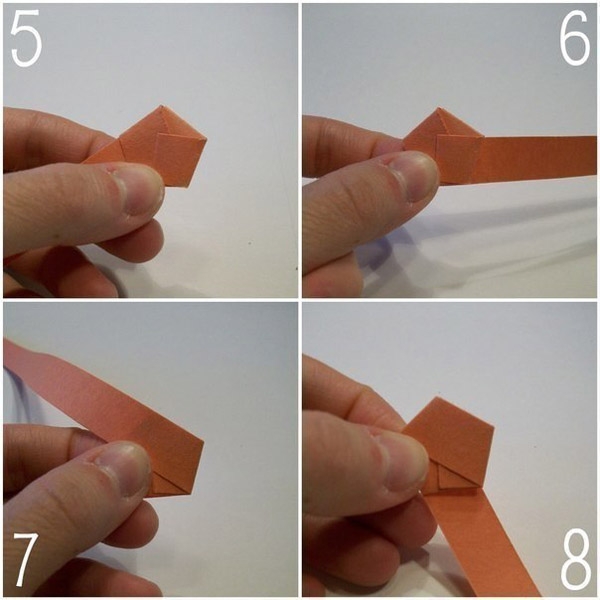
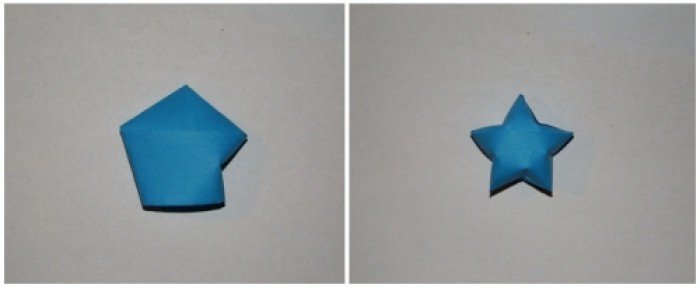
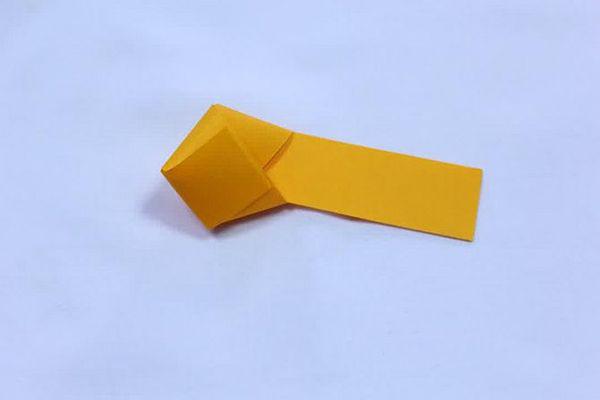
1-4. Bend a strip of paper around your finger and thread the tip of the paper into the resulting loop. We carefully tighten the resulting knot so that we get a neat pentagon.
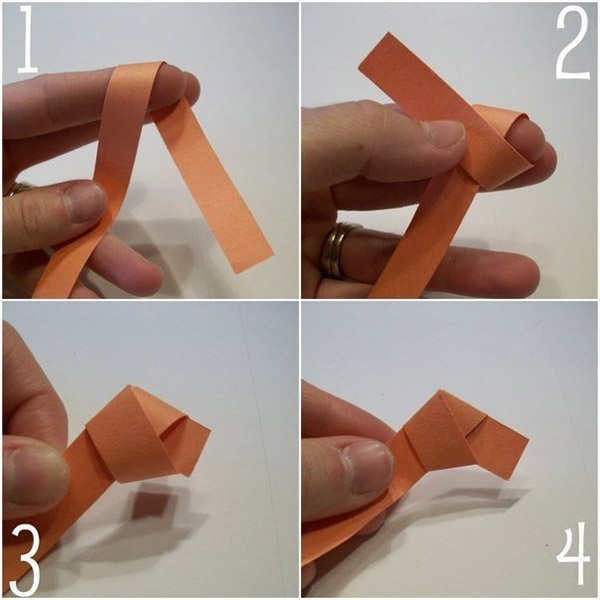
5. It is advisable that the tip does not go beyond the pentagon at all, but if this happens, then we simply bend it into the opposite side(step 5). And it’s even easier - cut off the excess)))
6-8. With the free end of the strip we begin to wrap the pentagon in a circle, in total you should wrap it 10 times in this way.
Let's make a star applique.
One could say - an applique of a Star, but there is a catch: children are accustomed to thinking that a star is necessarily a five-rayed figure - like on the Kremlin towers. And all because of a play on words - and now the kids are filling the night sky in their drawings with huge pentagrams.
To avoid such misunderstandings, we will call the applique Star. The goal, of course, is to train children’s hands and eyes.
At the same time, we actually want to create a beautiful composition. I suggest the first option.
Let it be as a compositional center. Color, cut out and glue in the center of the album sheet. The application has begun.
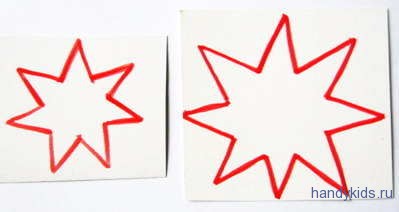
Star templates for cutting
But the voids around willy-nilly will have to be filled with patterns that are suitable in meaning. I have Star templates made from thick cardboard ready.
Here we have one more goal - we will repeat the method of cutting from the edge. That is, in in this case To obtain a high-quality template, you should not cut it with a continuous cut along a zigzag contour, but cut each beam separately with two cuts from the edge of the sheet. About. The method in some cases is much more profitable than our usual one, but the fact is that, understanding with their heads how best to act, children usually mechanically cut out of habit, as always. This is where awareness and the ability to control our actions come in handy.
So, the template stencils are cut out, now let’s carefully outline them with a pencil. It’s a very useful activity—working with stencils develops manual dexterity and intelligence. And to distribute the stars beautifully, you will need an eye.
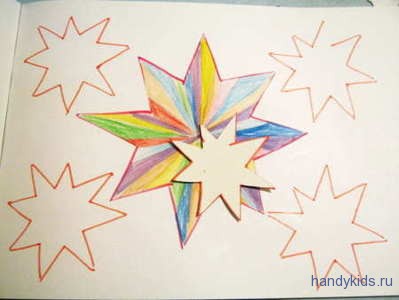
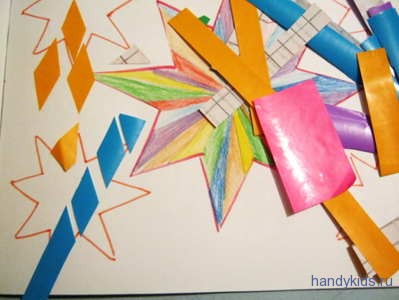
Of course, you can simply cut out stars from colored paper using a stencil and glue them on - quite a beautiful option. But I want something more interesting. Let's collect stars from individual rays
Preparatory stage: put a dot in the center of each star. Don’t rush, don’t be rash, consult your eye. Now we connect this center with straight lines with the angles between the rays - we train our drawing skills, and now all the stars are divided into diamonds. We learned how to cut out these very diamonds economically from a strip of paper when we were doing the Kokoshnik appliqué. So let’s now take this opportunity to repeat it – this method is simple, but cunning.
dividing a strip of paper into diamonds
So, cut the diamonds and - go ahead - glue the rays. Moreover, they need to be oriented correctly and clearly fall into the contour of the sprocket, a very difficult task, but how much benefit!
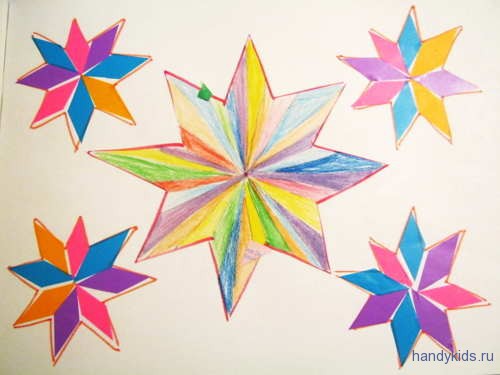
So, we have the first picture ready" Stars applique».
But since I have a lot of groups of children, and I quickly get bored doing the same thing with everyone, I always come up with several variations of the theme. For example, . Remember?
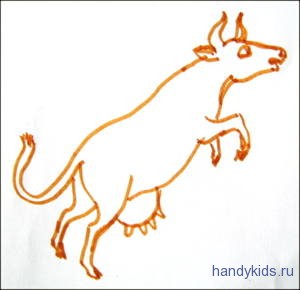
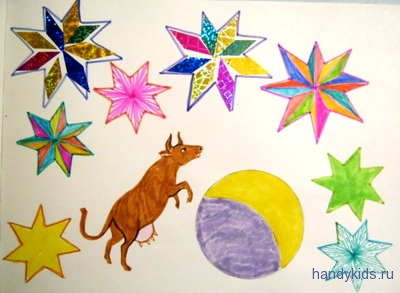
In Mother Goose's Rhymes, the Cow jumped over the moon. So, so that my students would be interested in the applique of the Star and also have a plot and, so to speak, adventure, I combined two themes.
We color the Cow coloring page and cut it out (despite its apparent simplicity, this task in itself is already very useful).
And now we’ll decorate all parts of the sky around the cow and the moon with stars.
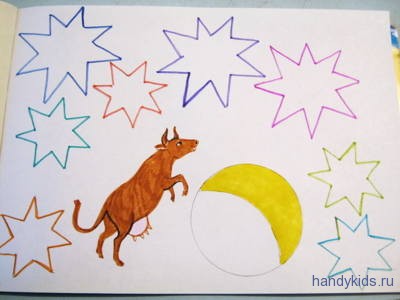
Let's make an applique of stars in the sky
The picture will turn out very beautiful and decorative. And if the applique is made not from paper, but from colored foil, the success will be deafening. Children will glue it all together with delight.
Marina Novikova told you how to apply the star applique to your advantage.
Tags: ,
For interior decoration or themed holidays, a decorative element such as a star is often used. There are a lot of variations on the theme of making a star: large and small, voluminous and flat, double or single. Materials for making crafts also vary significantly. This can be paper, fabric, foil, wire and other available means. In this article we will look at the most popular formats for making paper stars. Well, the task will be made easier by a selection of thematic photos, detailed diagrams and video material from a master class on making a star with your own hands.
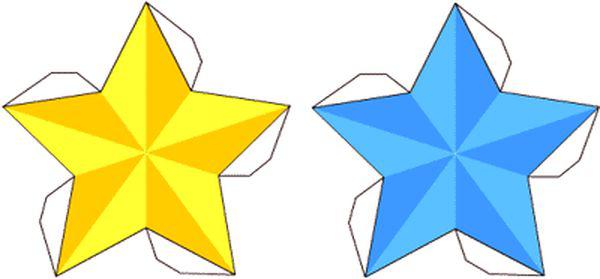
How to make a small star out of paper
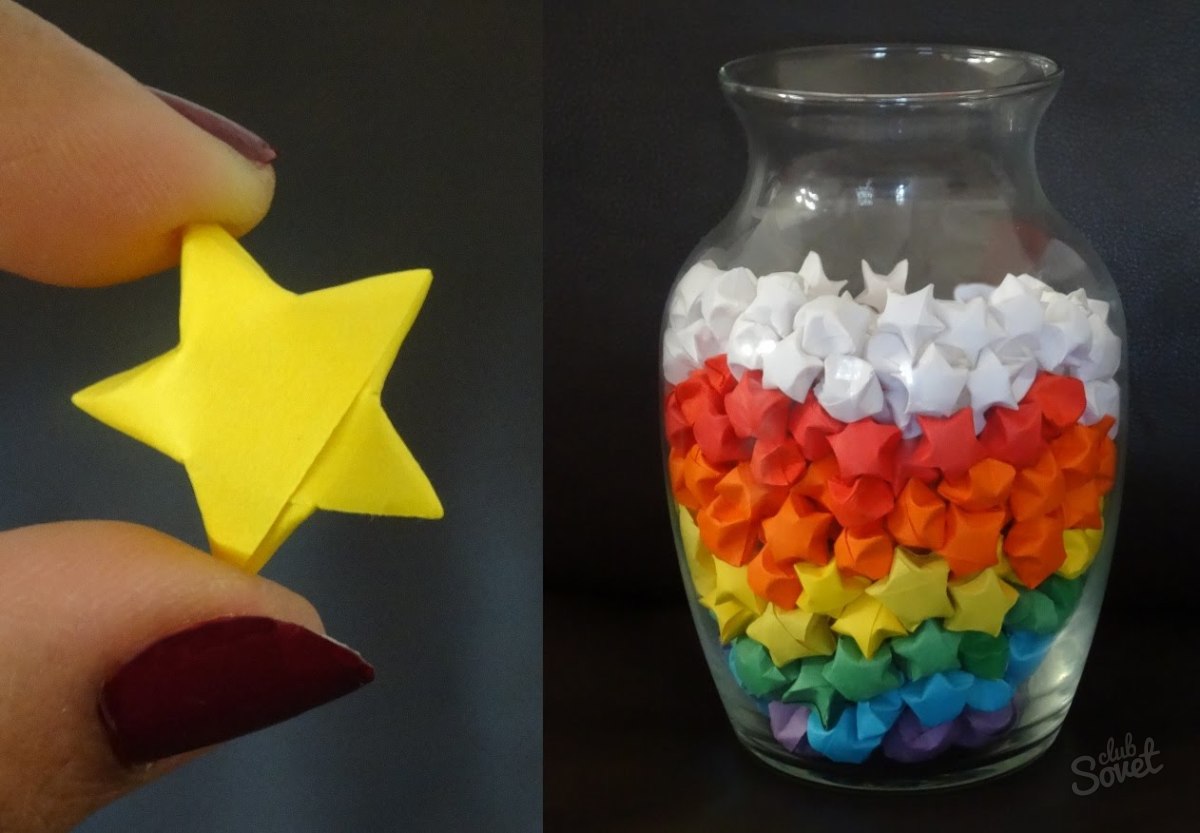
These stars are small (1.5 cm), but in large quantities they look very impressive and original.
To work, you will need colored or glossy paper (you can also use old glossy magazines) and scissors.
- First, blanks are made: strips of paper are cut, measuring 29x1.1 cm. The width and length of the strips can be changed according to the desired size of the future star.
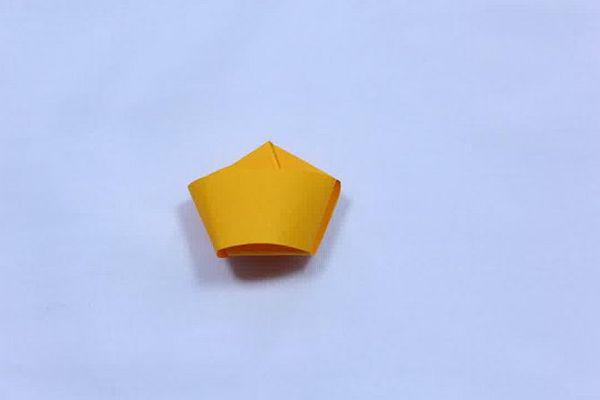
- Make a small loop from the strip (at the edge), then bend the protruding short end. It turns out to be a pentagonal figure, press it lightly.
- Turn the product over (pentagon) and continue working with the long end of the strip.
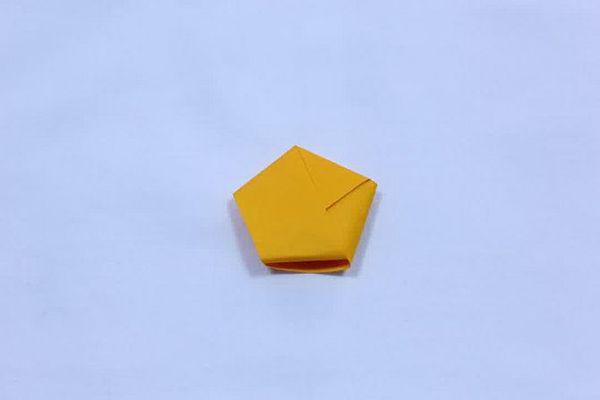
- We begin to tightly wrap the pentagonal figure with the strip, gradually, without squeezing it too much. There are at least 10 similar wraps, that is, each side of the star is wrapped twice.
- Hide the remaining edge of the strip underneath.
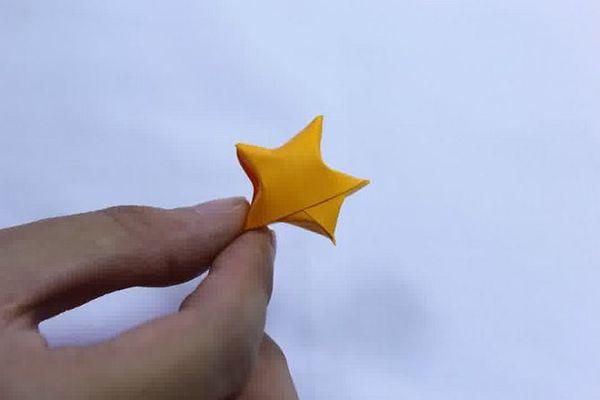
- The next stage: turning the pentagon into a full-fledged star. Holding the workpiece with one hand, use the nail of the other hand to press on the middle of the face of the pentagon, forming the rays of an asterisk. Five pressures - and the star is ready!
- Such stars look very stylish in the interior: you can fill a glass vase or jar with them. And if you do this activity with your children, your finger motor skills will be great.
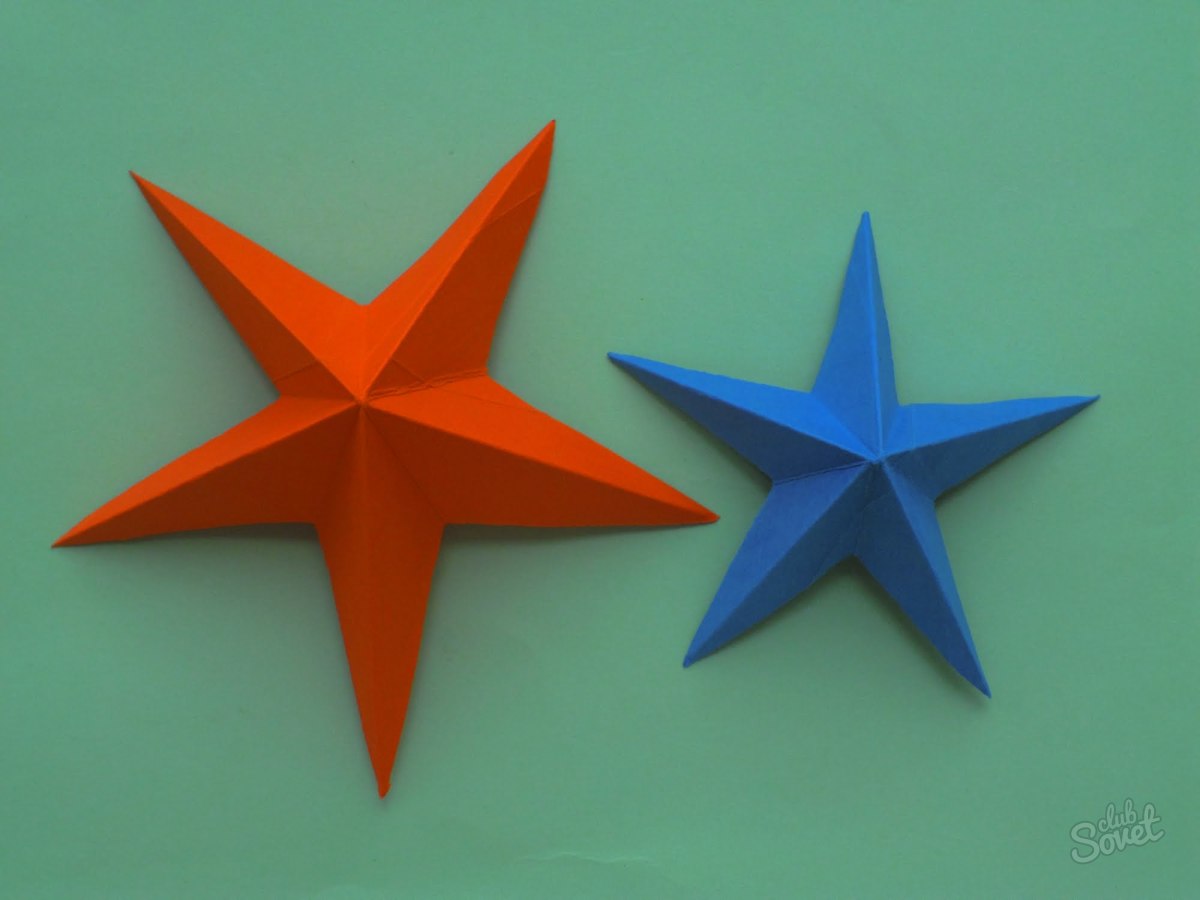
How to make a 3D star out of paper
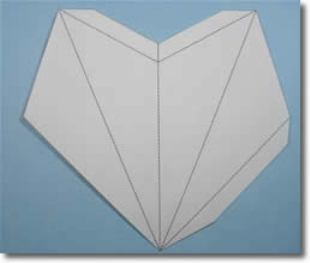
To make such voluminous stars you will need dense decorative paper, scissors and glue.
- Draw blanks for the rays of the star, print and transfer to the desired paper.
- Bend along the lines and glue along the edge (allowances for gluing are given).
- Then, glue the five prepared templates together, getting a three-dimensional star.
![]()
- The size of the stars can be adjusted independently by increasing or decreasing the size of the template.
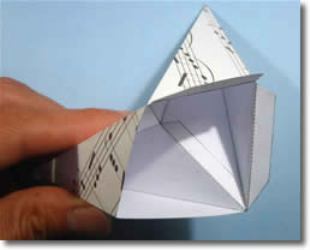
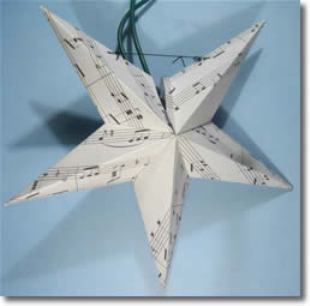
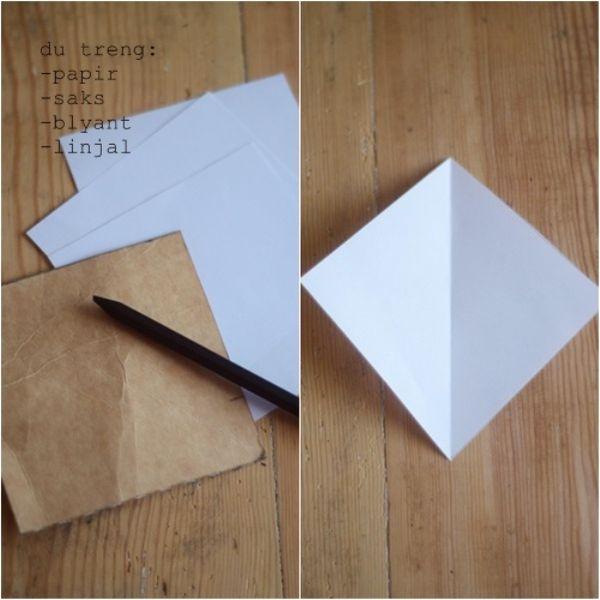
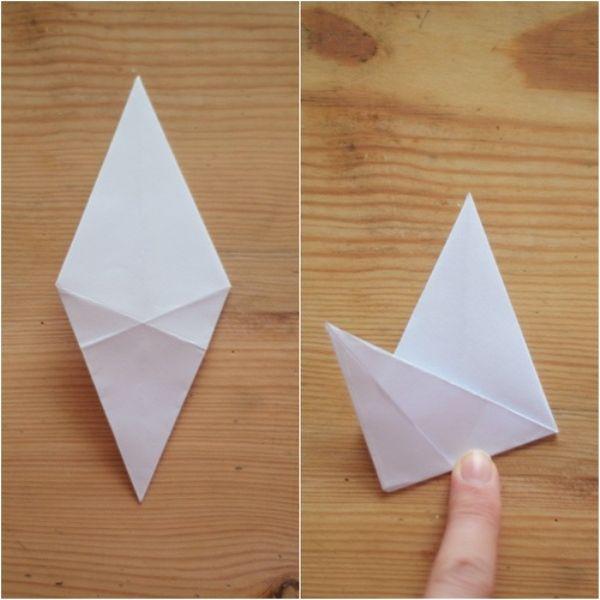
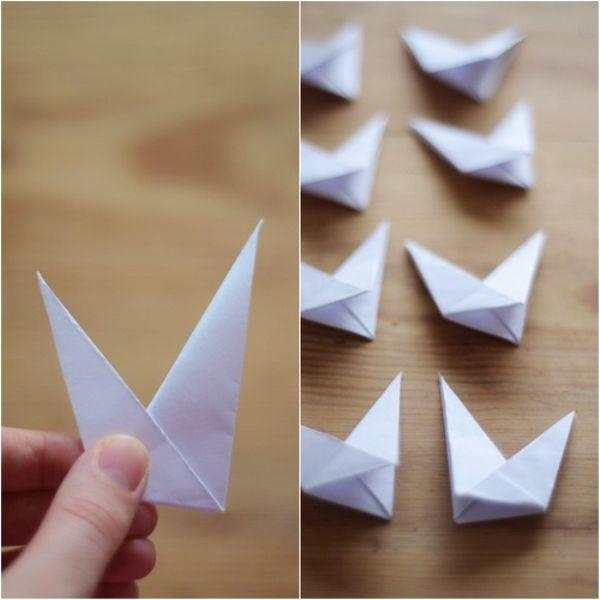
How to make an origami star out of paper
Such stars look great and stylish from newspaper or music paper.
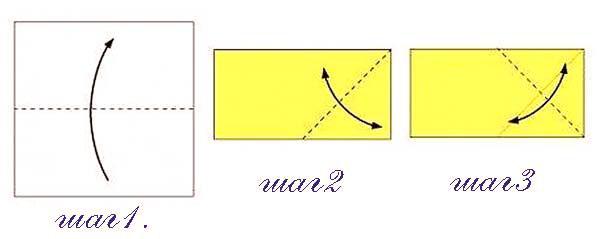
- Fold the square-shaped sheet in half, then bend the triangle of one of the vertices.
- Do the same maneuver with the other vertex of the rectangle.
- Place the opposite corner of the rectangle at the intersection point of the previous folds.
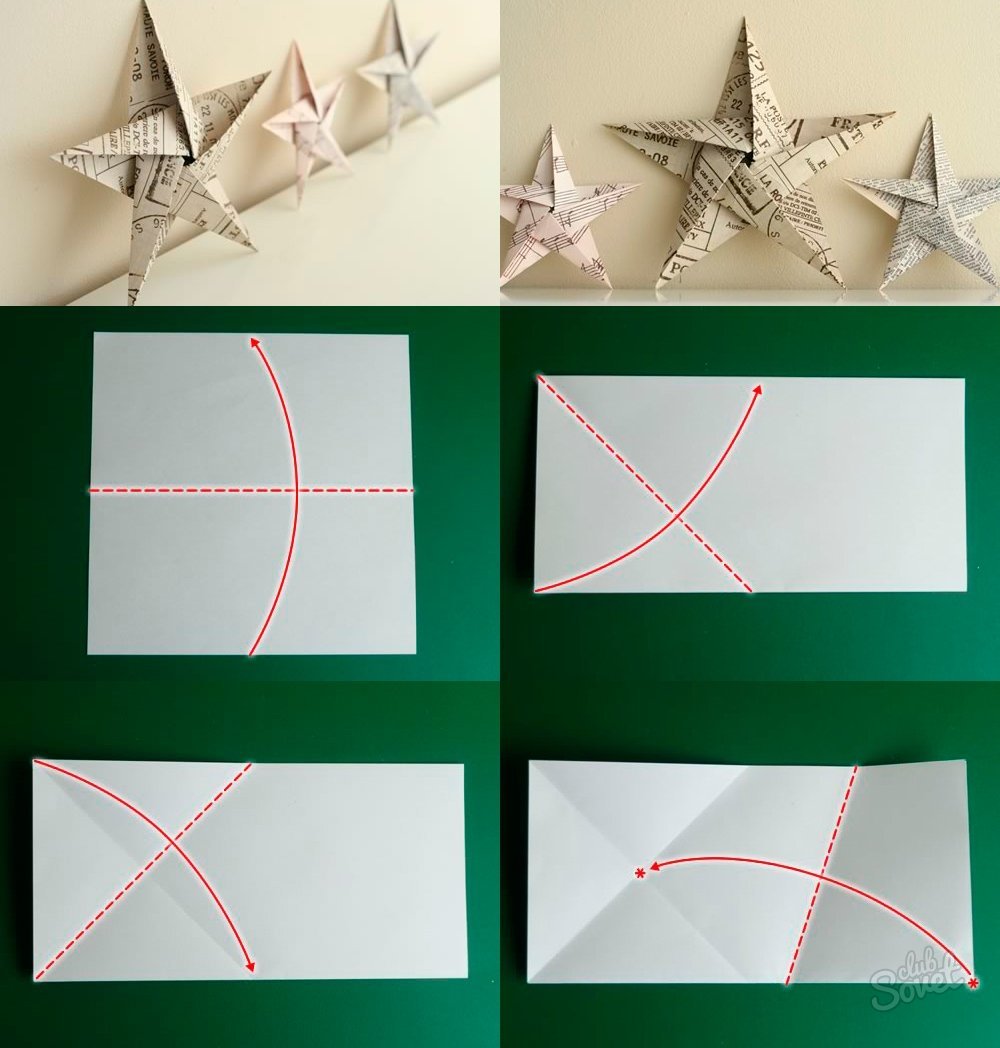
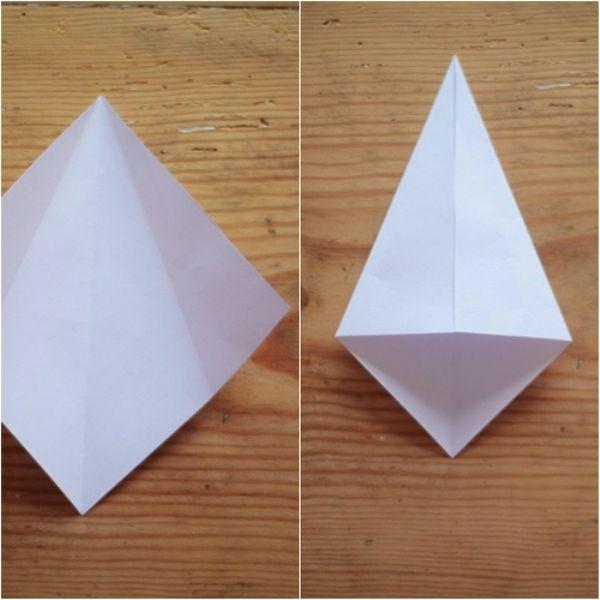
- Next, bend the rays of the future star along the drawn lines. The remaining shapeless tail of the workpiece is cut off.
- If all folds are performed correctly, you can see a pentagon pattern on the spread.
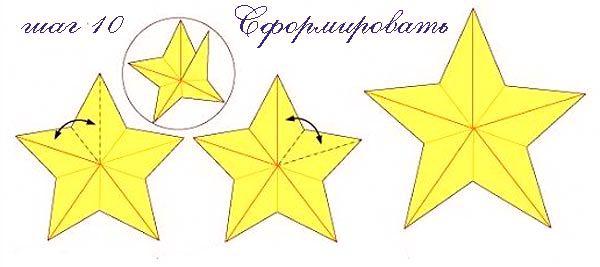
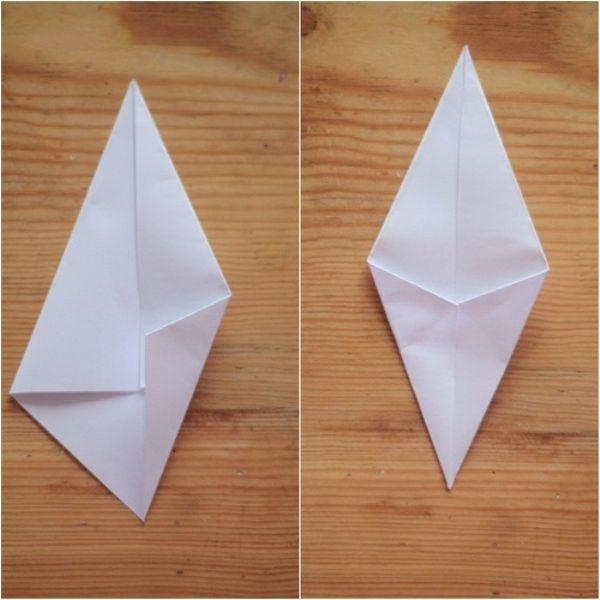
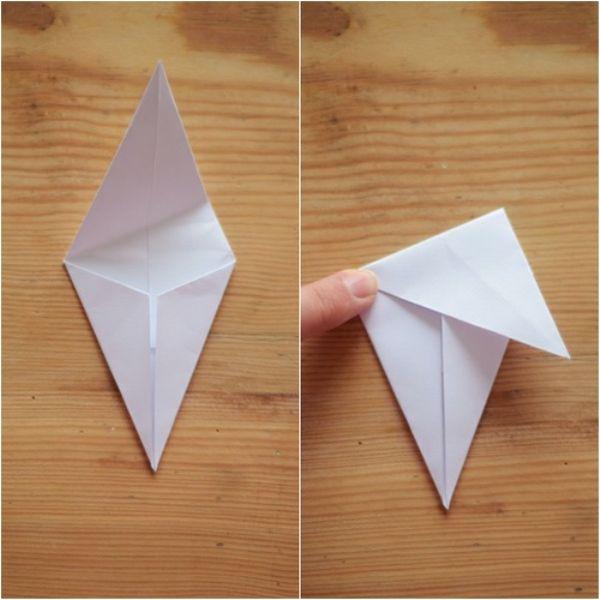
- The final stage is the most difficult. To get a star, you need to carefully bend and wrap the resulting template along the lines.
So, in this article, the most popular methods of making a paper star were discussed. Absolutely different in appearance and manufacturing method, the presented options will ideally fit into the festive interior and become a spectacular decoration.
How beautiful the starry sky is! Millions of small lights burn across the vast sky, forming the most unusual constellations. What are stars? These are not just points in the sky, in fact, they are special planets, heated to such a temperature that they are capable of emitting a large number of light and energy. Following the instructions on how to make a star out of paper, it is not at all difficult to create such beauty with your own hands. We can say that stars are flares, but what kind? The time during which they emit light varies from person to person. Surely everyone is familiar sparklers- you light it, and small sparks are scattered on all sides - also stars. They don’t glow for long—a second—and then there’s no more flash.
It is worth comparing the Sun, the largest star closest to Earth. How much light and heat it gives to the living planet! Millions of years will pass until it goes out, but now every creature lives thanks to the energy of the Sun. What a pleasure it is to watch the bright sun in winter reflecting off the mirrored sheet of snow, bask in the spring under the warm May rays or sunbathe on a sandy beach on a sultry day! In autumn, the orange sun seems to merge with the golden falling leaves. It’s a bright day and the mood is great, which can’t be said about cloudy weather. They say it's dark at night without the sun. What about the Moon? No, it’s not a star, but the light it gives off is rays reflected from the Sun, which has set below the horizon.
Constellations
Not only the Moon pierces the darkness of the night with light, there are also other stars - those very visible points burning brightly high above. Thanks to ancient astrology, modern astronomy and other “cosmic” sciences, 88 constellations are currently known, 47 of which were discovered many centuries ago. Constellations are groups of stars located in celestial space so that from them the human imagination was able to recreate images of certain figures. In each group, the brightest, less bright and fainter stars are distinguished. In ancient times they were given great mystical (cult) significance; they belonged to different religions, superstitions, deities. Some of these ideas have been preserved to this day, however, the impact on a person’s fate is described by more realistic methods of biological and psychological influence, a striking example of this is modern astrology. Why do you need knowledge of the constellations? Having made such a decision on how to make a star out of paper with your own hands, you can get creative by putting the completed elements into familiar shapes or, for example, creating your own composition of the night sky.
paper star light
Stars, in terms of beauty, attract people with their bright light. You raise your head - and thousands of rays are simultaneously captured by visual perception - so that your head spins in pleasant delight. When figuring out how to make a star out of paper, a person was guided by the desire to create an image, a semblance of celestial bodies, from ordinary material accessible to everyone. Light is rays streaming from the main source, the representation of these rays is sharp tips extending from the center of the paper model. A regular star is a group of rays of equal size (including volume). However, for the sake of variety, there are models with different numbers of branches that differ from each other; following the prompts of your imagination, it will not be difficult to make a beautiful, interesting star.
Application of crafts
Well, how can such beauty not affect the most solemn holiday of the year. Christmas tree- the main beauty of the evening - was honored to wear a bright star on top, like a crown. This emphasizes the special importance of the coniferous tree among other New Year's attributes; fluffy spruce paws are also often hung with stars. This is how the forest princess becomes simply irresistible in her appearance. Following the example of how to make a star out of paper for a Christmas tree, anyone can make similar decorations and dress up the green beauty.
In addition to the Christmas tree, the star is used as decoration in other cases. Beautiful crafts complement the interior, festive clothes (for example, a children's party), and gorgeous little paper sparkles are used for various celebrations.
The red five-pointed star is the distinctive sign of the Red Army. On the eve of February 23 (or another military holiday), boys are invited to make a craft with their own hands using a glued three-dimensional star. This will emphasize the strong attitude of the growing stronger half to the male military duty to defend their family and homeland. The craft will be an excellent gift for dad, uncle or grandfather on a suitable holiday.
3D star
Instructions on how to make a three-dimensional star out of paper will help you complete this craft easily and quickly.
To work, you need to prepare paper (of any chosen color), a compass, a protractor, scissors, a pencil, and a ruler.
1. Using a compass, draw a circle of the selected radius on a piece of paper (the length of each ray of the star depends on the length of the compass opening).
2. A radius is drawn anywhere - a segment connects the center (the point of the compass needle) and any point on the circle.
3. The star, in this case, is five-pointed. 360 degrees of a circle are divided by five, resulting in 72 degrees per ray. If a different number of rays is required, the circle is divided accordingly (4 rays - 90 degrees, 6 rays - 60 degrees, 7 rays - approximately 52 degrees, etc.). A radius is drawn every 72 degrees.
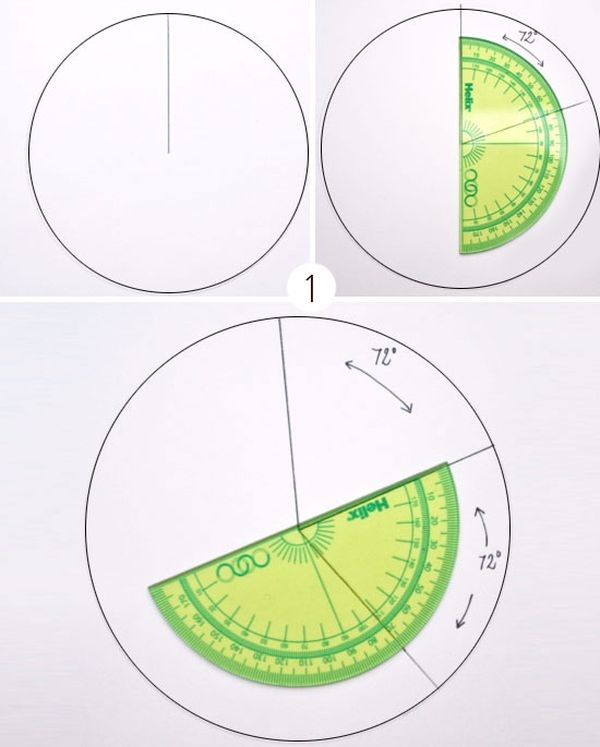
4. The length of the lateral sides of the rays is determined by the following action. Points are marked on each radius at the same distance from the center. The greater the distance, the shorter the length of the rays.
5. A perpendicular is drawn through each indicated point - from one edge of the circle to the other.
6. Segments are drawn from the center to each point of intersection of perpendiculars.
7. The figure is cut out along the outer lines of the depicted star.
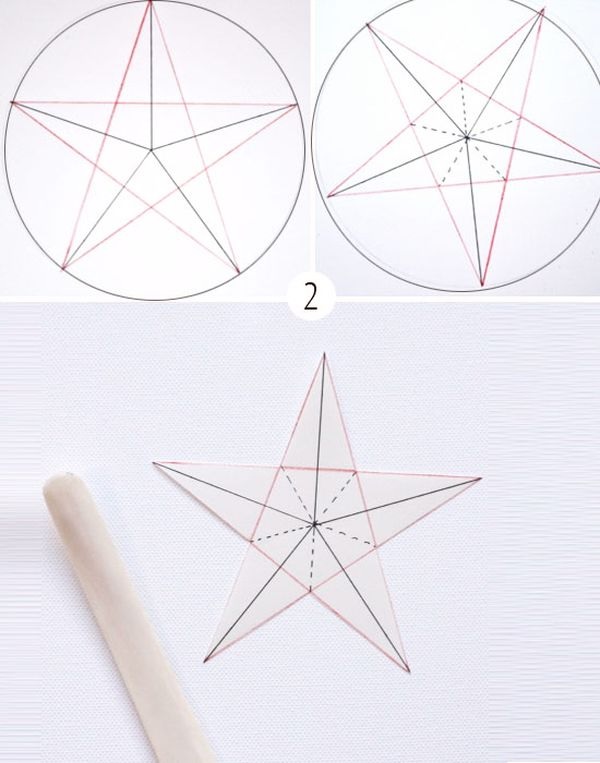
8. Volume is created by subsequent bending along short segments inward and along the central lines of the rays outward.
The volumetric star is completed!
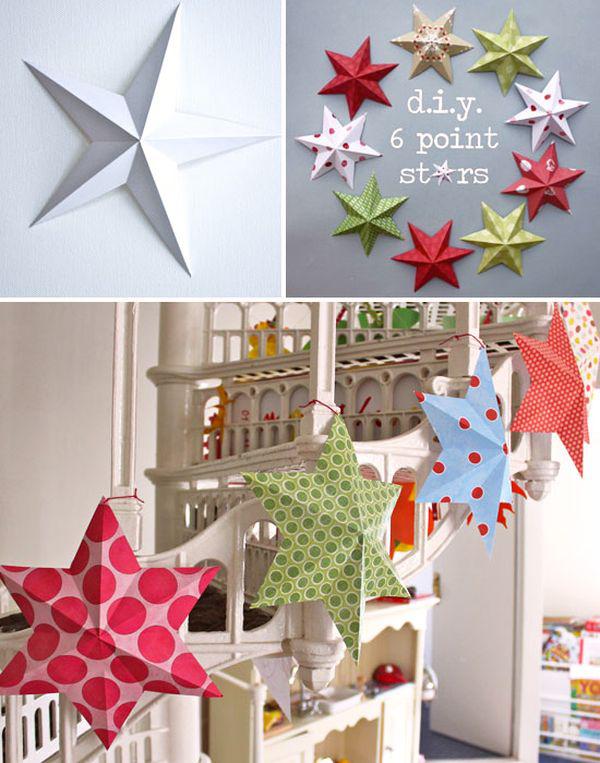
Double volume
The previous instructions on how to make a three-dimensional star out of paper contain information for making a convex part on one side of the bounding plane. This example will tell you how to perform double volume.
1. Following the example of the previous instructions, two identical elements are performed - five-pointed stars. However, here, in addition to the main outer surface, elements will be needed to connect the two parts into one figure. These are special “ears” that complement the shape from the sides of the rays. The figure can be cut out according to the printed pattern.
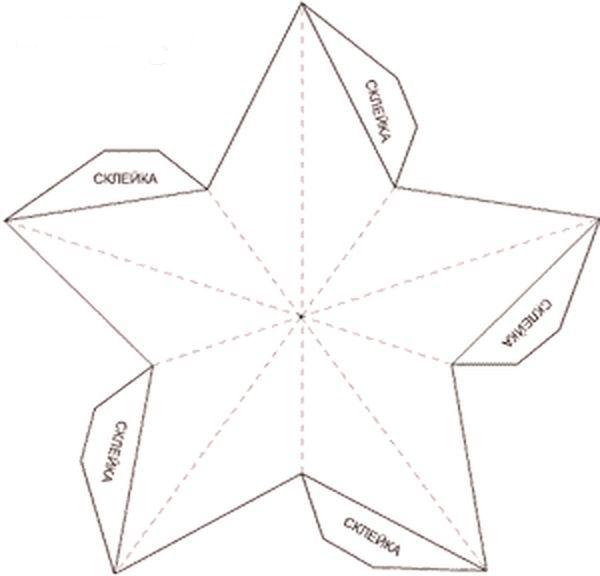
2. The embedded elements are similarly given a three-dimensional shape.
3. The structure is glued together using symmetrically cut additions.
4. The glue dries.
The double star in three-dimensional form is ready!
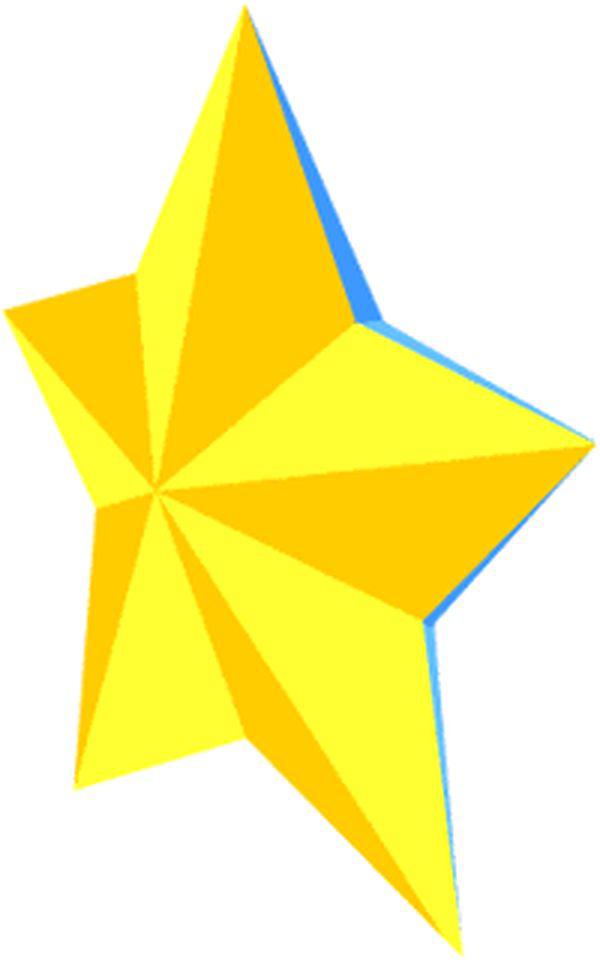
Star
The following instructions suggest making a simple little star.
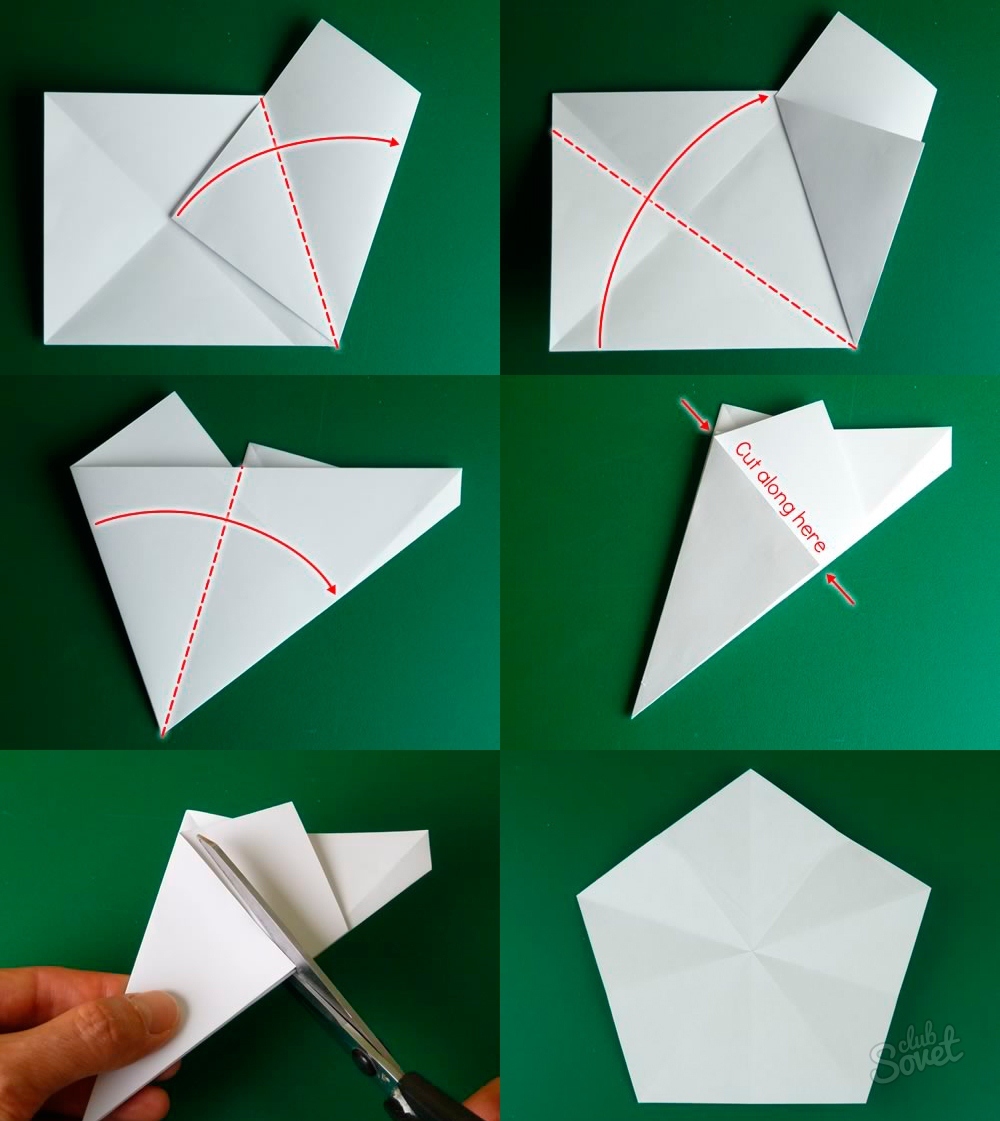
1. From a sheet of paper of any color (preferably painted on both sides), a thin strip (1-3 cm) is cut along the entire length of the sheet.
2. The strip is carefully tied into a loose knot in the middle and slowly tightened (also carefully so that the paper does not tear).
3. The paper should be pressed along all the loops of the knot along one plane (placing it on the table, ironing it from above).
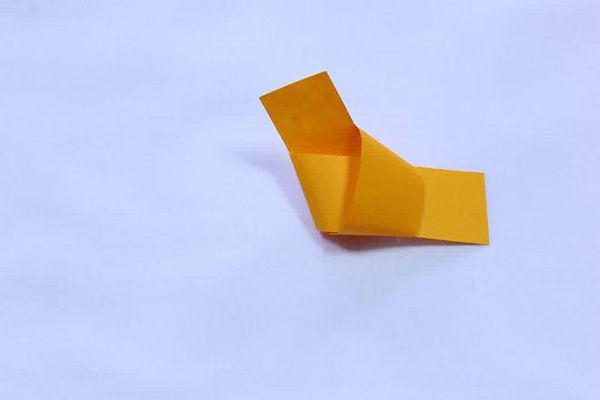
4. By turning the pentagon in the middle (knot) with either side, you need to find the part of the strip that goes on top. The protruding end, located at its edge, must be placed on it and tucked briefly, tearing off the excess part.
5. The second end wraps evenly around the remaining pentagon, going around each edge encountered. It’s okay if the end is long and it will take a long time to wrap. That's what it is positive point in the further creation of volume.
6. Having reached the end, the end of the strip must be tucked under the nearest overlap (if necessary, tear off the excess).
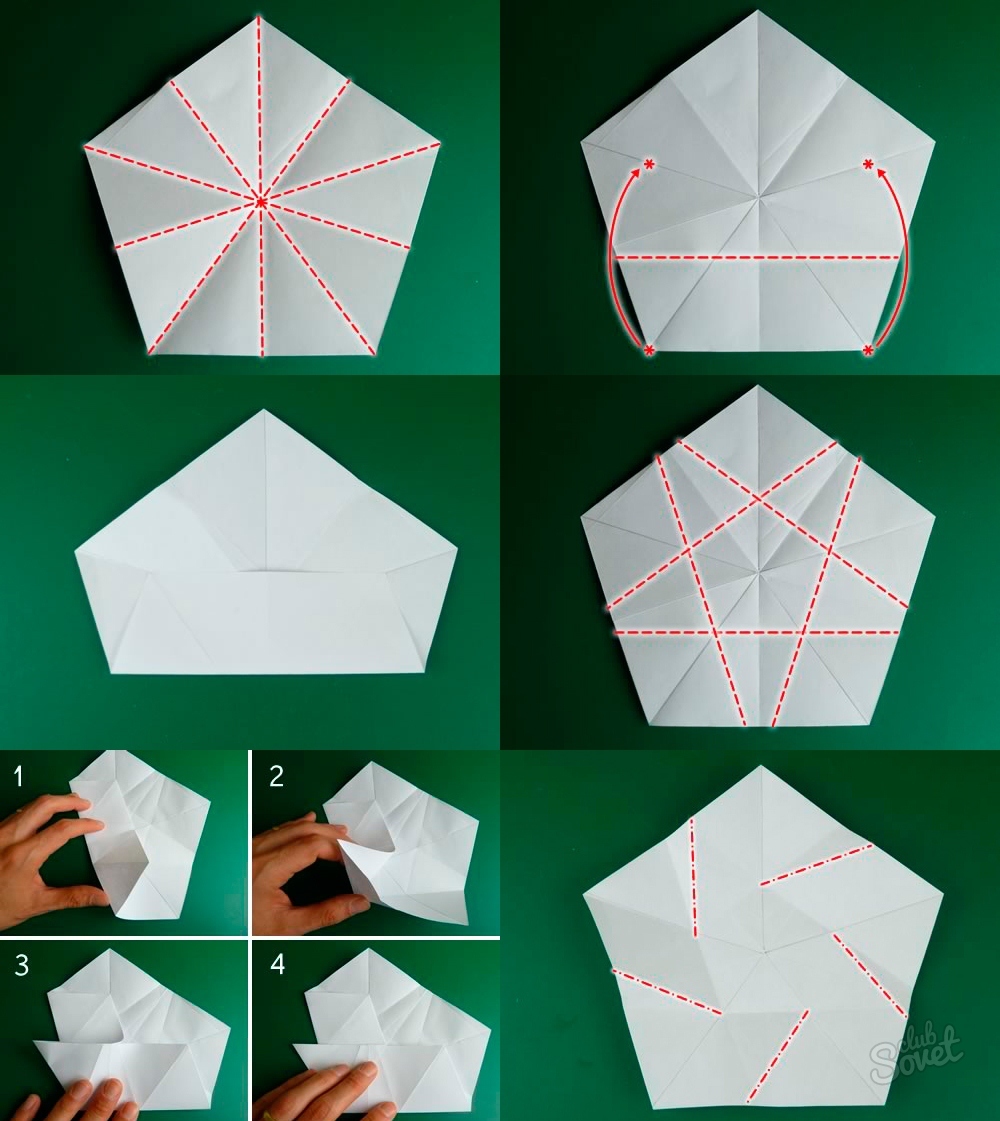
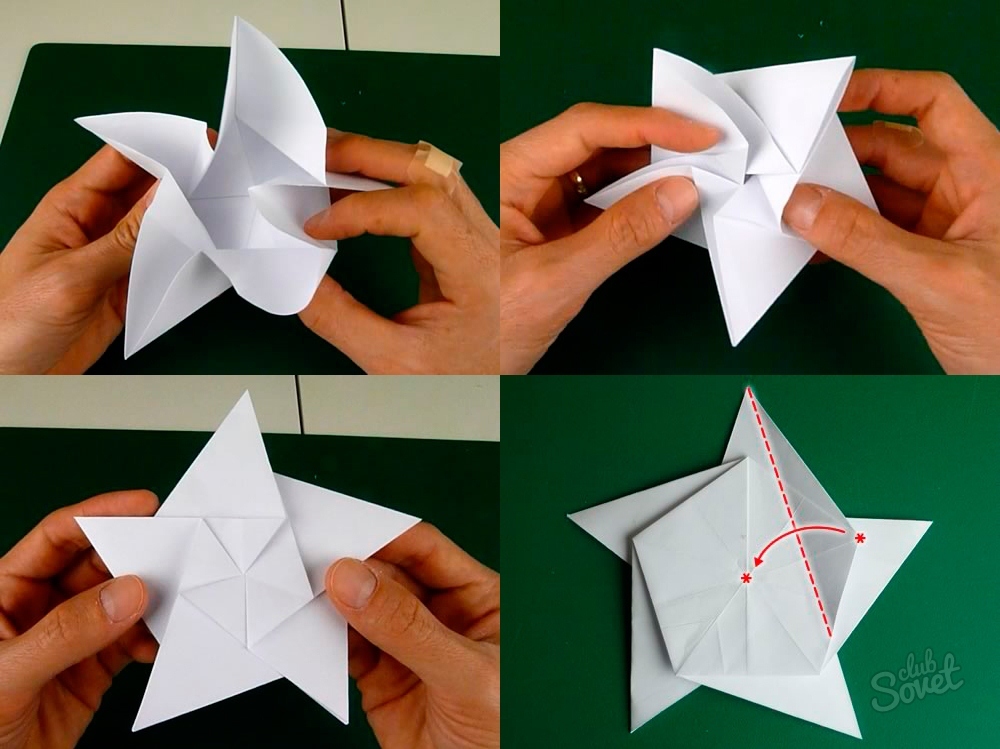
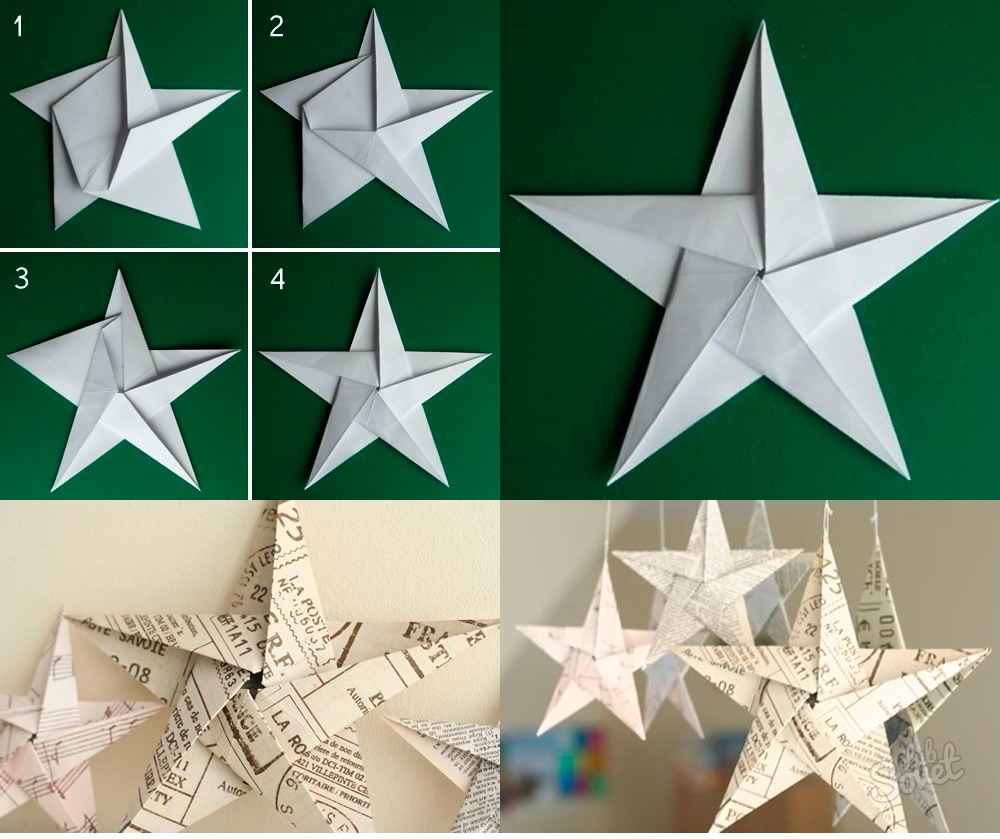
7. The corner of each vertex of a flat pentagon is compressed perpendicular to the surface with your fingers.
It turns out to be an interesting little star!

Origami
The following method, how to make an origami star out of paper, will also tell you about creating a three-dimensional form.
1. A square sheet is cut out of paper. The square is folded in half. The corner of the rectangle from the fold rises to the upper length and unbends, similarly - another corner at the same width.
2. The bottom corner of the opposite width approaches the center of the intersection of the last folds. Next, the same corner is pressed with its side to the new fold.
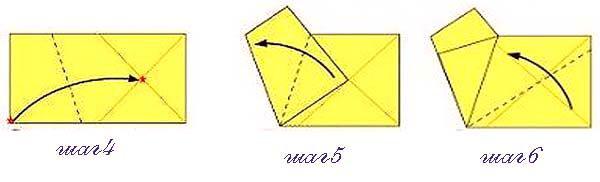
3. The lower right corner of the rectangle goes to the last oblique fold.
4. The imaginary larger half is folded back towards the smaller one.
5. Top part the resulting figure is cut so that the cutting line is approximately equal to the new smaller side. This results in an isosceles triangle.
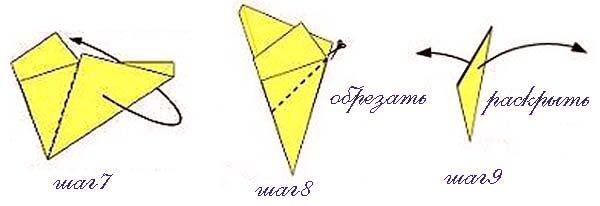
6. The whole figure is revealed. A three-dimensional star is formed.
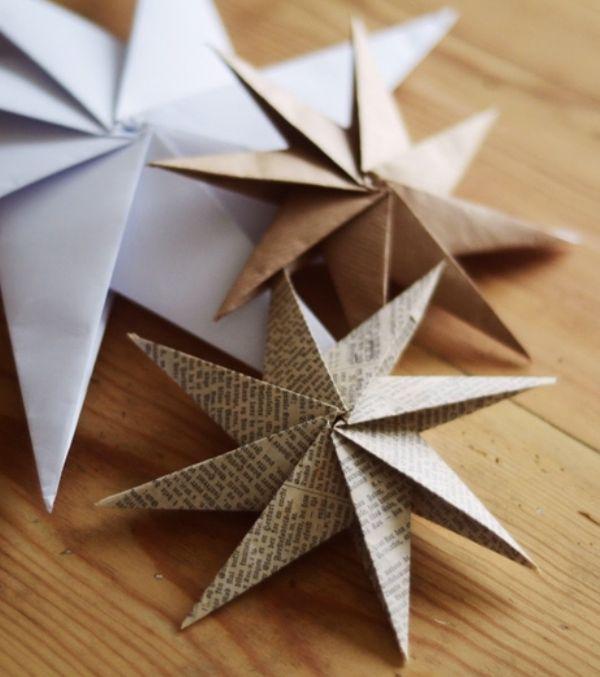
Origami: method No. 2
This instruction in origami style will tell you how to make an eight-pointed star.
To work, you will need several square sheets of paper and manual dexterity.
1. One of the squares is bent in half diagonally and turned back.
2. The upper ones are applied to the resulting fold line. sides.
3. The lower sides also rise towards the middle.
4. The upper corner is bent down obliquely and turned back, similarly at the same angle - to the other side.
5. The figure is turned over backwards and upside down at the same time. The upper corner is folded convexly, and the lower one, following it, rises along the upper oblique folds.
6. Similar to the received part, 7 more blanks are made.
7. The pieces are connected: the small corner of each next piece is inserted inside the large corner of the previous piece.

This makes an excellent eight-pointed figurine! You can also try something like making a star out of rubber bands; this type of craft is more complex, but no less interesting.
A paper star will not only decorate your home on the eve of the Christmas holidays, it will be suitable for educational activities with children. Making a three-dimensional paper star with your own hands is quite simple, and joint lessons will help develop the child’s imagination and hand motor skills.
An ordinary piece of paper can be a suitable space for creativity. Having given it the desired shape, the craft can be decorated by coloring it with felt-tip pens and paints. Imagination and manual dexterity will help your child create a masterpiece. This article will tell you how to make a three-dimensional star out of paper.
Required materials and tools
All the tools and materials that may be useful in work can be found in everyone’s home. Therefore, absolutely anyone can do this work. To create a star you will need:
- paper;
- protractor;
- compass;
- scissors;
- simple pencil;
- decorations.
Instructions for creating a volumetric star
Start making crafts by choosing paper. For work, you can use either a regular sheet or bright multi-colored paper. A voluminous star made of paper with your own hands can be made from durable material; in this case, the craft will be quite dense, and it can be used as a decorative decoration for a room or a Christmas tree toy. 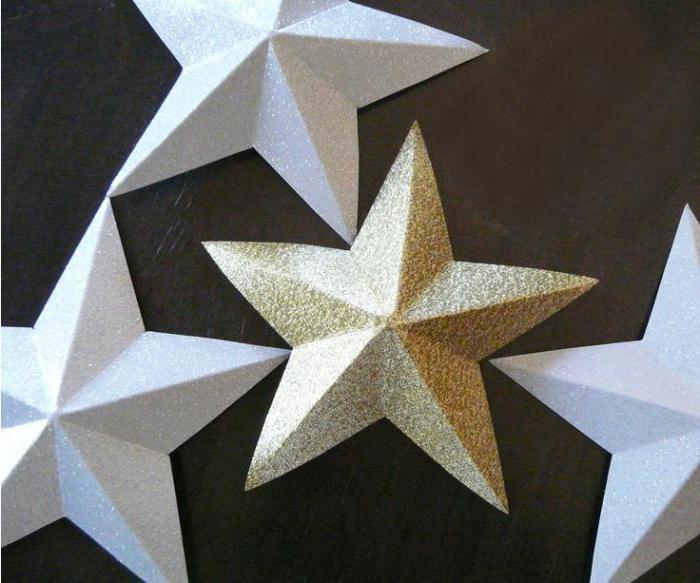
On the back of the colored paper you need to draw a circle, the diameter of which will correspond to the size of the star. A compass is suitable for these purposes, but if you don’t have one, then you can use a saucer or other round object. After this, you need to draw a line from the edge to the center of the circle.
At the second stage, a transport ruler will come in handy. With its help, you need to mark an angle of 72 degrees from a straight line and draw a line. In this way, you need to mark the entire circle - you get five lines.
The next step is to connect all the lines into a star. In the center of the part you need to draw additional lines as illustrated in the picture. After this, the star needs to be cut out and bent along the main lines so that the drawing faces inward. If thick paper was used in the work, then you should work much more carefully on the folds so that they are as pronounced as possible. For these purposes, you can use any blunt object (ruler, back of a knife, etc.). 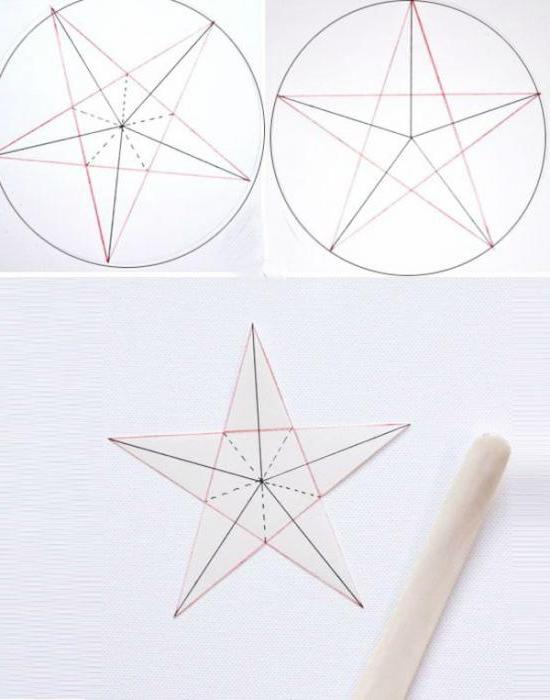
A voluminous star made of paper is made quite quickly with your own hands. Finally, you need to make a small loop so that the beautiful craft can be hung on the Christmas tree or somewhere else.
Double volume
This option is a continuation of the first instruction, which tells how to make one convex part. This master class will tell you how to make double volume.
According to the previous example, two similar elements should be performed. A 3D paper star template is presented below. Its difference lies in the fact that there are additional elements intended for gluing parts. 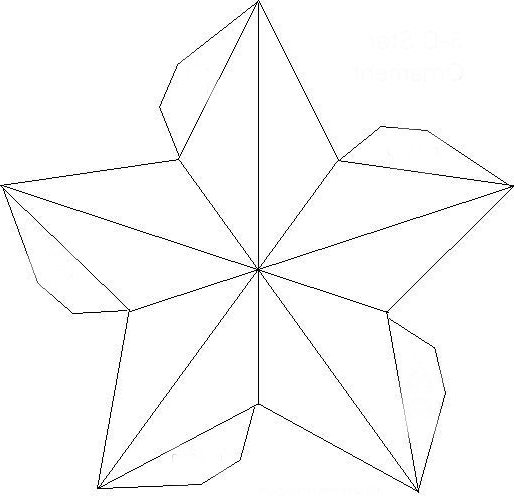
The elements cut out from the template need to be shaped and glued together according to symmetrical additions. All you have to do is wait until the glue dries, and the volumetric paper will be ready.
Star from book pages
And although this star looks very beautiful, many may not be happy about having to spoil books. This is not at all necessary, because they can be replaced with old magazines, newspapers or technical publications.
When thinking about how to make a three-dimensional star out of paper, first of all you should worry about the materials and tools necessary for the work. You will need a voluminous paper star; it can be made by following the master classes presented above. In addition, you need to prepare scissors, glue, and an old book. 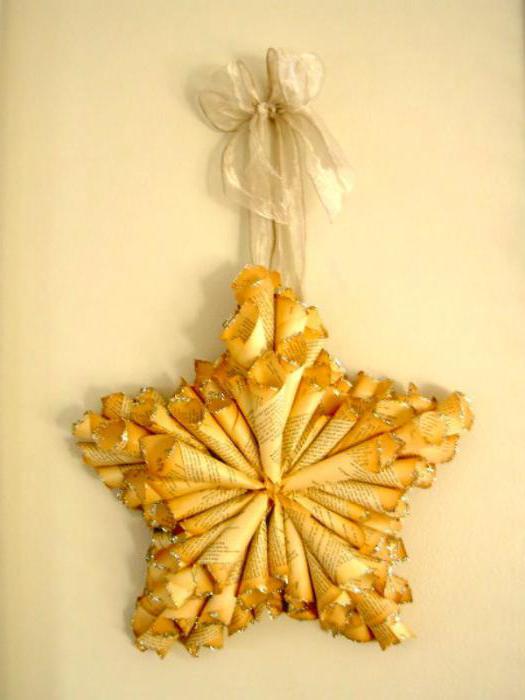
The first step is to make a lot of paper bags. For each of them you need a paper rectangle equal to one-fourth of a book page. When many parts are ready, they need to be glued to the paper star as shown in the photo. Finally, apply a little glue to the bags and sprinkle the craft with glitter.
A voluminous star made of paper with your own hands is quick and easy to make. To make it a wonderful decoration for a room, Christmas tree or gift, you can experiment with colors and sizes. Such elements can be fastened together using threads, glue or double-sided tape.


