Drawing a turtle with children. How to draw a question ant and a wise turtle
Turtles are very ancient animals that are characterized by slow and sedate movements. They live in many parts of the world, and they can often be found in zoos. But in order to understand how to draw a turtle, you don’t have to go to the zoo, just look at its photo or watch documentary on this topic. It’s also very good to learn how to draw a turtle from life, because these creatures are often kept in apartments as pets. And this is not surprising, because turtles are very unpretentious, not prone to aggression, and with proper care they can live an incredibly long time.
Before you draw a turtle with a pencil step by step, you must prepare the following items:
1). Pencil;
2). A pen with black gel ink;
3). Colour pencils;
4). A piece of paper;
5). An eraser.
Now, if all those office supplies that are listed a little above are already at hand, you can start learning how to draw a turtle step by step:
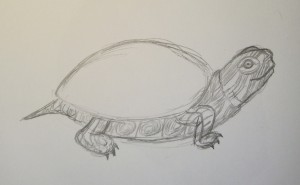
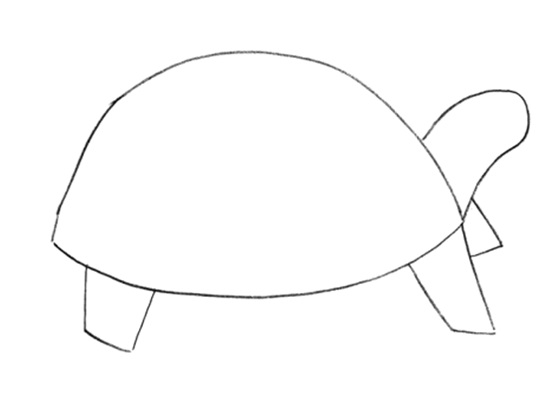
1. Using light strokes, outline the outlines of the turtle’s body and shell;

2. Draw legs and a small tail to the turtle’s body;

3. Draw claws on the animal’s paws. And on the turtle’s head draw eyes and a mouth;

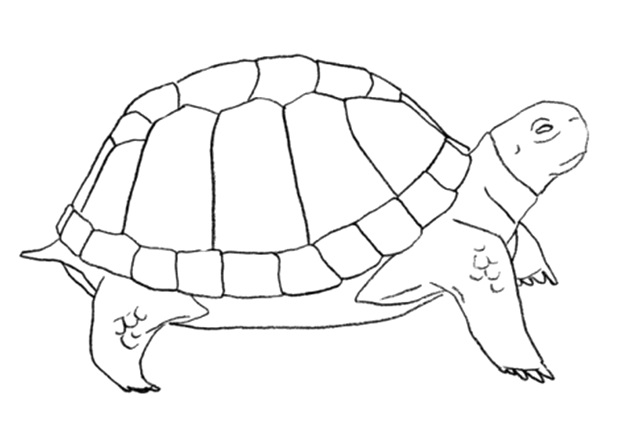
4. Draw a pattern on the turtle’s body;
5. Also draw her shell in more detail;

6. Now you understand how to draw a turtle with a pencil. But this is not enough to make the image look complete. It is best to color the drawing of a turtle using colored pencils. But first, trace the image of the turtle with a pen;
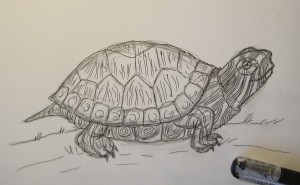
7. Then use an eraser to remove the pencil lines;

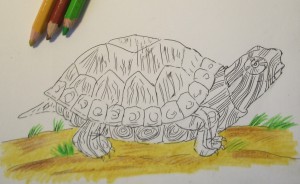
8. Use light brown and dark brown pencils to shade the ground, and color the grass green;
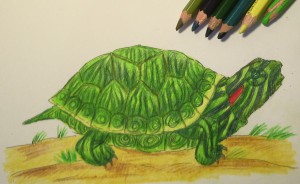
9. Paint the turtle’s claws with gray color. Use green and yellow pencils to color the animal’s body. Use a burgundy pencil to fill in the spot near the eye;

10. Using a yellow pencil, as well as pencils of various green tones, color the turtle's shell.
The drawing is completely ready! Now you know how to draw a turtle and you can teach it to your baby! The drawing can be done with a regular pencil! And if you still want to color it, you can use any paints, as well as felt-tip pens or watercolor pencils, which have a wide palette of shades!

Drawing is a fun activity for children. Depicting nature, animals and birds undoubtedly brings them great pleasure. Marine inhabitants, and in particular turtles, are distinguished by their special beauty and grace.
Drawing a reptile is not an easy task even for adults, but by depicting each part of the body step by step, you will be able to quickly reproduce a beautiful and believable turtle on paper.
The difficulties of depicting a reptile lie in the structural features of the body: quite unusual shape shell, the presence of many folds and wrinkles on the limbs, head and neck.
All these features appearance It will be possible to draw at the very end, when the torso is completely depicted and the limbs are sketched in pencil. For children, such a task will be quite difficult, so the help of parents is simply necessary here.
Please note that such drawings are best created using contours; this will simplify the task for children. If you want to draw a turtle as realistically as possible, then you should make sketches by drawing simple geometric shapes.
Try to recreate the animal by drawing rectangles, circles and triangles. Using this drawing technique, you can quickly hone your skills, and it will be much easier to depict animals and birds on paper.
Before you start drawing a turtle with a pencil step by step, you need to prepare everything you need: paper, pencils of varying degrees of hardness, an eraser.
Don’t forget about a stick designed for rubbing hatching; if you don’t have such a tool at hand, you can use plain paper that has been previously rolled into a cone shape.
Having drawn the turtle step by step with a pencil, you can begin to paint the resulting image. For this purpose you will need both colored pencils and paints (preferably gouache).
Well, now we draw a turtle together with the children step by step, following the instructions described below.
The process of creating an image of a reptile
- First you need to prepare a sheet of paper. We draw a horizontal as well as a vertical line that will intersect in the center. This procedure is necessary so that you can easily navigate and understand where exactly you need to start drawing a turtle. This is what the markup looks like before starting work.
- Next we draw simple geometric figures, we get a kind of blank. The carapace is most body, so it should be sketched out first; then it will be easier to determine the proportions of the remaining parts of the turtle’s body.
It is worth taking into account that it is necessary to make a pencil sketch with not too thick strokes. Thick lines will be much harder to erase later with an eraser.
- Now you need to make the neck more distinct, draw the eye, and detail the forelimbs. Don’t forget to draw a small tail, draw it as clearly as possible.

- Step by step, we schematically draw the shell with a pencil, draw the muzzle, and make adjustments to the structure of the front part of the reptile’s body. This activity can be entrusted to a child, he will quickly cope with the task.

- Upon completion of the drawing, you can erase unnecessary lines with an eraser, draw folds on the front and hind limbs, and draw toes on the paws. It is also necessary to round the depicted cells of the shell, thanks to this they will look more voluminous.
- Finally, we will paint the turtle using gouache. To draw the cells of the shell, it is better to use several different shades to make the image lively and realistic. Applying shading in the area of the neck and muzzle will help create a shadow, thereby conveying all the structural features of the body as accurately as possible.

There are many options for how to draw a turtle step by step, but the proposed method is quite simple, and besides, the drawing turns out very bright and lively.
For children, this activity will be very fun and entertaining. Thanks to the guidance of adults, a child will be able to draw a reptile in 10-15 minutes.
However, you don’t have to paint the sketch with a pencil; it already looks great; by rubbing the shading, we clearly highlight the parts of the body, as if we “revive” the turtle.
Dreams are different. Some people dream of skydiving, others want to have pleasant experiences traveling to distant countries, and others want to learn languages. Learning to draw is also someone’s dream, and quite achievable.
Visual talent is a gift from God; for some it is given initially, while for others it is difficult to convey a complex picture on paper. However, you can learn how to draw a turtle or fish, trees and flowers by following the tips.
Choosing a character
Decide what kind of turtle you will draw. Will it be an aquarium inhabitant or the heroine of programs about wildlife? A popular option is such cartoon characters as the cartoon character “Lion Cub and the Turtle”, the wise resident of the pond from the children’s fairy tale “The Adventures of Pinocchio” Tortilla or the Teenage Mutant Ninja Turtles? The answer to these questions is a hint on how to draw a turtle. If the image of the listed heroes seems too complicated for you, opt for an ordinary sea creature.
How to draw a turtle with a pencil step by step
One option for depicting our heroine (side view) is to start with a sketch of the head. Draw an elongated oval of irregular shape, mark a circle or point inside - the eye. Don’t be afraid to make the wrong move and ruin the drawing, since clear lines and perfect symmetry are not found in nature. For work, choose a thin pencil that can be easily erased without a trace. After removing the extra lines, the image will need to be outlined in a dark color or colored. The success of such an activity as drawing a turtle with a pencil lies in the accuracy of the drawing and the absence of dirt.
Draw a line of the mouth on the face, then outline the paw. Afterwards, draw the shell by combining the lines of the head and paws. Divide the large part into the shell and abdomen with legs, decorate the back of the turtle with a pattern. 
The listed rules do not have to be followed strictly; your picture may differ significantly in the shape and pattern of the shell, the size of body parts from the example given. The main thing is that all the details are present, including the small tail.
Drawing a turtle: portrait
It is more convenient to depict someone in profile or from above; full-face drawings are much less common. How to draw a turtle also depends on the position of the character. The portrait image will be cute and visual. 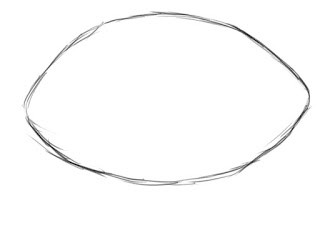
First, we draw a detail that resembles a pie, which we divide with 2 uneven lines. 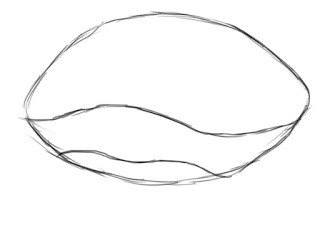 In the center between the stripes we place a circle - this will be the head, on the sides we add legs, one of which is bent during movement.
 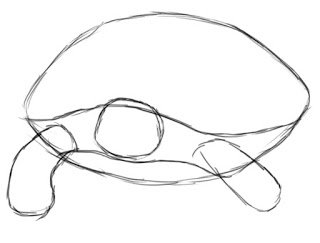 Erase the extra lines, draw the claws and a piece of the third paw. Inside the circle, draw a smaller circle - this is the face.
  The look will be complemented by 2 round expressive eyes, eyebrows, two dots and a line above them - a nose and mouth in the form of a curved line.
  The pattern of the shell can be made in relief by shading some areas - creating an imitation of the play of light and shadow. The edges of the details that make up the pattern, shaded on one side, appear convex, and the image appears three-dimensional.
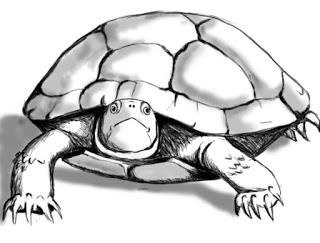
These simple tips and examples will help you find your solution on how to draw a turtle.

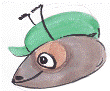
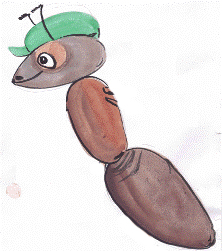
All first-graders are familiar with an inquisitive ant named Question. He goes to school with the guys and studies the world. And the Wise Turtle helps them in this, who showed him the way to school. As you may have guessed, we will draw exactly these characters.
Ant question
Let's first look at how to draw a Question Ant step by step.
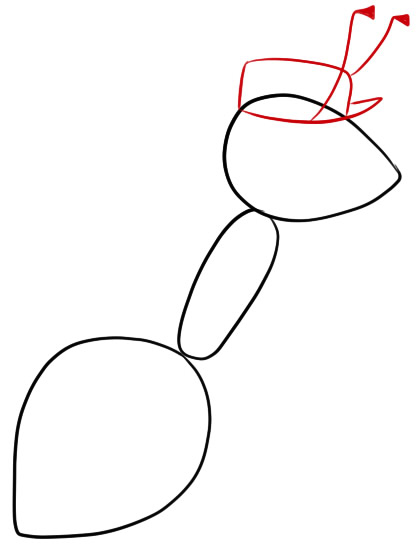
Stage 1
Sketch the outline. It can be represented in the form of simple figures. The head looks like a sunflower seed, outline the body in the form of an elongated oval, and then something like a droplet.

Stage 2
Detail the head. Draw the cap and mustache. Then erase the unnecessary line. Draw an eye - 2 circles and a dot, then draw a mouth. It's pretty simple.
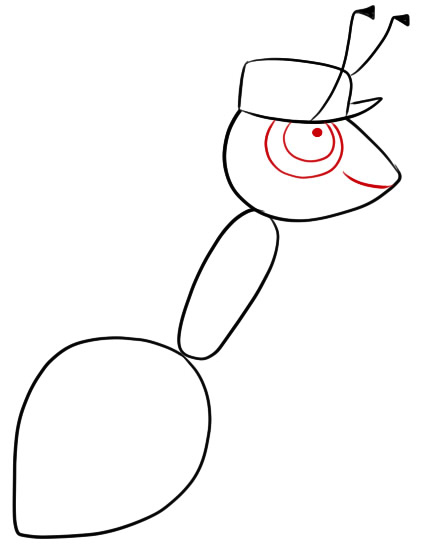
Stage 3
The next step will be drawing all the limbs. Carefully outline the upper legs, look how graceful they are. Then draw the same thin lower legs. They act as Questioner's legs, so put him in boots.
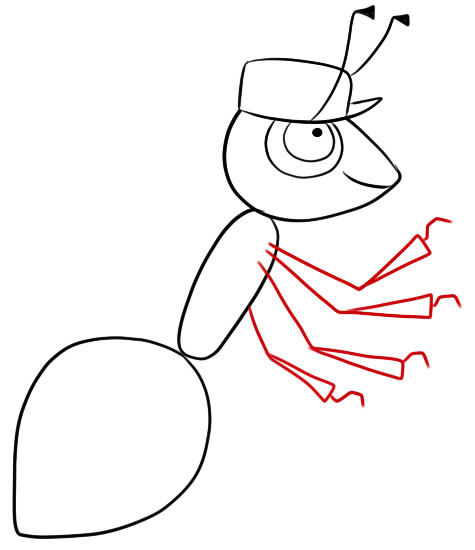
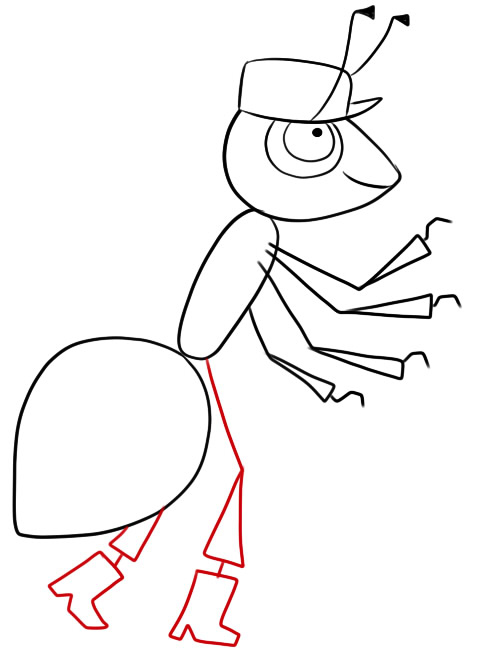
Stage 4
You remember that our character is a first grader, right? Show the backpack on the student's back. Add details to the backpack - buttons and a pocket.


This is such a wonderful Question that turned out to be, you can also color it at your discretion.
Drawing example for children
Surely many mothers are wondering how a child can draw an ant Question? And we will show you.
Draw the head in the form of a seed. Add a nose in the form of a dot and a mouth in the form of an arcuate line. Draw the eye, cap and antennae.
Then take care of the Ant's body, it consists of two parts: an oval and another seed. Add a couple of touches for some dimension.
Now draw four thin upper legs and two lower ones. Don't forget that your lower paws are in boots. You can color the ant at your own discretion or color scheme, in which he is depicted in the textbook. Look what a wonderful ant!
Wise turtle
And now we will show you how to draw a Wise Turtle.
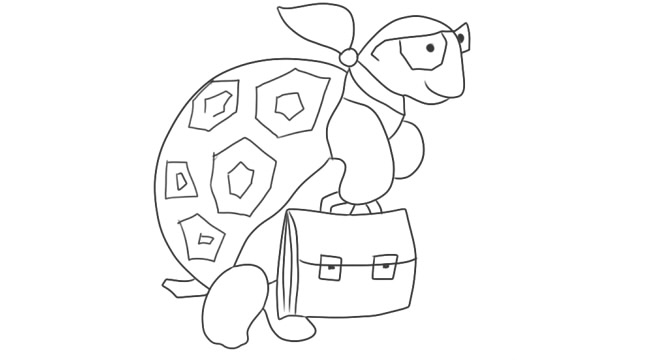
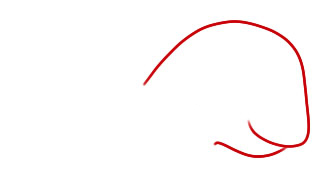
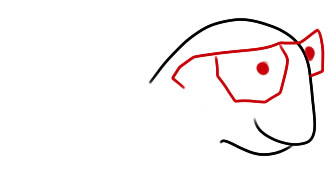
Outline the silhouette of the head: first draw a semicircle, and then draw the mouth and lower jaw, as shown in the example.
Our heroine is no longer young and smart, so she wears glasses. Draw glasses and dots in them - eyes. It is also necessary to add an important detail from our character’s wardrobe – a scarf around the neck.
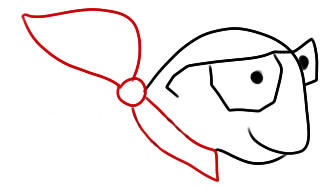
Start drawing the shell. Smoothly outline a semicircle and then a transition line between the back and the stomach. It doesn't have to be straight out. Don't forget to leave an outlet for the paws.

Now take hold of the paws themselves. First the upper ones, then the outline of the abdomen, and then the lower ones. Erase the extra lines.
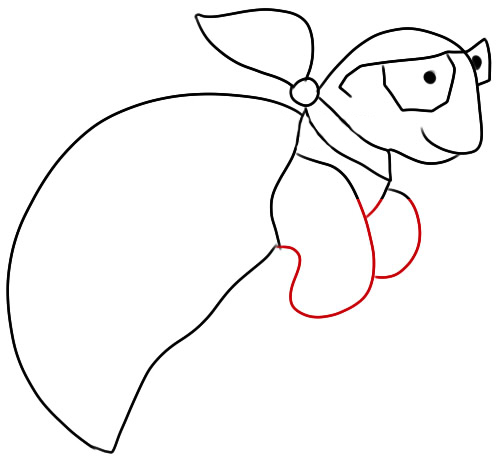

Draw a small tail. The turtle carries a whole store of knowledge, which is in her briefcase. Draw its outline in the form of a curved quadrilateral.
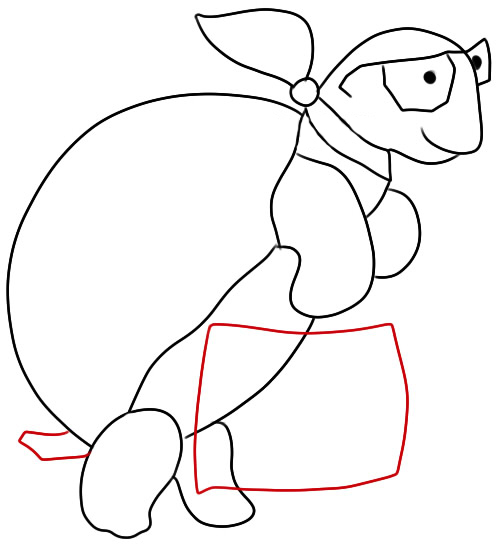
Arm yourself with an eraser and erase all unnecessary lines. Add some details. Show the rivets and side pleats on the briefcase. And also draw the handle that the Turtle holds the briefcase. The shell can also be detailed, for example, decorated with patterns such as in the picture below.


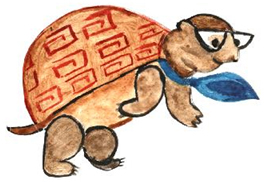
All that remains is to paint.
An example of drawing a Wise Turtle for children
Children also want to portray this interesting character. This is not difficult to do, because we will show you how to draw a wise turtle for a child.

Draw a semicircle. This will be the turtle's shell. Decorate with an extraordinary ornament.
The most important step is to outline the paws, a small tail and a scarf. Color the drawing. This is how the Wise Turtle came out.
Now you know how to draw these school favorites. You can show them apart, but it's even better to present them together. We wish you success!
After today's lesson you will learn how to easily draw a turtle. Here's a special video. After watching it, you will learn how to create a drawing of such a cute turtle.
In addition to the video tutorial, I picked up several step by step instructions that will help you understand how to draw a turtle. Shall we begin?
How to draw a funny turtle with a pencil step by step
First draw a small oval - this is the head of a turtle. Below, draw the shell in the form of a figure resembling a semicircle.
Now you need to combine the head and shell of the turtle by drawing two curved lines from one point. Draw a semicircle shape on top.

Draw three legs (we don't see the fourth). Draw a line under the shell - this is the body of the animal. And another one important detail- small sharp tail.
![]()
And now the most difficult thing is to draw the turtle’s eyes, or rather only one eye, because the other is not visible. You need to add folds above the eyes, and at the left eye you also need to add a corner of the cheek. Using two long curved lines draw a nose. Place a dot closer to the bottom edge, and draw a wide smile even lower. And to make our turtle drawing look more realistic, we need to add a few folds to the neck.

We are approaching the finish line - erase the extra lines and draw the contours.
I am delighted! Did you like it?

This is interesting! Did you know that turtles can live over 100 years? You can find out about age by counting the rings on the scutes that make up the turtle's shell. These animals also know how to remember people’s faces. They crane their necks when you talk to them sweet words, and if you talk rudely, they hide in a shell.
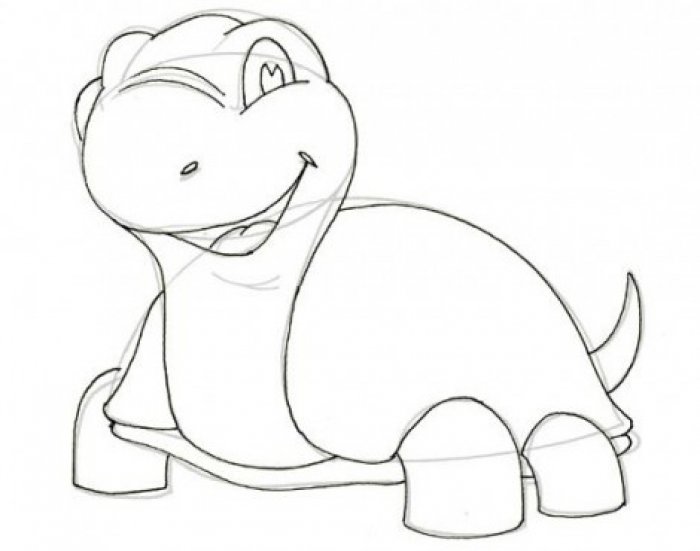
How to draw a cartoon turtle
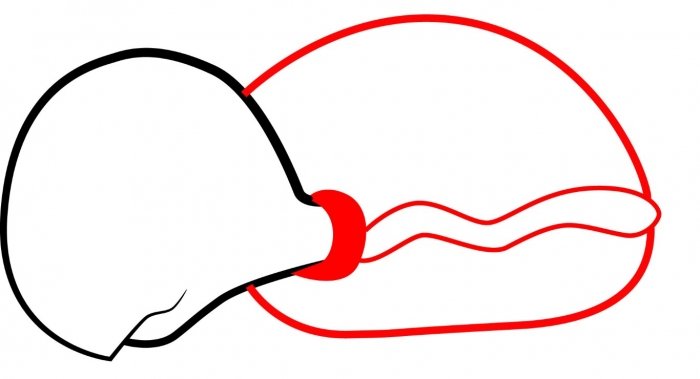
On the left side of the paper, draw something similar to an oval. Add a line at the bottom - this is the turtle's mouth.

Now draw another oval, which will be larger than the previous one. Closer to the bottom edge, draw two wavy lines - the border between the shell and the body of the turtle.
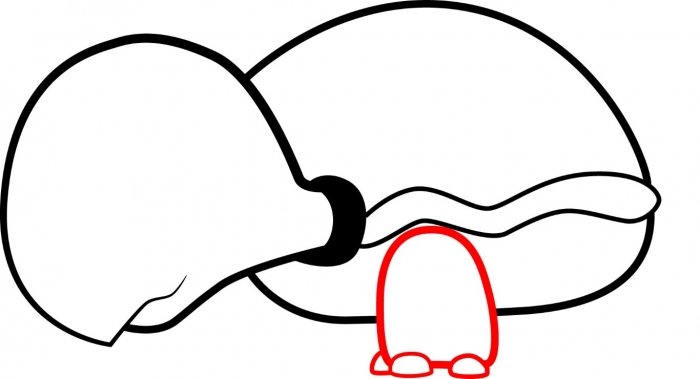
A little more - and the drawing of the turtle will be ready. Draw the turtle's legs.
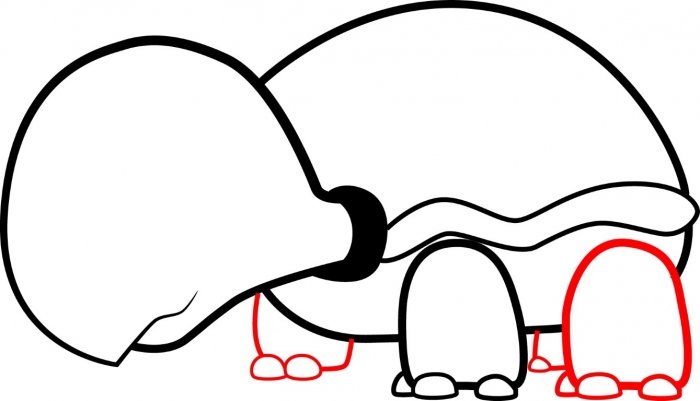
Now all that remains is to draw the eye and tail of the turtle.
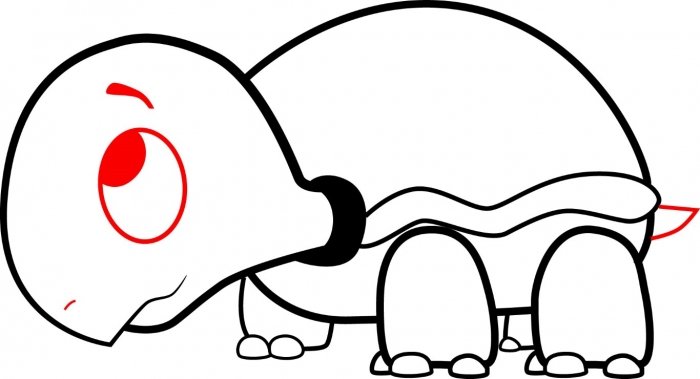
Color the picture.