Learn to draw cool drawings step by step. How to learn to draw beautifully with a simple pencil for beginners? Drawing is fun
Mark Kistler is one of the most popular and award-winning art teachers in the world. For many years he has hosted the program “Mark Kistler’s Imagination Station” on national television. Author of nine books, including the best-selling children's textbook Drawing in 3D with Mark Kistler.
In the previous introductory article, you learned about the basic principles of drawing three-dimensional drawings with a pencil.
Pencil drawing is one of the art forms. Pencil drawing is the basis for any artist's work. Therefore, in order to confidently draw objects, animals and even portraits, you must learn how to draw with a pencil. Having mastered the technique and simple methods drawing, you will find it easy to draw more complex things. In this pencil drawing tutorial we will learn technical graphite pencil drawings step by step.
First, we must remember the pencil drawing technique. You may have noticed that there is more pressure from the pencil to the paper than the darker lines. This is a very important factor for drawing with a graphite pencil. With such a simple discovery we will be able to set the tone, add shadows and draw graphics. Try experimenting with the tone of a realistic pencil drawing on paper.
In this article, I will tell you what tools you will need to draw 3D images, how to plan your classes, and we will also conduct a pre-exam to see how well you can draw at the moment.
What you will need:
1. Album or sketchbook (minimum 50 sheets).
2. Pencil (for now, you can take any pencil that is on hand).
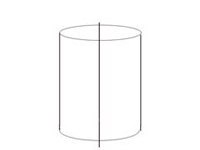
Once you've learned how to change the tone with a pencil, try drawing a simple object. For drawings you can use any household items. First draw a vertical midline for an object. Using it, you can observe the proportion of the drawings, then draw a basic sketch of the subject.
Don't choose an object that is too complex with many edges. A regular glass or mug is ideal for starting to learn how to draw with a pencil. 
After the contours of the mug are marked, you need to indicate its details. From the previous shape, draw a new sketch. Add additional details such as crown etc. these contours will be weak. They are always easy to fix or remove.
3. Planning or calendar (perhaps the most important thing on the entire list!). You will need to systematically allocate 20 minutes every day for drawing. So you need to plan for it and track it.
Step one
Take your planner and pencil - let's create a drawing lesson schedule for the first week. I know your days are extremely busy, so you might want to break one twenty-minute lesson into two ten-minute ones.
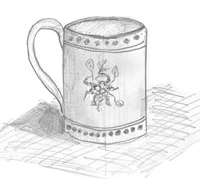
At this point you draw in some details and start adding shades to the mug. When you create a shadow for an object, you must indicate the direction of the light. The sun will be on right side my illustration. So that the shadow increases on the left side. Draw the shadows with strokes, this will give the style of pencil drawing.
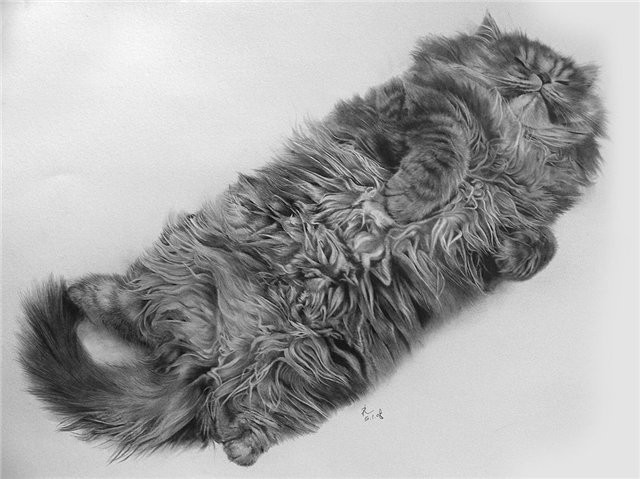
This mug was just an example. Drawing animals or moving objects requires some pencil drawing experience. But if you want to draw it, you can find lessons about animals and humans that we have on the site. Check out my other pencil drawings! When drawing many objects in a picture, you should focus on the main device. Draw the main objects more attractively.
My goal is for you to commit to spending a week with me. I know that after seven lessons you will love it. Immediate success is the greatest motivator! If you can draw every day for a week, you will successfully complete your training in a month.
However, it is perfectly acceptable to take a more leisurely approach and focus on a few lessons per week, spending much more time on lessons and additional assignments at the end of each lesson.
With this portable design course, you can easily acquire the art of painting, from the fundamentals to the most advanced techniques! Whether you are a beginner who wants to learn the rudiments of painting, or if you want to draw your advanced art skills, this game will help you become an artist!
Open lessons from the Academy of Arts
Each lesson follows the creation of a simple step-by-step drawing using a stylus, as if it were a pencil or brush. After completing the main lesson, there are other mini-lessons on different subjects with which you can put your skills into practice.
Draw and paint with flowers, pencils and brushes
In the classes you will learn everything you need to become an artist, and you can even apply what you learn in real life. This virtual painting course will make you feel like you are using real colors, pencils, and brushes!The main thing is don't give up!
Step two
Start drawing! Sit down at your desk, take a deep breath, smile (it really has to be sincere!), put a piece of paper in front of you and begin.
Test yourself. Pre-exam
So let's put pencil to paper and start drawing.
Let's start with a small pre-exam, which will be a starting point for you in the future.
Free painting with the Academy of Art
Using the tools of the craft, you'll also learn drawing techniques and drawing strategies to create stunning effects! It also acts as free program design when you happen to see something that will be immortalized with an artistic touch! Free mode allows you to use all the lesson tools to play and save your artistic compositions!
Here you will find all the screenshots, you can see the video lessons and admire how the artists use the Academy of Art as a course, but as a drawing program. You will also see a reproduction of Vermeer's "Girl with a Pearl Earring"! If funds have not yet been linked, this will be possible at the time of purchase. Once logged in, you will be able to view details and complete your purchase.
I want you to draw some objects. Relax! You are the only person who will see this. I want you to draw images that will serve as a starting point that you can use to track your progress in your drawing skills. Even if you're tempted to skip this part, get yourself together and draw these pictures! In thirty days, you'll be glad you did it!
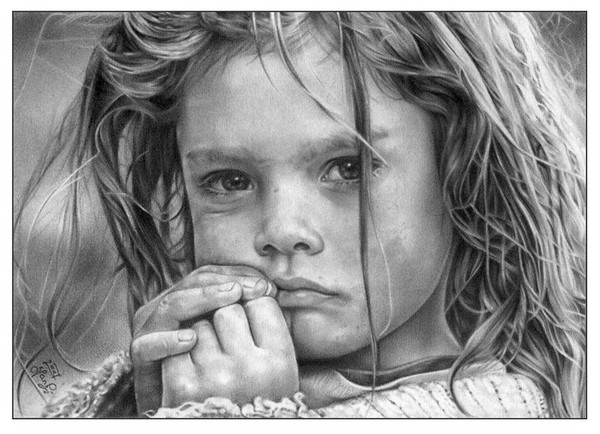
How to quickly learn to draw a person with a pencil?
You can check the details and complete your purchase on the next screen. The console must have the most up-to-date system software and must be connected to the Internet. In addition, it must have sufficient free space and must be configured to download automatically. For more information, visit the Consumer Service section.
Make sure you have enough free space on your console. This product is equipped with technical protective measures.
How to quickly learn to draw a person with a pencil?
You can check the details and complete your purchase on the next screen. The console must have the latest system software and must be connected to the Internet. In addition, it must have sufficient free space and must be configured to download automatically. For more information, visit the Consumer Service section.
Open your notepad. At the top of the first page, write “Day 1/30, Pre-Exam” and include today’s date and time. (Repeat this information each time with the appropriate lesson number and title).
So, draw:
2) Airplane
3) Bagel

I hope you're not too tired? Are you having fun? I want you to keep these first drawings in your notebook. You can compare them later with the drawings at the end of the course. You will be amazed at the phenomenal improvement in your skills!
Professional drawing training in art schools begins with graphics; this is the basis for the vision of drawing. Color distracts from the main thing, confuses and prevents you from seeing light and shadow. First, you should learn how to convey an image with a simple pencil. This trains the eye to see tone, which is much more important than color when creating a drawing. If you learn to draw with simple pencils, then working in color will be much easier later, because it will be clear where you need to lighten and where, on the contrary, darken. We will try to tell basic information on the topic of how you can easily learn to draw pictures on paper with a simple pencil for beginners. There are many courses in drawing, graphics and painting krasnoyarsk.videoforme.ru - learning to draw with the help of them is much easier and more interesting, since the process of completing the work is controlled by professional artists who will always tell you how to do it right.
How to learn to draw with a pencil for beginners (selection of materials)
Drawing with a simple pencil is good because it does not require large investments. You will need materials that every home has.
1. Thick paper
An album, a sketchbook, just regular drawing sheets - anything will do. The main thing is that the surface is dense and without auxiliary lines. Yes, it is much easier to draw by cells, but you must learn to draw straight lines yourself.
Try painting on watercolor paper as well, it has a grainy surface and is fun to work with.
2. A set of pencils of different densities
There are several types of pencils: soft, hard and hard-soft. They are easily distinguished by their different markings.
Russian markings:
M - soft;
T - hard;
TM - hard-soft.
European marking:
B - soft;
H - hard;
HB - hard-soft.
Usually an HB pencil is used for drawing; it is not too soft and not too hard, which allows you to work out light and shadow.
You can supplement this pencil with a soft pencil; to draw shadows or accents, a 2B pencil is sufficient.
It’s a good idea to get one hard pencil N. Use it to make fine lines, for example, to draw strands in your hair.
Many different sets are sold, most often from 5 to 12 simple pencils. There are different softnesses that can make creating works easier, but for a beginning artist three pencils will be enough.
The main thing here is that it washes well. There is no need to buy bright erasers in the shape of berries or animals; they are usually inferior in quality to the most common gray and white erasers. You need an eraser that can erase hard and soft lines without smudging the graphite.
Stationery knife
You will need it to sharpen pencils efficiently. It would seem like such a small thing, but it helps a lot during work. Pencils often break after sharpening, are not sharp enough and become dull faster.
How to sharpen pencils correctly
1. Take a pencil for sharpening
2. We step back a few centimeters from the edge and begin to remove the wood in large pieces, but not to the point of graphite.
3. Cut off the small flakes about a centimeter near the tip.
4. Remove excess graphite from the lead until the tip becomes sharp.
Now all the necessary materials have been purchased, pencils have been sharpened, and the question arises where to start. The creation of each drawing has certain sequential stages, according to which you can learn to draw beautifully with a simple pencil.
Composition
Any drawing begins with composition, or the arrangement of objects on the sheet. It doesn’t matter what you are going to depict: a person, a flower, a building, or something else, it’s all about how you arrange them. This is especially true for drawings that depict several objects. It's easier to speak specific example. Let's imagine that in front of you is a table with a vase, a cup and an apple. In order for the work to turn out harmonious, you must first try to determine from what angle they look most interesting. You can move objects and walk around the room in search of the most successful view. Having set to work, we must convey objects in their unity and interconnection. How to do it? Look at objects, simplify them to geometric shapes. Geometry is in everything, you just need to learn to see it. So, we can have a vase - a vertical rectangle, a cup - a smaller rectangle and a circle - an apple. Based on this, we turn the landscape sheet over vertically and begin to roughly arrange the objects.
It is always important to initially make a simple arrangement of geometric shapes, from which we then create a drawing. This makes further drawing easier. It’s a shame to draw, for example, the entire cup and realize that the vase no longer fits. Composition saves us from the errors of disproportion.

Construction
The next stage is working out the details of the drawing, or construction. We always start with the largest item. If we talk about still life, we start with a vase. Ours is symmetrical, that is, its right side is a mirror image of the left. So we have to convey this in the drawing. Draw a straight line down the center of the space allocated for the vase. Feel free to try on items. Pull the pencil in the direction and consider, for example, that the height of the vase is twice its width. Let's look again at the objects on the table. Let's say we see that the cup is exactly half the height of the vase, etc. By measuring objects relative to each other, we obtain the harmony of the image. So we slowly draw the image on the sheet.
Tonal analysis
Having built the objects, we got an outline, but this is not enough for a drawing. You can bring objects to life using light and shadow - this is how depth is created. Look carefully at the objects, determine where the light is coming from, which part is the most illuminated and which is the darkest.
A little secret: when peering at objects, squint your eyes. They will become less bright in color, and it will be easier to see light and shadows.
You can make marks with a pencil, highlighting the darkest parts and highlights of light. This will make it easier when shading.
How to learn to draw with a simple pencil (shading)
The main thing you need to learn in order to draw correctly on paper with a simple pencil is the ability to hatch. You can take landscape sheets and practice different shading options. The temptation is great to quickly scribble with a pencil and then smear it with a piece of paper or your finger. But doing this is wrong. The essence of graphic objects is largely reflected by the stroke itself, its direction, thickness and length. Shading, of course, also takes place in drawing, but not constantly, but as an element.

Basic rules of shading:
1. Shade, repeating the shape of the object.
For realism, we shade along the contour, thus conveying shape and volume.
2. We go from shadow to light
As we said above, almost any object has illuminated and darkened areas. Usually the transitions between them are quite smooth, and we need to convey that. One of the working methods is to gradually move from the shadows to the light, making the lines thinner, longer and lighter.
3. Short strokes
Do not try to shade the entire large area with one long line at once; it is better to break it into small ones.
4. Share plans
Objects in the foreground are more carefully worked out, and in the background it is enough to simply outline the general tone with the side of the stylus.
5. The more layers, the smoother the shading
If there must be several layers, then it is better to take a hard pencil, then they will be more accurate
The main rule in order to learn how to draw with a pencil is to devote as much time as possible to this. Daily classes will teach you to see objects correctly, capture details and transfer it to paper. Many people say, I want to learn how to draw with a pencil. But they don’t want to learn the rules and practice shading processes. But lightness of hand is earned through hard work. But drawing is a fascinating process that generously rewards the artist for his diligence with the joy of creativity.
P.S. My name is Alexander. This is my personal, independent project. I am very glad if you liked the article. If you were looking for something and didn’t find it, then you have a chance to find it right now. Just below there is a link to what you recently searched for. I will be glad if I prove useful to you twice.
Copyright site © - This news belongs to the site, and is the intellectual property of the blog, is protected by copyright law and cannot be used anywhere without an active link to the source. Read more - "about Authorship"
Is this what you were looking for? Perhaps this is something you couldn’t find for so long?


