Transferring the operating system from HDD to SSD. How to transfer the operating system to another hard drive Utility to transfer the system to ssd
Reading time: 8 minutes
Before the new year, I decided to upgrade my computer and replace the hard drive with a newfangled ssd drive. Its advantages and disadvantages (where without them) are already well known to everyone, so there is no need to paint them once again.
Until that day, I had not had the practice of using ssd drives, so I wanted not only to increase the speed of the computer's disk subsystem, but also to try how burdensome it would be for a simple user to move from a regular hard drive.
The first thing to choose was the most optimal way to transfer the entire operating system (in my case, Windows 7) along with all the drivers, settings and other software goodness from one disk to another.
After a little googling, it became clear that there are several migration methods. I liked the option from the company "Paragon" she has already taken care of users who wished to move to an ssd drive and created a program called - Paragon Migrate OS to SSD.
Paragon has a good reputation for making quality software, so I decided to use their data transfer software. Looking ahead, I will say that the chosen method fully met all my expectations.
The second question is the choice of the disk itself and its volume. Here I just asked my friend for advice and he pointed out several models that, in his opinion, are the best solution.
In the nearest store, a Corsair Force 3 SSD 120 was available, which was purchased.
Since there was no space in the system unit for another disk, I connected the ssd disk via a usb cable using a special adapter to copy data.
 So, everything is connected and ready to transfer data. For copying, as I said, I used the Paragon Migrate OS to SSD program. After starting, a wizard opens, following the instructions of which everything can be easily transferred.

Be sure to read the explanations that the program issues in the process.
The first step is to analyze the equipment.

After the completion of which, the partition on which the operating system is installed will be determined. 
At this stage, you need to select the ssd disk to which the copy will be made.
In the next window of the wizard, if necessary, you can select only those folders that you want to copy, excluding unnecessary ones in order to save space on the new disk. 
By clicking on the inscription - Please select folders to copy- a window for selecting folders and files will open 
I did not exclude anything, since the capacity of the new ssd disk was enough for me. It also makes sense to activate the item - Use all available space for the OS partition, unless of course you are going to make additional partitions on this disk.
After we have decided whether all the folders will be copied and whether we will give the entire disk to the system, press the button - Copy and wait for the end of the process.
When copying is completed, a message will be displayed with the result and further recommendations. 
Everything, the data is copied, it remains only to replace the regular hard drive with an ssd drive and boot from it.
After starting the computer, the operating system loaded, all files, folders, programs and drivers were in their places. Moving to ssd was a success, but I think it is necessary to clarify some features related to the operation of ssd drives.
It is recommended to use AHCI mode for the SATA controller. Therefore, you need to check whether this mode is enabled or not:
In the "Start" menu, open the "Control Panel".
In the "View" tab, turn on the display mode "Small icons".
Launch "Device Manager".
In the "Device Manager" look for the branch "IDE ATA / ATAPI controllers", open it and look at the AHCI controllers.
If the AHCI controller is listed, then the system is running in AHCI. mode
If there is no AHCI controller, then the system is started without AHCI support 
AHCI mode is recommended to be enabled. How to do this with an already installed operating system is described in detail and well in the Microsoft technical support knowledge base article, which I recommend reading in order to avoid problems when enabling AHCI mode.
It is also necessary to check if the TRIM mode is enabled (details about the TRIM command). It allows you to ensure fast operation of the ssd disk for a long time.
In order to check whether the TRIM command is enabled or not, you need to enter the following query on the command line (run as administrator):
fsutil behavior query DisableDeleteNotify
Many older (or cheaper) Windows laptops come with traditional mechanical hard drives, which are quite outdated and slow these days. Upgrading to a new, ultra-fast solid-state drive (or SSD) is the surest way to speed up your old computer. There's one problem: moving your Windows installation can be tricky, especially because SSDs are often smaller than their traditional hard drives.
However, there is a way to move your installation of Windows 7, 8, or 10 to an SSD without reinstalling Windows. It takes a few extra steps, but much less time.
What do you need in order to transfer the system from hdd to ssd?
Apart from your SSD, you will need a few more things to make this process work. Here's what we recommend:
- How to connect your SSD to your computer. If you have a desktop computer, you can simply install the new SSD along with the old hard drive on the same machine to clone it. However, if you're using a laptop, this is usually not possible, so you'll need to buy something like a SATA to USB cable (shown on the right), which will allow you to connect a 2.5" hard drive or SDD to your laptop via USB. You can also install your SSD in an external hard drive enclosure before you start the migration process, although this is a little more time consuming.
- A copy of EaseUS Todo Backup. Its free version has all the features we need to complete the task before us, so download the free version and install it just like you would any other Windows program. WARNING. Make sure you click the Configure link on the Install Additional Software page and uncheck all boxes otherwise EaseUS will try to install some related crapware along with the disk cloning tool.
- Data backup. We cannot stress this. It's completely stupid to start fiddling with your hard drive without a backup. Check out our guide to backing up your computer and make sure you have a complete backup of your important data before proceeding.
- Windows system recovery disc. It's a tool anyway. To prevent damage to your Master Boot Record, you can appear on a Windows repair disk and fix it in minutes. Follow these instructions for Windows 7 and these instructions for Windows 8 or 10. Don't forget to print a copy of our bootloader repair guide so you can fix it if you need to. No. Do it. Burn this CD and print this article - if you find it, it will save you from having to find another computer to create a bootable CD.
Now let's move on to instructions on how to How to move system from HDD to SSD?
Step One: Remove Your Current HDD
If you're moving to a drive that's smaller than your current one, which is often the case if you're moving to an SSD, you'll run into a problem right off the bat. Your target drive doesn't have enough space for all your files!
To check the capacity of each drive, plug the SSD into your computer and wait for it to appear in Windows Explorer. Right click on each drive and select " Properties". In the two screenshots below, you can see that the used space of our old drive (left) (141 GB) is larger than our new drive (right) (118 GB) can hold.


You will probably run into something similar. Therefore, before transferring data, you need to clean up your current hard drive.
Start by deleting any files you don't need. This means that old movies, TV shows, series, music, old backups and everything else take up a lot of space. Remove any programs you no longer use, then run Disk Cleanup to get rid of any other unwanted file on your system. You can even run a program like CCleaner to make sure everything is squeaky clean.
This will help a little, but in some cases it may not be enough. If you manage to delete the files, it means that you will need to find a new place to store your personal files like your photos, documents, movies, music, etc. because they won't fit into your new drive.
You have several options:
- External hard drive: if you have external hard drive(which you don't use for important backups!), it's time to use it. You will need to move all your precious files to it in order to shrink your partition Windows.
- Second internal drive A: This is usually not an option for many laptop users, but if you're a desktop user, you can buy a large, cheap secondary hard drive and transfer your files to that. You can even move the location of your documents, music, and other folders after the migration, so Windows never misses a beat.
- Cloud Storage: If you don't have additional hard drives, you can move those extra files to a cloud solution like Dropbox or OneDrive. Just be aware that if you don't have your personal files stored in the cloud, it may take some time (like days or even weeks) to download them, so just be prepared. Once you've moved all of your stuff to your cloud folders, you can turn them off to free up disk space.
Remember, since your new hard drive may be smaller than your old one, you'll need to find a new permanent place to store them, so choose the solution that works best for you in the long run.
Step Two: Update the SSD Firmware

SSD, technologically, is a new product on the market. Some of the earliest generation SSDs had various bugs and issues that were only banished with substantial firmware updates.
Each drive company has its own firmware update methodology - some require you to reboot with a special CD to flash the drive, and some allow you to flash the firmware from Windows if the drive is not the primary OS. OCZ, for example, has one of the aforementioned Windows tools (see screenshot above). Visit your drive manufacturer's website to learn more about your drive and how to update the firmware. Now is the best time to update the firmware as there is zero risk of data loss since you haven't copied anything yet.
As you have already noticed, moving the system from hdd to ssd is very simple. The main thing is to follow the instructions.
Step Three: Clone Your Drive with EaseUS Todo Backup
Now it's time for the main event. Launch the EaseUS app and click "Clone" on the main screen. This application will help move system from HDD to SSD.

First select the source disk. This will be your current Windows system drive. Our system drive consists of three partitions: the active boot partition, the actual Windows partition, and the recovery partition. We want to clone all three, so we're just going to put a check next to the hard drive to make sure they're all selected. Click "Next" to continue.

Now you need to select the SSD as the destination. In our case, this is "hard drive 4", containing 119 GB of unallocated space. Make sure you select the correct drive or you may lose your data!
Place a check on it and then check the box " Optimize for SSD”, which will give you the best performance from your final Windows installation.


EaseUS will show you what your resulting drive will look like. In some cases, you may need to make some adjustments. For example, on my SSD, EaseUS wanted to make the boot and recovery partitions much larger, even though they contain less than a gigabyte of data. I'd rather have this space on my main Windows partition, so I needed to resize it before continuing.

To resize these sections, first select it and then drag the handles that appear between the sections as if you were resizing an Explorer window.

I then resized the main Windows partition to fill the rest of the empty space.

Depending on the location of your drive, you may need to change things differently. When you're done, click "OK" to continue. Double check that everything looks correct and click Continue to start the clone operation.

If you receive the following warning, click OK to continue.

The actual length of the operation will depend on how big your source disk is, as well as the speed of the storage media and your computer. For us it took about 5 minutes. Move system from HDD to SSD turned out to be faster than we thought.
If any errors occur during this process, you may need to use a third-party defrag tool on your current system drive - in some cases, system files sitting on the end of the drive can make resizing difficult.

When the operation is completed, click Finish.
As you can see in the following screenshot, our new system drive is already showing up in File Explorer. It remains only to start using it.

To do this, the following steps are quite simple. Turn off your computer, remove the old drive, and install the new one in the same location. Restart your computer and it will automatically boot from your new drive.
If you're using a desktop computer and want to leave the old drive in place - perhaps as a backup or storage device - then you'll need to boot into your system BIOS (usually by holding down the "Remove" button until the Windows boot logo appears). From there, you you will need to specify your BIOS on the new drive as the first one to boot. You can follow our instructions for booting from USB for this - just select your new hard drive instead of a disk or USB drive in the instructions.
In any case, when you reboot, you should find that your SSD is now listed as the C: drive. (If it doesn't, double check that you followed the above steps correctly.)
Step Four: Put the Finishing Touches on Your SSD
Once your new system drive is up and running, you'll need to do a few final things to make sure everything works as it should and in top shape. Here's what we recommend.
Make sure TRIM is enabled. TRIM is a special set of commands that help SSDs efficiently manage empty disk space (if you're interested, you can read more here). Open a command prompt and type the following command:
fsutil behavior query DisableDeleteNotify
This long command has a very simple output: either 0 or 1. If you get a 1, TRIM is not enabled. If you get 0, TRIM is enabled. If you need to enable it, enter the following command:
fsutil behavior set DisableNotify 0
Make sure defrag is disabled. There is no need to defragment an SSD, and it's actually not recommended. Windows should handle this automatically, but it doesn't hurt to check. Open the start menu and in the run box type dfrgui to open disk defragmenter. Click the Schedule button, then click Select Drives. Uncheck "SSD" (it should be your C: drive) and click OK.
Restore personal files. Here you have to make some decisions. While it's possible that your documents and maybe even your photos will fit on your new SSD, it's unlikely your videos and music files will, which means you'll need to keep them somewhere else, like a second internal drive (you by the way, can use your old drive for this) or an external hard drive.
If you want, you can even point your special user folders to this new location, so Windows will always look for them first for matching files. Simply right-click on your Documents, Music, or other custom folders and select Properties > Location > Move... to move them.

A word on other SSD stuff and tricks. Be careful in customizing for these simple fixes. Many SSD guides suggest improving performance by disabling Superfetch (there is questionable evidence that this setting improves performance at all) or disabling the page file (which reduces the number of writes on the SSD, but can crash programs if they run out of RAM). These days, you don't have to work hard to keep your SSD running optimally.
conclusions
The tweaks suggested here will certainly improve performance and have no negative side effects. Use caution when deploying tweaks you find in other guides and forum posts. And remember: Modern SSDs may have limited writes, but they are much less limited than older-style SSDs. Talk about avoiding things that write to your drive is pretty old. Chances are you'll be replacing your computer before you're even close to wearing out your SSD!
Congratulations! You've cloned your drive, saved yourself hours of reinstalling Windows and tweaking your apps, and you're ready to enjoy a faster, quieter system drive.
If you still have any questions on how to transfer the system from HDD to SSD - write them in the comment form on our website.
Last week, the manager gave the go-ahead to upgrade the machine from HDD to SSD to all four of my colleagues, including myself. My indignant letter about the dangers of long compilation and Resharper's brakes on the developer's nerves helped. He said that starting the studio is not a trivial task, and compiling and then restarting ASP.NET is generally extremely painful.
In principle, the configuration is good, Xeon W3503 with 4GB of memory, and the computer should, in theory, fly (not in games, of course, but in an office setting). But unfortunately all this stuff is slowed down by the most common 250 gig Seagate. Therefore, having resolved the money issue, I began to choose a suitable SSD. To minimize downtime, I decided to just clone my disk. After looking at the current occupied volume, I stopped at a disk of 100GB. In a local store, Corsair 115GB SSDs were purchased for $ 170 in the amount of 4 pieces and distributed to everyone. It would be cheaper to take on newegg "e, but the time limits suggested the purchase "today," so I took what I had. At the same time, I bought up to 8 gigs of memory.
So, as the most proactive, I had to transfer my system, as well as help my colleagues. For cloning, I used Clonezilla. For partition manipulation, I also downloaded the . Both Clonezilla and Gparted need to be burned to discs or flash drives, as you prefer.
Since I have Win 7, the Internet recommends cloning the entire disk so that all the hidden system partitions that the Windows installer created are copied. Here is the algorithm I followed:
- Clean up the source disk so that the space occupied is less than the size of the SSD. For example, empty the trash, delete temporary files, reduce the paging file.
- Check disk for fragmentation. I had 0% and a colleague had 1% and had problems in the next step.
- Reboot into Gparted, and reduce the size of the main partition to the size of an SSD or less. For example, I reduced from 235GB to 100GB. A colleague managed to reduce it only to 106GB. The main thing is to fit into the volume of the final disk.
- Reboot into Windows and wait for the disk check (chkdsk) to finish automatically. Without it, there will be problems in the next step.
- Turn off the computer, connect the SSD, and boot into Clonezilla. There you need to select device-device mode, beginner mode, disk_to_local_disk, select the correct source disk and destination disk (from HDD to SSD). Give the go-ahead to all warnings and lean back to wait 15-20 minutes (in the case of 100GB).
- You can stop at this step, but I wanted to have a second disk in the system for backup and just data storage. Therefore, we are overloaded into Windows. The old version will boot, and the new disk will be disconnected due to collisions.
- Now you need to delete the boot record of the old disk. Or shaman with bcdedit or download EasyBCD in Google. We make a backup of the record just in case and demolish everything that is. When exiting, the program will warn you that the system will not boot next time. We don't need to.
- We reboot the system, this time the system should boot from the new disk. Much faster.
- Open Control Panel-Administrative Tools-Computer Management-Disk Management. We click on the old disk that is Offline and select Online. The new disk appears in the system. Here you can also correct the volume letters (for example, transfer the old partition to the letter D).
- In the same place it is possible to increase sections to a maximum. You don't need to reboot into GParted. You need to right-click on the partition and select Expand Volume.
The second colleague still has XP SP2 x64, and his disk is divided into two, so I could not apply the above algorithm, because. couldn't just copy the whole disk. In addition, the size of the partition with the axis was a little less than a hundred gigabytes, so there is no need to reduce it. So for this option, here's what I did:
- Turn off the computer, connect the SSD.
- Enable, go to Control Panel-Administrative Tools-Computer Management-Disk management. Select a new drive, initialize it, and create a new partition exactly the same size as the one being cloned. That is, if the cloned partition is 104,855,655,624 bytes, then the new partition must be the same size. Otherwise, I got strange glitches in the cloned partition (the indicated volumes in Explorer and Disk management were different) and Gparted cursed for errors in NTFS, but chkdsk did not find anything.
- Reboot into Clonezilla, select device-device mode, beginner mode, part_to_local_part mode and select the correct source and destination partitions (of the same size, but on different disks). Give the go-ahead to all warnings and lean back to wait 15-20 minutes (in the case of 100GB).
- Reboot into Clonezilla again, select the same options from the previous step, but at the partition selection stage, write off the names of the mounted disks (for example, sda for HDD, and sdb for SDD) and press Cancel until the "Enter shell command" menu appears (or something like that). Here you need to enter two magic commands:
sudo dd if=/dev/sda of=mbr1.img bs=446 count=1
sudo dd if=mbr1.img of=/dev/sdb bs=446 count=1Where sda is your original HDD and sdb is the SDD clone. These two commands (which in principle can be combined into one) will copy the MBR from the HDD to the SSD (since the MBR was not cloned in the previous step). Also, if you have a Win XP installation disk, you can run fixmbr which will do the same (write the correct mbr).
- Reboot into Gparted and increase the volume of the new partition to the volume of the disk (for example, I had an extra 10 gigabytes).
- Reboot into the old Windows, go to Disk management, right-click on the new partition on the new disk and select Mark Partition as Active. This step can most likely be done from Clonezilla, but I don't know how.
- In order not to cheat with boot.ini, you can preload into the BIOS and remove the old disk from the list of boot options.
This is how I upgraded four computers in a few hours of trial and error. Of course, if you work out this procedure to perfection, then it will not take so much time and so many steps. But experience, as they say, is priceless. :)
Was this upgrade worth it?
Here is a comparison in reading speeds: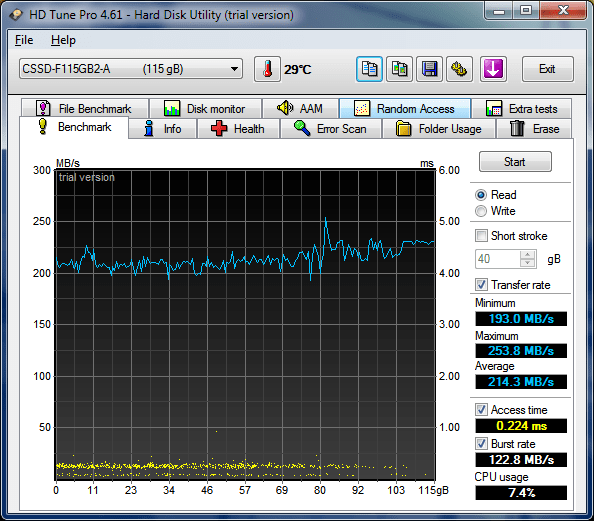
And the sensations are not transmitted at all, Windows starts instantly, projects are compiled twice as fast (I spotted it), Resharper does not blunt, in short, beauty!
Those who buy SSD drives to replace their HDD hard drive or even several, one way or another, are faced with the issue of transferring the operating system from the old drive to the new one. After all, for example, you have a computer where Windows is installed on the HDD. Having bought an SSD, you want the system to now boot from it. In this article, I will show a couple of ways to transfer the system from HDD to SSD, which I tried to use myself.
An SSD is a solid state drive, a storage device that has come to replace the old HDD hard drives. These drives, compared to HDDs, have a much higher write speed, smaller size and weight. The main disadvantages are that the cost of one gigabyte is several times higher than that of HDDs, and they also have a much lower write resource (durability).
Transferring a Windows system from HDD to SSD
Transferring a system from an HDD to an SSD is actually a simple process, but sometimes you have to face various problems.
There are only 2 steps in this process:
Connect the SSD drive to the computer;
Perform a system transfer using one of the programs designed for this.
Stage number 1. Connecting an SSD drive to a computer along with an HDD
Well, in stage number 1, there are usually no problems. You can connect an SSD to a computer in the same way as an HDD (with SATA connectors), in this regard they are no different.
If the SSD was bought for a laptop, then it may be that the laptop does not have a compartment for connecting a second disk. In this case, there are several options:
An SSD can be connected via a USB connector by purchasing a special adapter (USB-SATA), or a box for an external drive (a box where the drive itself is inserted and can be connected to a computer via a regular USB cable). This adapter and (or) a box for an external drive may come in handy more than once.
If, along with a laptop, you also have a desktop computer, then you can connect both drives to it so that you can then transfer the system directly through that computer.
You can first boot from the old HDD and make a complete image of the system disk using a special program, transfer this image to some external hard drive that can be connected via USB, and then start recovery to a new SSD drive through the program.
This, in my opinion, is the most inconvenient option. Moreover, when using this option, all programs that allow you to transfer the system directly from one disk to another disappear at once, and only programs remain that allow you to create a disk image and then restore it to another disk.
Stage number 2. System transfer
This stage is simple, but sometimes you can’t do without problems and questions ...
So, to transfer the system from HDD to SSD, you need a special program. There are several options, I have tried only 3 so far:
Transfer through a special program from the SSD developer.
I consider this the most optimal and simplest option, since with such a transfer of problems and difficulties, there are usually no problems.
All you need to do is go to the website of the manufacturer of the SSD you bought and see if there is a special program for transferring the system. If there is, quickly perform a transfer with it and rejoice :)
Example.
Bought an SSD drive “Samsung SSD 850 Evo Sata III MZ-75E250BW”. We see that the developer is Samsung, which means that the program must be searched on their website. Either through the site menu, find the purchased disk model, or in Google or Yandex search, we try to type the full name of the model and, for sure, one of the first lines of the search results will contain a link to the page of the desired disk on the developer's website.
And then on the site we are looking for a section for downloading files. It can be named differently. For example, on the Samsung website, on the page of each model, there is a “Instructions and Downloads” section, where there are various files for download, including the Data Migration Tool transfer program (each developer may have a different name!).
Having found the desired program, download it, install it, select the disk from which you transfer the system and the connected new SSD disk. It remains to wait for the completion of the operation.
Programs for transferring a system to an SSD are unique for each developer, so more precise instructions cannot be given here. But these programs are as simple as possible, with the most minimal set of settings, and therefore questions should not arise.
Transfer through special disk-to-disk system migration programs from developers specializing in programs for working with disks and partitions.
One such program is Paragon Migrate OS to SSD. This is a specialized program that allows you to easily, without any complicated settings, transfer the system from one disk to another (in our case, to an SSD). Suitable for all discs.
There is only one drawback of this method - the program is paid, but it is quite inexpensive, given that it can come in handy more than once.
You can find out the current price and purchase the program on the official website of the developer:
Installing the program is the simplest, I will not dwell here in detail. You can read about the general process of installing programs for Windows.
After starting the program, there will be a warning that from the target disk, i.e. from the one to which you transfer the system, all data will be deleted. Well, if you just purchased an SSD drive, it’s unlikely that you wrote something to it, but if it’s some kind of old drive, then keep this warning in mind and don’t forget in this case to first transfer all the data from the target drive somewhere to a safe place !
In the next window, select the target disk and click "Next".
Select a source disk, i.e. from where the system will be transferred is impossible, since the program itself determines which system is loaded and will only transfer it.
Transfer through special programs designed for backup. One such program is Acronis True Image, which is very popular. The program is paid, it costs much more than, for example, the Paragon Migrate OS to SSD mentioned above. But its functionality is also very impressive, because it immediately solves a lot of tasks related to backup and recovery, and not just transferring the system.
I have already written several articles about this program and it is easy to find them by typing “acronis” in the blog search.
This program is good, but it is not always suitable for transferring a system from HDD to SSD, as my practice has shown. I came across situations when it was not possible to transfer the system through this program, for reasons I do not understand.
There are, of course, other programs in the same category of backups, but many of them also cost money. So I prefer one of the methods above.
Conclusion
Most likely, if you need to transfer the system to a brand new SSD, you can use option number 1, because the developers of these drives often provide their programs for transferring the system. If it didn’t work out, I think option No. 2 will definitely help, in extreme cases, through another program specialized for migrating a system from HDD to SSD.
We have already reached attractive volumes and equally attractive prices, so more and more computer and laptop users are buying them as an additional or main system storage. And the matter remains small - to transfer the existing Windows operating system from the old HDD to the new one, which will allow the system to boot faster and generally make your laptop and computer noticeably more productive.
Migration of the Windows operating system from a hard drive to is now a simple and fast, and at the same time absolutely free process. And even if you didn’t receive a utility for transferring the operating system with your new SSD, you can transfer Windows using the free version of the program.
And to make the OS transfer process even simpler and more understandable, we have prepared detailed step-by-step instructions.
The process of transferring Windows to a new one takes place in 4 stages:
1.
Connect the SSD to the computer, turn on the computer and start the trial version of Hard Disk Manager 12 Professional. Select from the main menu Wizards > OS Migration. After that click Further to continue working. Keep in mind that all data on the drive you are migrating to will be lost after the operation is completed. Before migrating, save them to another drive.
2.
The wizard will search for a system partition that contains supported Windows operating systems. If multiple OSes are found, you will be able to specify the system to migrate. The OS Migration Wizard will automatically select one or two disk partitions and ask you to specify the disk to which the migration will be performed.


3.
Clicking OK, you will see a warning that everything is ready to start the OS transfer operation. If you are going to use the SSD for Windows only, check the appropriate box to have the Wizard use the entire drive to accommodate the partition. In order for the computer to boot from after the transfer is completed, you need to check this option. At the same time, the "donor" HDD ceases to be bootable.


4. Click Copy to start the migration process. After the migration is complete, the first thing to do is to check that Windows starts from the destination SSD. If so, remove the Windows OS partition from the original drive, then repartition it as you see fit.
Using the free version of the Hard Disk Manager 12 Professional utility allows you to create a bootable one and transfer your Windows operating system to it as conveniently and quickly as possible. When you buy the full version of the program, you get access to a lot more features, but in our case, the free version is more than enough to transfer Windows.