What to do to make the shoot take root quickly. How to properly root cuttings of indoor plants
Probably, almost all gardeners have had such cases when it seems that a lot of cuttings were prepared, and a lot of time was spent on rooting, but in the end all the work was in vain. Not a single root appears on any of them. In order to avoid such situations, you need to learn how to properly root cuttings, especially since there are several methods of rooting, which will be discussed in detail below.
How to root cuttings:
This rooting method is the simplest, and it has probably been used at least once by any florist or gardener. However, such rooting attempts were not always successful, and some of the cuttings never developed the long-awaited roots. In order to maximize a large number of cuttings have taken root, you need to learn simple rules:
- There is no need to replace the liquid in the jar. If such a need arises, then you just need to top it up.
- Under no circumstances should the liquid be cold, both the one in the container and the one you add. It is best if it is at room temperature.
- There should not be a large number of cuttings in the same container. Experts advise that for 1 tbsp. There was a maximum of 2 or 3 cuttings of water.
- There should not be too much liquid in the container, as this can cause rot.
- It is recommended to use containers made of opaque material, since roots form in them relatively faster.
- Cuttings prepared in the autumn that take root in the spring must first be prepared. They are immersed in water and, after being taken out a few hours later, the cut is refreshed, while all the dry part is removed down to the living wood. Then it can be rooted in water.
- It is recommended to dissolve activated carbon (2 tablets), potassium-phosphorus fertilizer, root growth stimulants in the liquid, or you can take willow water.
- If the cuttings were harvested in the autumn, and there are no leaf plates on it, then the container will need to be removed to a dark place. If the cutting is summer and there is at least a particle of a leaf plate on it, then such a cutting should be placed in a lighted place for rooting.
- It is necessary to systematically aerate the liquid in the container, otherwise rot may appear on the cuttings.
In the box
To root cuttings of indoor plants, and not only, you can use a variety of containers: boxes, cups, pots, etc. You need to pour a certain soil mixture into the selected container. There are several suitable soil mixtures:
- Earth, sand, perlite and peat, taken in equal parts.
- River sand and vermiculite. They must be taken in equal shares.
- Vermiculite, sand, peat and perlite, taken in equal proportions.
Such soil mixtures are characterized by high air permeability, which has a beneficial effect on the formation of roots and their growth. Many gardeners advise not to water the cuttings, but when planting them, place ropes at the bottom of the container, the ends of which should be outside. These tips should be placed in a container filled to half clean water. All that remains to be done is to systematically add water into the container.
To prevent the plantings from starting to rot, you should remember that root system should definitely be warm, but top part The cuttings must be regularly ventilated. After the cutting comes to life and begins to grow, complex fertilizer can be added to the water for irrigation, and the solution must be prepared according to the instructions.
In order not to bother with watering or fertilizing, you can resort to the following method. Vermiculite is immersed in water for 7 days. Then it is poured into the container so that approximately another 40 mm remains to the top edge. A layer of calcined or well-dried sand is poured on top, the thickness of which should be 25 mm. Then, using a long peg, a hole is made in the substrate to the very bottom of the box, into which the cutting is placed. Then the sand around it will need to be compacted. Roots will appear pretty soon.
It is recommended to shorten cuttings that have begun to grow actively, leaving only a few lower leaf blades. It is recommended to plant a rooted cutting in early autumn, so for the entire spring-summer period it will need to be taken out into the garden or vegetable garden directly in a container.
How to root cuttings in open ground
The cutting should be planted in open soil when its roots reach 6 or 7 cm in length. In the first year, the cutting should be kept under cover, regularly watered and ventilated. By the time autumn arrives, a good seedling should already have formed.
Most indoor plants can be propagated vegetatively - by cuttings, layering, children or dividing an adult plant. At first glance, everything is simple: cut off a cutting, stick it in the ground and wait for it to take root. In fact, such a trick does not always work out for everyone.
This matter requires experience and skill. For some people, everything they plant grows and prospers; in England they are called “green hands.” Most of us sometimes manage to root a cutting and grow a plant from it, but more often the planting material rots or dries out.
What do you need to know about rooting cuttings in order to propagate your favorite indoor flowers without any problems?
- Before you begin harvesting cuttings and rooting them, it is important to decide on the following issues:
- Find out what kind of houseplant it is, whether it can be propagated by cuttings and read tips on how to do this specifically for this species;
- Select and cut the cuttings correctly;
- Prepare dishes for rooting and soil suitable for this plant;
- Treat with a root growth stimulator, if necessary;
Plant the cuttings and care for them properly.
Some indoor plants take root easily and quickly. There are no problems with the rooting of balsam, zonal pelargonium, tradescantia, and coleus. Large-flowered pelargoniums are more capricious. Ficuses and begonias are almost always successfully propagated by cuttings. Azaleas and gardenias are difficult to root. If you don’t have any experience, then it’s better to practice on the most unpretentious and easily rooted house flowers.
- How to take cuttings correctly
- For rooting, cuttings are taken from a healthy specimen. Indoor plants affected by pests and fungal diseases must first be cured.
- Cuttings are cut with a sharp knife, woody shoots are cut with pruning shears. Thin and tender stems cannot be cut with scissors, although this seems convenient - the cut site is compressed, the tissue is injured and the cutting then quickly rots.
- The cuttings are cut small, they should have 3-4 leaves. The length of the cutting itself can be different for different indoor plants; it depends on the distance between the leaves. In some species, apical cuttings root better; in most, apical and lateral cuttings take root equally. The bottom cut should be just below the knot. The stems of many indoor flowers easily break off at the internode, this for separation. It’s even better if the cutting has a “heel” - the place where this branch grew from the main trunk. When rooting in water, you can see that the roots of some plants (impatiens or zonal pelargonium, for example) appear along the entire length of the cutting, immersed in water. In others they grow only from the bottom cut. There are plants whose roots appear only from the node.
- The lower leaves are immediately removed; upon contact with wet soil or water, they rot, affecting the cutting itself.
- Some plants have a large leaf area, and planted cuttings evaporate a lot of water. The leaf blades are partially cut (by a third or half).
- If there are buds or flowers on the cutting, they must be removed, otherwise the cutting may simply not have enough strength to form roots.
- It is not recommended to immediately place freshly cut cuttings in water or soil. Most houseplants need to sit outdoors for a few hours before planting.
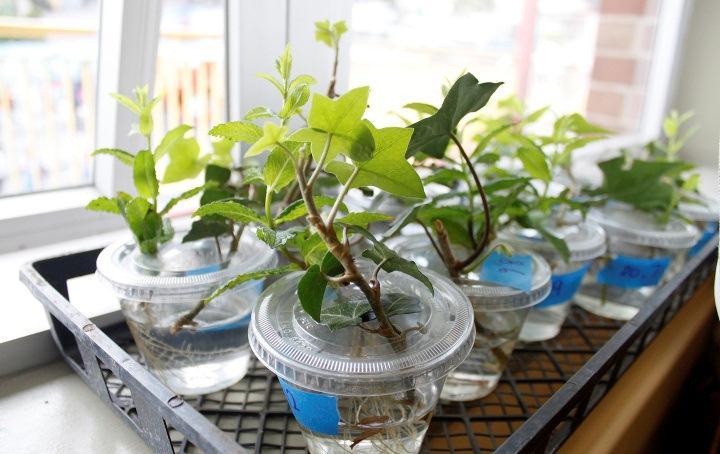
Rooting in water
The easiest way to propagate houseplants is to cut a branch, put it in water and wait for the roots to appear. But not all plant species develop roots under such conditions. Many simply rot after a while. Saintpaulia, balsam, zonal pelargonium, tradescantia, ivy, and coleus are usually propagated in water.
What to root in?In any small glass or plastic container. In a glass, for example. It is noteworthy that roots appear faster in dark glass dishes. The cuttings are placed so that the lower part is submerged shallowly. Roots require the presence of oxygen to form; they form at the interface between water and air. The water level in the glass should be such that the ends of the cuttings are in the water, but most of them are above the water level.
What water should I use? Regular, from the tap. Some advise taking only boiled water, it does not contain microbes, but in fact they are introduced there as soon as the cutting is placed in it. It is impossible to disinfect a plant without destroying it. In addition, in the ordinary air of an apartment there are more than enough various microorganisms. Melt water is useful, it does not contain salts and is effective for rooting.
Do I need to change the water in the container with cuttings? No, you should not change the water under the cuttings, but only add it if necessary. They often die after changing the water. Probably, some kind of stable environment is formed in the glass from the waste products of the plant, promoting root growth. Saintpaulia leaves and passionflower cuttings that have already produced roots sometimes die after changing the water. Place an activated carbon tablet in the water to inhibit putrefactive processes.
How many cuttings can be placed in one glass? A little, 1 or 2. The more capricious the plant, the less. In large numbers, cuttings usually all die. As soon as one begins to rot, this process will affect everyone else.
Rooting in the ground
Some plant species do not grow roots in water. They can stand in it for a month and not sprout a single root, while they will appear in the ground within a week. General rule this: plants of swamps and tropical rainforests easily take root in water, species from arid areas are better planted in the ground.
Petunias, large-flowered pelargoniums, fuchsias, begonias, hydrangeas, and hibiscus are rooted in the soil.
Soil for rooting
What soil should I use to root cuttings? Loose, able to retain moisture well, with neutral acidity. For most crops, a simple mixture is most often used: peat in half with coarse sand.
Or other inert soil that is not prone to rotting. You can add perlite and vermiculite and coconut fiber to peat. Sphagnum moss is useful, it has disinfectant properties and retains water well. Too loose soil dries out quickly. Soil sterility.
The soil for rooting cuttings of indoor plants should not contain fungal infections and insect pests. Many flower lovers steam garden soil, fry it or freeze it. The safest thing to do is buy ready-made soil at garden centers and add roasted sand to it. This purchased land is treated with fungicides and insecticides, which reliably protects the plants for some time. Soil acidity.
The acidity of the soil affects rooting. Usually they buy soil with neutral acidity from the store. Most types of indoor plants take root best in it. Hydrangeas need acidic soil; their cuttings root most effectively in slightly acidic soil. The general rule for most plants is this: the acidity of the soil for rooting should be close to that required for an adult plant of this species, but slightly closer to neutral.
Rooting dishes If one cutting rots, the rot will not spread to other cuttings. Through the transparent walls you can see the emerging roots. Be sure to make a drainage hole in the bottom of the cup. It is advisable to place a little perlite or pieces of polystyrene at the bottom to allow excess water to drain freely.

The downside of the cups is their small volume. If you missed a glass when watering, the cutting may dry out.
Conventional seedling boxes or special pallets (cassettes, trays) with cells are convenient for rooting a large number of cuttings.
In the boxes, moisture is distributed more evenly, the cuttings are arranged more compactly and are easier to care for.
For small cuttings, plastic food containers with a transparent lid are considered the most convenient option. They are quite rigid, the lid is easy to open when ventilated, and it is easy to make drainage holes in them.
- When choosing dishes for rooting, follow these rules:
- If the plant does not tolerate transplantation well, take cups;
If there are a lot of cuttings, their survival rate is low - choose boxes or pallets.
Cuttings of citrus fruits, myrtles, and oleanders are usually planted in boxes. The crowns of these plants need to be molded and pruned, after which many branches remain, quite suitable for cuttings. Not all of them will take root, but some of them will still take root.
How to plant a cutting
The question seems simple. At first sight. Some plants have roots that grow along the entire length of the stem buried in the soil. The deeper you plant, the more roots there will be. In others, they appear only from a thickening at the cut site, and new shoots will grow from there. This place should not be very deep from the soil surface.
A universal method is to plant cuttings not strictly vertically, but obliquely, at approximately an angle of 45 degrees. Then the lower end of the cutting is not located deeply, and a fairly large part of the shoot is in contact with the soil.
Some plants (scindapsus, syngonium, monstera) have large distances between nodes; the length of the cutting can be 20-30 cm. They are unstable when planted in the ground. Tall plastic glasses or bottles with the top cut off are convenient for them. The soil is poured onto the bottom of the vessel, and the walls serve as support.
Some indoor vines are capable of growing aerial roots; they take root easily when in contact with the ground. Cuttings of Wood's Ceropegia and Philodendron can be rooted if you simply place them on moist soil, pressing them down with pebbles at the nodes, and spray them regularly.
Some gardeners, before planting cuttings, soak them in a solution of heteroauxin or other root formation stimulant. Such substances promote plant regeneration, stimulate root formation in cuttings, accelerate root formation in seedlings and adult plants, and enhance the growth of adventitious roots. There are different drugs. The cuttings are either soaked in a solution, or sprinkled with powder, or watered under the root strictly according to the instructions.
These root formation stimulators make it possible to obtain new specimens from cuttings of even the most difficult plants to propagate.
Caring for cuttings
90% of rooting success depends on proper care of planted cuttings of indoor plants. Caring for cuttings largely depends on the type of plant, but there are rules that are common to all.
Moisture conservation and watering
Do you need film? It is almost always recommended to cover rooting shoots with film or glass on top to protect them from drying out, leaving a small hole for ventilation. For cuttings planted in cups, just put a small plastic bag on top.
This requirement is not relevant for all plants, but it won’t hurt, especially in the first days. Succulent plants, as a rule, are not covered with anything.
Important! Be sure to ventilate regularly! How often? If it’s cool, it’s enough to open it once a day for half an hour; if it’s hot and there are a lot of water droplets on the film, open it 3 times for 10-15 minutes. From excess condensation, cuttings easily rot. Frequent spraying accelerates rooting, but plants with pubescent leaves or shoots are not recommended to be sprayed.
When the first roots appear, the film can be removed. Spraying continues.
Should I trim the leaves? Cuttings of plants with large leaves evaporate a lot of moisture, and the soil dries out quickly. It is useful to cut the leaf blades of cuttings by half or 2/3. This is done with cuttings of lemons, indoor roses, hibiscus, and gardenias. Fleshy thick leaves are not shortened. They already hold moisture well, but when damaged they begin to rot.
How to water? Cuttings covered with film are watered infrequently; make sure that the soil is slightly moist. It is better to water with soft, settled water at room temperature or a few degrees warmer. When roots appear, the plant begins to absorb more moisture from the soil and evaporate more of it, watering is increased, and the cover is removed.
Temperature
Temperature is the most important factor for most plants. Chopped shoots actively develop in warm conditions. The optimal temperature is 22-28°C. Moreover, not only the air should be warm, but also the soil. In winter, even the most unpretentious plants cannot take root on cold windowsills.
Plants of the tropics require higher temperatures; many representatives of subtropics and temperate climates form roots at 20 degrees. Very heat-loving exotic species take root only with bottom heating! To do this, you can place the container with cuttings on a warm windowsill above the radiator or buy a special heated box for seedlings.
When it's very hot, that's also bad! At temperatures above 30 degrees, most cuttings die.
As soon as you notice the appearance of roots (transparent containers are very convenient in this regard) or the beginning of the growth of a new leaf, it is advisable to lower the temperature to normal room temperature.
Most websites dedicated to houseplants advise rooting cuttings in spring or late summer. These tips are correct for most species. And often the point here is not that the roots do not grow at other times. They are growing! But during these periods it is easiest to ensure the required temperature and light conditions without any special tricks.
Lighting
Sunlight stimulates growth. It would be a mistake to place the cuttings in the shade, where the sun practically does not penetrate. There should be a lot of light, but it should be diffused. IN summer heat It is better not to keep them in the midday sun to prevent overheating. But the morning and pre-sunset rays will be beneficial, especially for cuttings of sun-loving species (hibiscus, gloxinia, pelargonium).
Some types of plants are rooted by cuttings without leaves (grapes, barberries); they can also be kept in a shaded place. The reason for this is that if the cutting was harvested in the fall, at a time when the plant no longer had leaves, then it contains a certain amount of heteroauxin, which stimulates the formation of roots.
Transplanting young plants
The resulting seedlings need to be transplanted into separate pots. For many plants, this stage is considered the most difficult. Many species do not tolerate root damage. Others don't like changes in temperature or soil.
How to replant? The rule is simple - replant rooted cuttings only by handling, without shaking off the soil, trying not to damage the weak roots.
When to replant? The shoots rooted in the cups are replanted when it is clear that the roots have entwined the earth well. If the walls are not transparent, then replant if roots appear in the drainage hole. Cuttings in a common box are more difficult to separate from each other; they are usually replanted when they begin to grow and produce a new leaf. Being late in replanting from a separate cell or cup will not do much harm; it will only slow down the development of the plant a little, while in a box the roots may become so intertwined that it will be difficult to separate them.
How to adapt? A sudden change in conditions can destroy the plants obtained with such difficulty. If the seedling is moved to another place or into the open air, then before transplanting it must be accustomed to the new habitat. The shelter is removed from it, moved to another place, first for several hours, then the time is increased. Plants must get used to lower temperatures and different lighting.
Unusual methods of cuttings
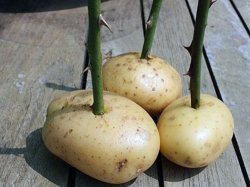
There are quite exotic, but effective, rooting methods. Often they allow you to root even plants that are difficult to take cuttings.
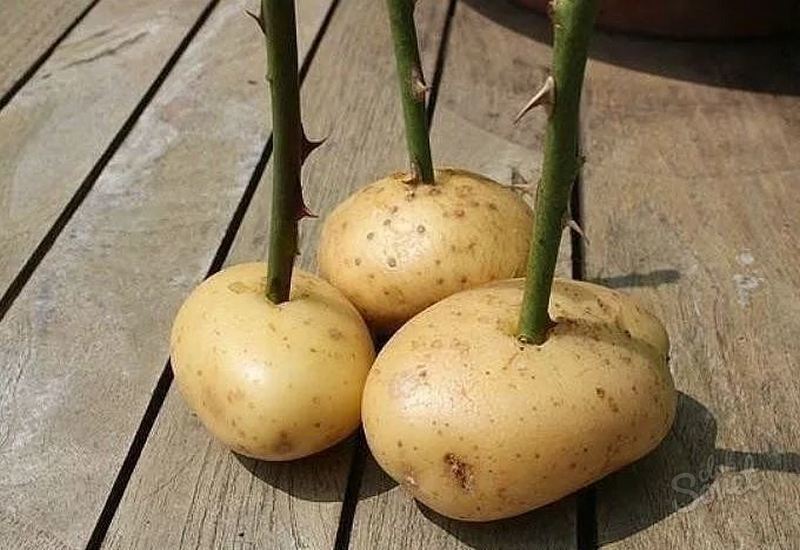
For example, in potatoes. To do this, the tuber is thoroughly washed, all its eyes are removed, and the desired cutting is inserted into the hole made. Then the tuber is buried in the ground, and the stalk is covered glass jar or film and watered regularly. At the same time, the cuttings are supplied with a large amount of nutrients and actively produce roots, and the plants subsequently grow and develop well. Even capricious roses can be rooted this way!
Or, another way: a twig is stuck into a piece of a special floral sponge to extend the life of cut flowers. She long time
retains moisture and is treated with special antibacterial substances. For example, this sponge is good for rooting fuchsia. The burrito method has worked well for roses.
In this way, you can root cuttings no less thick than a pencil. Take cuttings with 3-4 buds and remove all leaves. They are treated with a root growth stimulator and several pieces are wrapped in wet newspaper. The cuttings packed in paper are placed in a dark plastic bag and left for 3 weeks at a temperature of 14-18 degrees. A basement works well.published
Cuttings, like cuttings, are one of the most common methods of plant propagation.
In addition, it is also cost-effective. There is no need to buy expensive seedlings on the market, just grow them yourself. But how to carry it out, what nuances need to be taken into account. How to make rooting of cuttings faster and easier.
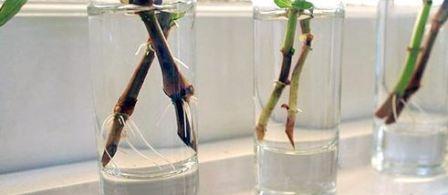
Rooted cuttings in a jar of water
The most affordable method of rooting cuttings, is to put them in a jar of water. If you take into account some specific conditions for individual plants, then you can root almost any plant in this way, even the most difficult to root. At the same time, it is necessary to know some of the subtleties of this seemingly simple method. For example, how necessary is a water change, and is it necessary to do it at all? It has been noticed that not all plants tolerate this procedure painlessly. During the time that the cutting is in the water, a unique microflora is formed in it, and its own internal metabolism is created. By changing the water in the jar, we destroy this inner world, the established connection between exchangeable particles. For example, passionflower cuttings that had successfully taken root in a jar of water suddenly died when the water in the jar was changed. Despite the fact that the water with which the old one was replaced was clean, settled, and free of harmful impurities, the plant dies.
Thus, practical experiments have established that the water in the jar cannot be changed, and in order for nutrients to flow in, it must be carefully added so that the original level does not decrease.
What should this level be? Again, there is no clear answer here. Each plant is individual and demanding in its own way when it comes to the rooting process.
Take honeysuckle cuttings, for example. If three cuttings are placed in a small jar of water with a volume of only 200 ml, then the cuttings will not take root. And if you separate them and put them in different jars, each separately, even if they are of a smaller volume, rooting will occur without problems. In this way, rooted cuttings subsequently take root well in the ground in a new place.
Video tutorial - Germinating cuttings in water
Roots in a jar mainly form at the border zone where water and air meet. And this is understandable, because oxygen is necessary for the formation of roots. Therefore, it is important to know what the water level in the container should be. If it is too high, then there will be insufficient oxygen at the bottom of the jar and the ends of the cuttings will begin to rot. It was experimentally established that if aeration is carried out in a jar with cuttings, then the formation of roots occurs along all parts of the cutting in the water. Moreover, the time required for the formation of the root system is significantly reduced.
Which cuttings are suitable for propagation
Which cuttings will take root best in water? Through trial and error, it was found that strong, strong vertical shoots are bad. Inconspicuous thin side shoots are more suitable for this mission. Although some plants have specific characteristics. So, for example, in the pointed yew and spruce, the lateral shoots taken for cuttings later become low-growing plants creeping along the ground with branches growing in different directions. And rooted cuttings from straight, strong vertical shoots become slender, straight trees.
It also matters which part of the shoot is taken from cuttings. If a long shoot is cut for this purpose, then it is cut into several parts. So the part that was closer to the stem takes root better and faster.
For cuttings, different shoots are taken, both young and old. If you decide to cut out a young, non-woody shoot, then you need to cut it immediately under the bud or under the node. This will make it more resistant to fungal attack. The woody shoot is cut off in the middle of the node.
There is a way to make short cuttings that germinate effectively. To do this, cuttings with one bud and one leaf are cut from any woody or green shoot. The length of such shoots is no more than 3-4 cm. The upper cut should be at the level of the bud, from which the leaf grows. The remaining leaves are removed. Such cuttings take root in water quite quickly.
Light plays a big role in cuttings. If the cutting has leaves, then light is necessary for its successful rooting. Since this produces heteroauxin, which stimulates the growth of the root system. If the cutting is taken from a shoot whose castings have already fallen off, then it already contains a certain amount of heteroauxin, and it does not need light for successful rooting. Then it must be buried in the ground.
Article on the topic "How to grow a rose from a bouquet"
Video tutorial - Growing roses from cuttings
A cutting is a part of a plant taken from the parent shoot of the current year. Cuttings are the most famous method of vegetative propagation, which gardeners use to create the desired plant in short time. If you plan to work with cuttings, read our tips - they will help you.
How to root a cutting - cutting
Not least important during rooting is the type of shoot and its correct cutting.
- Green cuttings - this year's growth with leaves. Prepare them from the first days of June to the end of July - cut off 15 cm of the shoot, making a cut under the bud. Do not keep the harvested material in the sun - plant immediately.
- Cut mature shoots with dark green bark at the internodes, leaving three eyes - about 10 cm. Harvesting and rooting time is late summer.
- Take woody (annual) shoots during hibernation - late autumn or in winter. Cut at least 30 cm, store until spring in damp sand in the cellar or in a plastic bag in the refrigerator. Start awakening activities in March: soak the branches in water for a day, then cut them to living wood and set them for germination.
How to root a cutting in water
As practice shows, roots form most quickly in water. This is the basis of the simplest rooting method - water:
- Place the collected branches, 2 pieces each, in half-liter jars;
- fill the containers 1/3 full and add an activated carbon tablet;
- Keep summer cuttings in the light, winter ones in the dark.
Important: do not change the water in the jars, but only add it when it evaporates.
With this approach, after 10 days the leaves will hatch on the sticks, the shoot will begin to grow, and after three weeks the roots will appear. When they grow 6 cm, plant them in the soil.

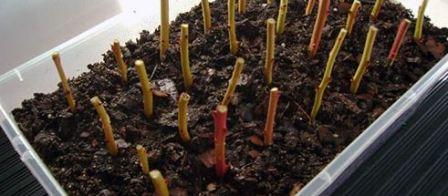
How to root a cutting in a box
To form roots, you can use any containers filled with nutrient substrate.
- Treat the cuttings according to the instructions with a root stimulator, such as Kornevin.
- Pour sand, earth, perlite into the box - 1:1:1, mix. Make holes with a pencil to the bottom, lower the cuttings into them, compact the soil. Place a mini-garden on the windowsill.
- Water every day without letting the soil dry out. After a week, when the buds begin to swell, feed the plants with complex fertilizer. Further - as in the first case.

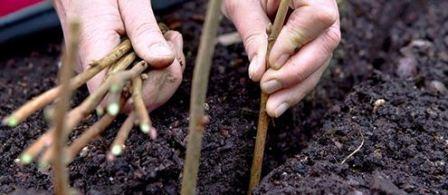
How to root a cutting in open ground
If you don’t have time, use a similar option - plant the cuttings directly into the ground.
- Find a sunny, sheltered place on the site and dig up the soil.
- Make holes according to the number of cuttings. In each hole, place a “pillow” - a mixture of peat and sawdust (1:3), and on top - 3 cm of river sand.
- Pour water - 1 glass per root and insert the sticks. Cover them with plastic containers or covering material. Remove the cover for air ventilation every three days.
- When the buds swell, open the shoots and water them with an infusion of chicken humus diluted 1:4 with water. Replant to a permanent location next year so that the roots have time to get stronger.

How to root a cutting - an interesting option
A somewhat unusual, but very effective way is to plant sprigs in potato tubers.
- Wedge the stalk into a raw potato (remove the eyes) so that there is one eye in its pulp.
- Plant the resulting “sculpture” in the ground, water it and cover it with a jar.
- After a week, rooting will occur, which will lead to the appearance of fresh shoots.
There are many ways to root cuttings - choose the one that suits you and create your own environmentally friendly planting material.
Growing plants from cuttings is the most popular method of vegetative propagation.
Numerous guides have been written on rooting cuttings. But in the process of cuttings and root formation, sometimes a lot of details are discovered that decisively influence the final result.
The easiest way to root cuttings is in a jar of water. Under certain conditions, it can be used even for plants that are considered difficult to root. But despite the simplicity of this method, there are many subtleties on which success depends.
How to carry it out? What can I do to make rooting of cuttings easier? What little things need to be taken into account when taking cuttings? Let's try to answer these questions.
Should I change the water in the jar with cuttings?
Not all plants can tolerate this change of water. In all likelihood, some necessary metabolic products accumulate in the water in which the cuttings are rooted. Thus, it was noticed that passionflower cuttings, which had already produced roots, died repeatedly after changing the water. Moreover, the water was well settled, without harmful impurities. Therefore, it is advisable not to change the water, but to add it as it evaporates.
Amount of water.
What amount of water should be in the jar when cutting? For example, a plant such as honeysuckle does not produce roots in a 200 ml jar if there are more than three cuttings in it. And if you place the cuttings one at a time in smaller containers, rooting of the cuttings occurs without problems.
It is important not only the amount of water per cutting, but also the level of water in the jar. For the formation of roots, the presence of oxygen is necessary; it is not for nothing that roots form at the boundary of water and air. If the vessel is too deep and there is a lot of water, there is not enough oxygen in the lower part, which leads to rotting of the cuttings. The experiments of the British showed that when the water in the vessel was aerated during cuttings, roots on the cuttings formed along the entire length and in a shorter time.
Selection of shoots for cutting cuttings.
It is important to choose the right shoot from which to cut the cutting. Oddly enough, the main, powerful shoots that grow upwards make bad cuttings. Good quality cuttings are obtained from lateral, not too actively growing branches. So, don’t go after power and size.
You should not take thin fruit twigs that have stopped growing. It is better to take those shoots that are still growing. Usually the middle part of the shoot is taken for cuttings. It is more convenient to cut cuttings into three buds. If the deficit is two, or even one.
Some coniferous plants, for example, spruce and pointed yew, have an interesting property. Cuttings taken from lateral horizontal branches produce disheveled, sometimes even almost creeping plants, while cuttings from vertical branches produce vertical trees.
If for cuttings one long shoot is taken and cut into several parts, then it is important from which part of the shoot the cutting is taken. Cuttings taken from a lower part of the stem take root better. When cutting roses, you can often observe that of the cuttings obtained from a stem that is equally lignified along the entire length, only the very last one, cut from the very base, takes root. This also applies to other cuttings, such as passionflower.
How and when to take cuttings?
This time, time matters: it is better to cut early in the morning - there is more moisture in the cuttings. Before planting, daytime and evening cuttings should be kept in water for an hour, renewing the cut with a sharp knife.
Depending on the type of plant and the ability of the cuttings to root, it is customary to divide the cuttings into groups.
Green cuttings– cut from early to mid-summer, in morning time.
Semi-lignified cuttings– cut at the end of summer, no more than 15 cm long.
When cutting cuttings from a green, immature shoot, the cut is made directly under the node or bud. The tissues located in this place are more resistant to fungal diseases. If a more mature lignified shoot is chosen for cuttings, the cut is usually made in the middle of the internode.
Lignified cuttings– cut during the dormant period of plants (late autumn - early spring before buds open), no more than 25 cm long.
For all types of cuttings, the rule is that you need to cut the material from a strong, healthy shoot. Trim the cuts with a sharp knife. They should be smooth, without burrs or rags.
Green cuttings can be successfully propagated by: grapes, geraniums, larkspur, forsythia, chrysanthemum, mock orange and berry crops.
They reproduce well from lignified cuttings: viburnum, dogwood, rose, plum, spirea.
From any shoots: green, semi-lignified and woody, you can cut a cutting consisting of a bud with a leaf. Such cuttings should be 2.5–4 cm long. The upper cut is made as close to the bud as possible; it is advisable not to leave the hemp at all. The upper cut is made as close to the bud as possible (if possible without leaving a stump). The lower one is 2.5-4 cm from the upper one.
Each cutting should consist of:
- a very short piece of stem;
- one sheet (the other sheet is removed);
- a bud located in the axil of a leaf.
It would be possible to leave all the leaves on the cuttings. But, being in water (and, even more so, when rooting in a substrate, when the supply of water is limited), excess leaves dry out the cuttings, which can cause them to die.
Methods of cutting cuttings. On the left is a nodal cutting, its lower cut is located directly under the node or bud. Unripe green cuttings are usually cut this way, since the tissues located in this place are more resistant to fungal diseases.
 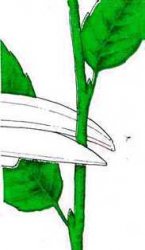 Right - Cut in the middle of the internode. As a rule, this is done when cutting cuttings from more mature (woody) shoots.
If the winter cutting uses up its reserves, then the summer cutting is mainly what produces green leaf. There is a difficulty here. To produce its glucose, the leaf needs more light. But at the same time it must evaporate water, but there is still no trace of water - the roots have not grown. It will not evaporate water if the air humidity is 100%. So you need film. But in the summer, under the film, everything burns out in an hour. The solution to the problem lies in the exact selection of a place for the greenhouse. There should be almost no direct sun there - well, maybe before eight in the morning and after eight in the evening, and individual sunbeams are not contraindicated. But there should be a maximum of free sky. It’s normal - under the northern wall, and so that there are no trees or houses nearby. Or under the crown of a large tree, around which there is an illuminated space.
The bed is done the same way. The same layer of sand or screenings, spilled with a stimulant and half the dose of fertilizer. A wire frame 20-30 cm high. A clean film is stretched. One edge is dug in, the rest are pressed tightly to the ground, but in such a way that it is easy to lift the film. That's all the device called a cold greenhouse. If at the same time you arrange a reflective screen that would cast light from the open part of the sky and from the dark side, rooting will be even faster and more powerful. A sheet of aluminum, mirror film or just something white is suitable for this. The reflector effect is very noticeable.
The role of light in plant propagation by cuttings.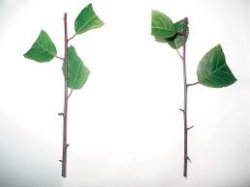 Light has a significant effect on the rooting of cuttings. If the cutting has at least part of a leaf, it needs light to root. At the same time, cuttings without leaves produce roots better in the dark. The reason for this is that if the cutting was harvested at a time when the plant no longer had leaves, it contains a certain amount of heteroauxin, which stimulates the formation of roots, which, in all likelihood, decomposes in the light. And in the presence of green leaves, heteroauxin, on the contrary, is produced. From this point of view, it would be better to leave a large number of leaves on the cuttings, but in this case, moisture evaporates more actively and the cuttings dry out. Therefore they recommend most remove the leaves, and sometimes even cut off the halves of the remaining leaves.
So, the light factor during cuttings affects as follows. A cutting that does not have leaves produces roots better in the dark.
To root a cutting that has at least a piece of leaf left, light is needed.
It is worth noting that in light dishes, even in the light, roots form worse than in dark ones.
Storage and planting of cuttings.
For green cuttings, place the chopped material in a plastic bag or place it in water. Green cuttings must be planted on the day of cutting. Green cuttings cannot be stored at all without moisture. They can be worn in a damp bag for at most half a day, but they cannot be wrinkled. By placing them in water, they can be preserved for a couple more days, but the leaves should not fall into the water, and it is better to put a bag of transparent film on the jar to increase air humidity.
It is enough to weed such a greenhouse and water it with a watering can once a week. It is better, of course, to arrange wick watering. When the shoots begin to grow rapidly, the film can be removed, but you need to water more often. You can feed it once every two weeks, and if humus is added, you don’t have to feed it at all. Subtlety of care: leaves that stick to sweaty film or sand quickly rot. Make sure this doesn't happen.
Lignified cuttings can be stored in a bag in the refrigerator or in sand in the basement until spring.
For green cuttings, to prevent excessive loss of moisture, cut the leaf blades in half. For plants with a hollow core, the lower cut of the cutting must be filled with paraffin to prevent rotting. This process involves covering the cuttings with a thin film of paraffin. This is done as follows: the upper ends of the cuttings or seedlings with the eyes located on them are immersed for a moment in molten paraffin, the temperature of which should be + 75-85 ° C. If you use paraffin heated to a lower temperature, then its layer on the cuttings will form too thick and it will often crumble later. Paraffin is heated in a water bath. Paraffin cannot be heated over an open fire, because its temperature can be much higher than recommended, and this will lead to burns of the tissue of the cuttings; in addition, paraffin heated to a high temperature is a fire hazard.
For waxing, you can use regular technical paraffin, or just regular paraffin candles. In order for the paraffin to stick better to the cuttings and its film to be elastic, you can add bitumen and rosin, 30g per 1000g of paraffin. If you add beeswax to paraffin, up to 10% of its weight, then waxing of cuttings and seedlings can be done at a lower temperature. The use of paraffin, which has good anti-transpiration properties, allows you to increase the survival rate of cuttings in a shkolka (this is a mini-bed, a place for cutting seedlings, rooting cuttings, cuttings of perennials, i.e. where plants are grown with for different periods growth) and plant seedlings and then bury them in soil.
Select the distance between the cuttings according to the size of the plant so that the leaves do not touch. This time we deepen it purely symbolically: semi-lignified ones - to the lower third, herbaceous ones (mint, lemon balm, etc.) - by 2 cm. In summer, the cuttings rot especially quickly, and the roots grow even better if the moisture is not very close. Bury the green cuttings into the ground up to the leaves.
Bury the lignified cuttings into the soil so that 2-3 buds remain above the surface. The cuttings should be 2-3 cm above the ground. Keep the soil moist.
Try to root whatever you want. Look at the cutting realistically: it is a living organism that has everything it needs to survive. There is both a bud and a cambium for the roots. A cutting is almost the same as a seed. Even the ends of perennial currant branches cut in August and sea buckthorn branches cut in September take root. Even two- and three-year-old wood takes root.
Moreover, the ability to take root by cuttings is developed. Plants have a “memory” for rooting! About a third of the cuttings take root first. Cuttings taken from rooted plants survive by two-thirds. And cuttings from them take root one hundred percent. This was described in detail by Michurin.
And that is not all. The most unrooted cuttings can be prepared for guaranteed rooting. And even make it take root “without leaving the branch.”
How to root anything that doesn’t want to take root. 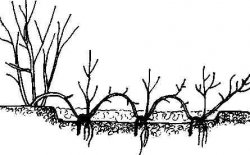 The most reliable way to root a plant is to make layering. A branch, buried in the ground and moistened, gives its roots over the summer without risking anything and without stopping its growth. In the spring it can be cut off and planted wherever needed. This way you can reproduce anything. And the trees take root well. Layerings are not done because most gardeners are used to raising the crown high above the ground for some reason. Yuri Ignatovich Trashchei's trees in Vasyurinskaya sit almost horizontally. Their branches are lowered and dug in, then dug in again, and the trees can “walk” through the garden, forming a low-growing “tree-garden”.
And the Chinese noticed in ancient times: if a branch is placed strictly horizontally, several shoots climb up from it. If such a branch is buried, roots form under each shoot, and you can get several plants.
The mother branch (shoot) must be pinned firmly to the ground and watered well. The method is called: Chinese layering. It is used when propagating rootstocks in nurseries: the regrown seedling is buried in a ditch, leaving only the top in the light. By autumn, a “comb” of shoots grows, and everything with its roots can be divided.
And in Kazakhstan, a varietal tree is buried in two directions for three years in a row. The main skeletal branches become like rhizomes, and underground trunks are formed, overgrown with roots. And on top there are a wall of fruit-bearing branches. This greatly improves drought resistance. And in cold climates, God himself ordered the use of this technique.
The formation of roots on a layer can be enhanced and accelerated by cutting or removing part of the bark on the underside of the branch. Substances flowing from the leaves will accumulate here, and an influx will form, containing a mass of root buds. If only one layer is separated, the entire bark can be cut into a ring. All the substances will settle here and a bloat will form, which is even better.
Michurin, who already at the age of ten was playfully grafting anything, learned to use it. There was always a shortage of land in his nurseries, and he came up with a method of air layering. If the branch cannot be lowered to the ground, then why not raise the earth to the branch? It turned out that there was enough water. Ivan Vladimirovich used a device made of a rubber and glass tube. In May he ringed young branches, in July the tube was filled with roots. Only the apple trees were struggling: the roots might not appear until the fall. But here’s what’s important: all the “stubborn” branches formed an excellent swelling, and it was covered with pimples of root buds. All these branches, planted in the beds in the spring, took root perfectly! Conclusion: simply by ringing the shoot at the beginning of summer, we prepare it for confident rooting.
It is not difficult to ring young currant or gooseberry branches at the base and cover them with soil or put on a bag, box, or kefir package filled with moist soil. The harvest is ripe - we cut off the branches with berries. The berries go into action, and the branches with roots go into the ground. A year - and new bushes. It’s a miracle with grapes: ring the fruit shoots at the base (those on which the tassels ripen) in June, and in the fall you’ll cut not just any, but stems ready for rooting. And if you are not too lazy to tie down the soil, then in August-September you can plant chubuk with roots. In the spring it will grow powerfully, developing three branches at once. Winning - year! If this becomes a habit, we will have a late summer market for planting material.
All this was developed and described back in the 20s. Michurin really hoped that our gardening would be transformed thanks to his methods. “This method of rooting, when fully developed, promises a great revolution in the field of gardening in the future. in this case You will have to wait much less for the start of fruiting compared to grafted trees." Here is N.I. Kurdyumov's option for creating layerings.
In May-June, the border between last year's and summer's wood is clearly visible: the place from which the shoot began to grow. Remove a centimeter-wide ring of bark immediately below this joint. We also make furrows to form roots 3-5 cm long. It is better to take a growth shoot, without branches - it is more convenient to put on a bag. From below, we tightly tie the bag onto the palm below the ring of the removed bark. We must blind all the buds inside the package. In the bag we put damp rotted sawdust, rotted leaves, moss, a little humus or soil. Moisturizing - average, not dirty at all! Quantity - no more than a glass. We tie the bag on top 2-3 cm above the furrows. Now let's wrap it all in a couple of layers of newspapers and secure them: the sun should not heat the bag too much. This is all. Sometimes you can come up, remove the paper and see what is being done in the package. As soon as the bag is filled with roots, the growing shoot can be shortened by half. After a week you can plant it in a well-watered hole. You need to cut the branch along the bottom edge of the bag, and remove the bag when planting.
You can root both two- and three-year-old branches in this way. Of course, planting them in summer is a big risk, and you need to wait until autumn. But such branches immediately produce fruit-bearing, low-growing trees.
You can “remove” an entire young tree! A three- to four-year-old tree can have its trunk ringed. Strengthen, as expected, a container with earth - a bag or box. Water. By autumn, roots have formed, and the tree can be cut off and planted - of course, greatly relieving the crown. And new shoots will creep out from under the ring - in a couple of years, a new crown of the headless tree will grow from them. This is how two trees are made from one tree in one summer. This is especially popular in the tropics.
Is it possible to take cuttings from plants during the dormant period?
Surprisingly, many plants reproduce better during the dormant period. For example, large percentage spring cuttings black currant dies, and those planted in the ground in the fall take root much better.
Sea buckthorn branches harvested at the end of January - February form roots in water after 1 - 2 weeks in a jar of ordinary water. Adding honey to water to root sea buckthorn has a good effect. Dilute a tablespoon of honey in a glass of water and leave the cuttings in the solution for 6-12 hours. When cutting sea buckthorn in winter, it is important to remember that the roots on the cuttings grow quickly and if you do not transplant them into the soil in time, they will outgrow and can easily break off.
Also, experienced gardeners say that yew berry and thuja vulgaris, which gave roots in February - March, were planted in the ground in May - June and took root well.
How to choose a mother plant.
How well the cuttings will take root also depends on the plant from which they are cut. Interestingly, the ability of taken cuttings to root depends on the nutrition of the mother plant. In particular, from his nutrition. If the mother plant has not been fertilized, rooting of cuttings obtained from it is difficult. If it received fertilizing with a high nitrogen content, the cuttings also give roots very poorly. In order for roots to form easily and actively on cuttings, fertilizers for the mother plant must contain sufficient amounts of potassium and phosphorus and a small amount of nitrogen. If it receives nitrogen in excess, then the roots on the cuttings form very poorly.
It is also difficult for cuttings of a plant that has been “starving” to form roots.
Also for plants that have difficulty rooting, the age of the mother plant is a significant factor. Cuttings taken from older plants take poorly or do not take cuttings at all, even if the cuttings are taken from annual shoots and even when they are treated with a root formation stimulator. Conversely, young plants produce rooted cuttings even in species that are not usually propagated by cuttings, such as apple and pear trees. But in order for such cuttings to produce roots, they need to be treated with heteroauxin.
At the same time, for easily rooted plants, the age of the mother plant does not matter.
Selecting a part of the shoot for cuttings.
It is also important from which part of the shoot the cutting is taken.
Often very long shoots are taken for cuttings, from which a large number of cuttings are cut with pruners at once.
The lower the segment of the stem from which the cutting is taken is located, the better it takes root in most plants.
Growth stimulants for cuttings.
To increase the likelihood of rooting, to accelerate the formation of roots on cuttings (especially those that are difficult to root), to obtain a more powerful root system, it is recommended to treat the cuttings before planting with growth stimulants (phytohormones), which promote the beneficial accumulation of organic substances at the site of root formation. For successful cuttings of woody plants, growth stimulants are often used:
- heteroauxin (fine crystalline powder of white, pink or yellowish color);
- beta-indolylbutyric acid (outwardly similar to heteroauxin);
- beta-indolylacetic acid and alpha-naphthylacetic acid (white or grayish powders).
Growth stimulants have great biological activity, so they are used in very small concentrations (according to instructions). To treat cuttings with solutions of growth stimulants, glass, porcelain or enamel dishes are used. Treatment of cuttings with growth stimulants is carried out in a darkened room at a temperature no higher than 20-23 degrees (more than heat is dangerous, and at 28-30 degrees poisoning of the cuttings occurs).
Three methods of stimulating treatment of cuttings are most often used:
- immersion of the lower ends of the cuttings in aqueous solutions of stimulants (solutions of low, medium or high concentration are prepared);
- immersing the lower ends of the cuttings in alcohol solutions of stimulants (used to treat cuttings of plants that cannot remain in water for a long time, as well as for propagating rare and valuable plants);
- treatment of the lower ends of the cuttings with dry growth powder (a mixture of a growth stimulant with talc or crushed charcoal, usually at the rate of 1-30 mg of stimulant per 1 g of talc or charcoal).
Root formation of cuttings is further enhanced by treating their lower ends before planting with a mixture of a growth stimulator with vitamin C (ascorbic acid) or vitamin B1 (thiamine). Vitamins also contribute to faster growth of shoots in rooted cuttings (however, the use of vitamins alone to improve root formation and better growth of shoots in cuttings, without using growth stimulants together with vitamins, does not give a positive effect). When preparing aqueous or alcoholic solutions of a growth stimulator, when preparing growth powder, one of the above-mentioned vitamins is added to them, after dissolving its powder in a small amount of water. After preparing an alcohol solution of the stimulant, a vitamin is added to it in the following concentration: vitamin C - 20-50 mg per 1 ml of 50% alcohol, vitamin B1 - 2-20 mg. When preparing growth powder, dissolved vitamin is added to it at the rate of: vitamin C - 50-100 mg per 1 g of talc or coal, vitamin B1 - 5-10 mg per 1 g.
A freshly prepared growth stimulator solution along with a vitamin solution added to it is used immediately after cutting the cuttings; the depth of immersion in the growth stimulator solution depends on the length of the cuttings and the degree of their lignification. Green cuttings are immersed in the solution by 2-4 cm (no deeper than a third of the length) and kept in it for 10 hours to a day (according to the instructions); The processing time depends on the concentration of the solution and the type of stimulant. The short length and the presence of leaves in green cuttings contribute to enhanced absorption of the stimulant by the cuttings along with water. Lignified cuttings are immersed in the solution up to half or two-thirds of the length of the cutting.
In growth powder prepared in advance for dry treatment of cuttings before planting, the content of a growth stimulant can vary within significant limits (depending on the desired activity of the stimulant). To prepare growth powder, the stimulator is first dissolved in water, and then this aqueous solution is thoroughly mixed with talc or charcoal and a vitamin solution. The resulting mixture is dried in a dark place at a temperature of 50-70 degrees; The powder is stored in a tightly closed opaque container. To treat the cutting, its lower part is moistened with water, dusted with growth powder and immediately planted.
Amateur gardeners often use Epin, Kornevin, Sodium Humate, Zircon, and aloe juice as growth stimulants when rooting cuttings. Seeds, corms, and cuttings of perennial plants are also soaked in growth stimulants before planting. The Epin solution has proven itself very well as a natural bioregulator when used for spraying to maintain plant immunity during the rooting process, before and after picking seedlings and under stressful plant growing conditions.
 An interesting way of cuttings.
Some amateur gardeners have recently been practicing an interesting method of cuttings, which allows them to root even plants that are difficult to cut.
The cuttings are stuck into a potato tuber from which all the eyes have previously been removed. Then the tuber is buried in the ground, and the cutting is covered with a glass jar and watered regularly. At the same time, the cuttings are supplied with a large amount of nutrients and actively produce roots, and the plants subsequently grow and develop well.


