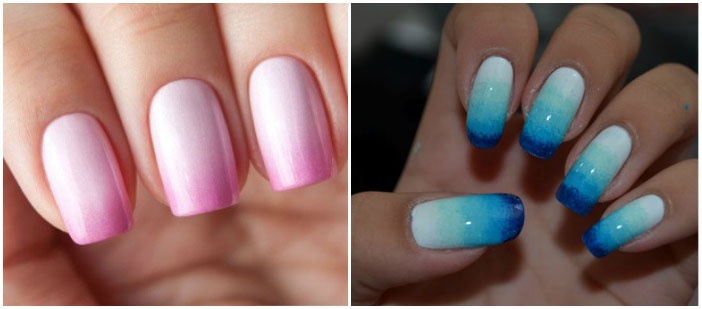
Ombre nails with gel polish - current designs. Ombre nails: stylish manicure at home.
The desire of girls to look charming is quite natural and justified. Daily makeup, hairstyle, outfits - all this helps to create a wonderful image. An equally important element is manicure. Modern fashion dictates its terms in terms of design, so the ombre nail technique is now very popular. The resulting result will not only please the girl, but also attract the admiring glances of others. How to do this manicure yourself?
Step-by-step instructions for creating an ombre shellac manicure
Stylish, original, bright manicure is the dream of all girls. The standard coating of the nail plate with varnish is a thing of the past. It was replaced by new designs. A popular trend in the fashionable manicure industry is the ombre technique. With some knowledge and skills, it is possible to make a stylish nail plate design at home without the help of a professional.
To create an ombre effect on nails with shellac you will need:
- manicure set;
- UV lamp;
- shellac varnish of different shades (the quantity and colors depend on the chosen type of ombre and the wishes of the girl);
- degreaser;
- varnish base;
- fixative;
- sponge;
- toothpick;
- a small piece of foil;
- cotton buds;
- nail polish remover (ZhDSL).
Let's look at how to create an ombre effect on your nails:
- We align the nail plates to the same length, file them with a nail file, and polish them with a buff.
- We treat the nails with a degreasing agent so that the base lays down evenly and is fixed.
- We apply a base layer of shellac and place the hand in a UF lamp to completely polymerize it.
- Next comes a layer of varnish of the main color. Using the play of color shades, it is possible to make the nail visually longer. To do this, you need to use light colors at the base of the nail plate. As a result of the transitions, the tip will be slightly darker. This layer is fixed using ultraviolet light.
- Let's proceed directly to creating the ombre. Apply a small amount of varnish in two shades to the foil. Mix colors to create a beautiful, smooth transition from one color to another.
- A sponge or makeup sponge must be dipped into the resulting varnish mixture. We apply it to the nail with maximum care and precision. We remove the varnish that has got on the skin using a cotton swab dipped in ZhDSL.
- We carry out a similar manipulation with all nails, after which we dry everything in an ultraviolet lamp.

- We cover all nails with a special fixative, which will ensure long-term preservation of the manicure. This layer, like the rest, is fixed in a UV lamp for two minutes.
- The final stage of creating an ombre manicure based on shellac will be the elimination of the sticky layer. To do this, moisten a cotton pad with a special solution and wipe all nails. An amazing manicure is ready.
Using this master class, having all the necessary tools and desire, you can easily make an original manicure yourself. The main advantage of using shellac is that you won’t have to worry about adjusting the result for about two to three weeks (unless you get tired of it and you want to renew it). This exquisite design is ideal for both a festive event and Everyday life.
Using shellac, you can make an original design that combines ombre and French techniques. The materials needed are the same as for the standard technique; in addition, you only need strips for a French manicure. Technique:
- We repeat the first 4 points from the previous master class.
- We glue the French strip onto the nail, and cover the tip with a dark-colored varnish. Remove the film.
- Take a polish a couple of shades lighter (glitter will look nice) and use a sponge to apply it to 2/3 of the nail, leaving the base with the base color. This design looks especially festive and charming.

How to do an ombre manicure on nails with gel polish: technique
A beautiful manicure using ombre gel polishes can often only be done in beauty salons or by professionals. This is due to the need to have special tools and parts that not every girl has at home. To create an ombre design with gel polish you will need:
- manicure set;
- base for gel polish;
- topcoat for gel-based varnish;
- gel polishes, at least 2 shades;
- UV lamp;
- nylon brush (thin).
Step-by-step manicure:
- We do a manicure, adjusting the length of the nails and their shape.
- Cover with a thin layer of bonder, which helps clean and degrease the nail plate. Dry in a lamp for a minute.
- Apply transparent gel polish and cure under ultraviolet light for 20 seconds.
- Apply gel polish of the selected color to the nail (at the base). We cover the remaining half of the plate with varnish of a different shade.
- Using a brush, we smooth out the edges, making the transition more natural. More colors can be used if desired. This will help make the design even more original and delightful.

- Dry it in an ultraviolet lamp. Approximate time - 3 minutes.
- Apply the finishing coat to the nails. A charming manicure is ready. In some cases, this design is supplemented with airbrush elements, which gives it sophistication and uniqueness.
Video tutorials on creating gradient nail art at home
To create a beautiful manicure, it is not at all necessary to go to a beauty salon and wait until the master has a convenient time for you. Modern technologies open up new opportunities for creating it at home. All the necessary materials and tools are available for free sale, and anyone can purchase everything they need. And using master classes and video tutorials, you can give yourself and your loved ones a delightful, stylish manicure without leaving home, at a time convenient for you.
Ombre nail painting for beginners
To create a stylish gradient design on your nails, you do not need any special knowledge or skills. It is not at all necessary to use shellac or gel polishes, especially if this is your first time doing this kind of manicure. Ordinary varnishes (it is better to choose from a professional series, not cheap ones) are perfect for creating such a design and using the ombre technique. The only drawback is that it does not last as long as gel-based products. But this is an excellent chance to update your manicure more often, create new masterpieces, and experiment.
To get a stylish design, it is important to choose the right color combination. For example, combinations of black-red, white-black, yellow-blue, white and purple look original. The advantage of this manicure is the ability to use your imagination, combining different shades to create a unique design. Watch the video from detailed description creating a bright, summer manicure in yellow and blue shades:
How to do ombre on short nails
Photo ideas for nail design with ombre effect 2017
Fashionable manicure using the ombre technique is very popular and is used by many masters in salons. This type of design has many advantages:
- Ease of execution.
- Ability to do it yourself at home. Special nail polishes with an ombre effect are often used. With their help, a design can be created when the color transition occurs not on one nail plate, but on different nails one hand.
- Combining different colors, shades, new, original drawings are created.
- Possibility of use different materials to create ombre: shellac, gel polish, glitter, pigments, regular varnish that does not require additional processing.
If you decide to get a manicure, but can’t decide on a color combination or style, look at a selection of photos of ombre nail designs. Photos of fashionable designs of 2017 will help you choose the best option for yourself. And you can do it yourself if you carefully read the master classes and video lessons presented above. Check out other interesting designs.

Fashion trends in manicure, as well as fashion in hairstyles, clothes and makeup, change regularly.
In the coming season, the trend is a creative approach to creating a beautiful and luxurious manicure, in which there are a lot of colors, tones and shades that smoothly flow into each other. Moreover, ombre on nails is only one part of the image; today fashionistas can use such a smooth transition of shades and tones in hair color, in clothes, and when selecting various accessories.
The popularity of ombre is due to its unusualness and variety of design options.
The ombre technique involves a smooth transition from one nail polish color to another, and you can make a manicure from a two-color palette, combine three or more colors, add original decorative elements in the form of sparkles, patterns, etc.
You can combine different colors with each other, it's all about your preferences. You can also combine polishes with different textures and use ombre on extended nails.
You can use two colors that are different shades from each other and in this case you will get a light and airy gradient. Or combine the incompatible and make a contrasting, bright and juicy manicure that will give your fashionable look originality and creativity. This effect will not go unnoticed.
It is quite simple to perform such a fashionable ombre manicure; the main thing is to choose decorative varnishes, shellac (gel polish) and the necessary tools that you can find at home.
Ombre includes two basic application techniques: A vertical gradient or horizontal transitions are created on the nails. There is an even simpler option, when the gradient begins with the lightest shade on the little finger and towards the big finger it becomes deeper and richer - such a manicure looks luxurious and elegant, regardless of the length of the nails.
Vertical ombre allows you to get a smooth vertical color transition and you can use two or more types of varnish, even with different textures, which will give your manicure more originality.
Horizontal ombre on nails - this is the creation of transverse smooth transitions along the entire length of the nail plate. And in this option, your imagination can tell you what and how many colors of varnish you can use.
For diagonal manicure, a peculiar flow of one color into another is obtained. The application technique involves up to five different colored varnishes, which are applied diagonally along the entire length of the nails.
Transitions from one color to another from finger to finger are the use of five shades that become richer and deeper: the lightest shade will be on the little finger, and the deepest on the thumb. This ombre color is considered the easiest to do at home, and you can do it just fine on your own.
How to do an ombre manicure at home
There are several options for performing ombre manicure at home:
- Ombre sponge. This option is often used to create a complex and multi-color horizontal or vertical ombre. Apply the selected colors of varnish to the prepared lip and quickly, but very carefully, transfer everything to the nails. After the gradient dries, seal it with clear polish and remove any excess from the skin around the nails.
- Ombre tassel. The main varnish is applied to the nails, preferably a light shade. Then a varnish of a darker tone is applied and, using a nylon brush, carefully shaded and mixed with the main color of the coating. After drying, seal everything with clear varnish. In this option, you can use several colors of varnish, where one tone will smoothly flow into another.
- Ombre with film. Take film, foil or a regular file, onto which drop drop by drop the varnishes whose palette you have chosen - shades of the same color or contrasting colors. Blend the boundaries between the varnishes with a toothpick and blot the resulting result with a sponge. Apply everything to the nail surface (previously coated with base varnish), dry and secure with clear varnish.
- Airbrush in ombre. This is the most difficult, but also the most impressive, stylish type of ombre, which only a professional master with the skills and necessary equipment can handle. In this option, you get the most unusual and complex transitions from one tone to another, the manicure turns out to be very rich and luxurious, dynamic and voluminous, and every new season necessarily places emphasis on this design.
Ombre nail design: various options for applying shades to artificial nails
If you don’t naturally have the best shape for your nails or you want to quickly get long nails, you can extend them and use an ombre nail design.
Ombre acrylic powder
When trying different options for applying shades to extended nails, you can start with the simplest thing - acrylic powder, which easily creates the desired variations in color transitions.
For example, apply a white base polish to your nails and let it dry for a couple of minutes. The layer of varnish should be thin so that the powder sticks neatly and does not become too large quantity grains.
Now take a fan brush, dip it in the powder and lightly tap it on the nail. You should start the process from the base of the nail to the area where you plan to mix colors. To get a softer, more diffused effect, lift the brush higher as it moves toward the middle of the nail plate.
Thus, we apply the second color and send it all under the lamp. After the powder has dried, remove excess powder with a brush and sand the coating to obtain an even and smooth texture. Brush off the powder again and cover everything with a fixative.
Ombre with acrylic paints
A stylish and beautiful transition between colors can also be achieved using acrylic paints. To create the required color design, you will need a set of paints and volumetric brushes.
First, apply the lightest color to the tip of the nail and blend it down to the base. The second color should be mixed on foil or any other available product and applied next to the first, forming a neat transition. Now again apply the second shade directly to the nail and combine it with the palette that is already on the nails.
If desired, you can apply a beautiful pattern to the resulting result and secure everything with transparent varnish.
Today, gel polishes are very popular, having very rich and rich, deep colors and a rich shade palette.
It’s quite easy to get a trendy ombre nail design using these polishes.
At the beginning of the process, you should degrease the surface of the nail plate and apply the first layer of varnish, dry it with a lamp. Now you can use the second type of varnish and shade the border between the two colors with a thin brush and dry. Apply sealer and remove all traces of polish around the nail.
Ombre manicure: step by step using polish or gel polish
 In order to do an ombre manicure step by step and correctly, you must prepare properly.
First of all, collect the necessary set of tools with which you will create such luxurious beauty.
As you learn, you may need other additional tools and decorative products to create a manicure.
You will need:
- varnishes different colors and textures, acrylic paints;
- nail polish remover, fixatives;
- brushes of different lengths and volumes;
- cosmetic sponges with different grain sizes;
- toothpicks;
- cotton sponges;
- oil or special product to protect the cuticle and area around the nail from varnish;
- ultraviolet lamp (if you use gel polishes or have extended nails).
How to make a manicure with nail polish step by step, let's look at simple example, let's look at the technique of applying a design with regular varnish:
 |
Step 1 |
|
 |
Step 2 |
|
 |
Step 3 |
|
 |
Step 4 |
|
 |
Step 5 |
If you use a brush rather than a sponge to apply varnish, try to make each layer the same in volume as the previous one, so as not to create unevenness and create a beautiful and smooth transition from one color to another.
In the case of gel polish, you will need an ultraviolet lamp, thanks to which the polish will dry faster and stay on the nails for up to 2 weeks:
- Degrease the nail plate.
- Apply a base coat of varnish and dry it under a lamp.
- Apply the next coat of varnish and dry again.
- Finish coating and drying.
- Removing sticky moose from the nail plate using an alcohol-containing product.
Today it is very fashionable to do a stretched ombre, which can be done perfectly with the help of gel polishes and its implementation does not cause any trouble.
The preparatory steps are the same as for any other ombre technique. Apply the base color and dry under the lamp.
Now, from the base of the nail, apply one color to the middle, and then, from the tip of the nail, apply the second color. Take the thinnest brush and carefully combine two colors, making a smooth flow of one into the other. As you work on each nail, you should wipe the brush so that the color is rich and bright, not dirty and faded. Apply top coat and dry your nails under the lamp.
You can shade the varnishes in any direction, and when using a multi-color palette, you can generally create original and creative abstract art with smooth and contrasting transitions.
Ombre manicure: design options and technique
![]() There are a lot of options for performing ombre today and with each new season, even more of them appear.
There are a lot of options for performing ombre today and with each new season, even more of them appear.
You can create an ombre manicure using two or more colors, use different directions of application, varnishes of different shades of the same color, or very contrasting decors, where the combination of colors creates an extraordinary effect.
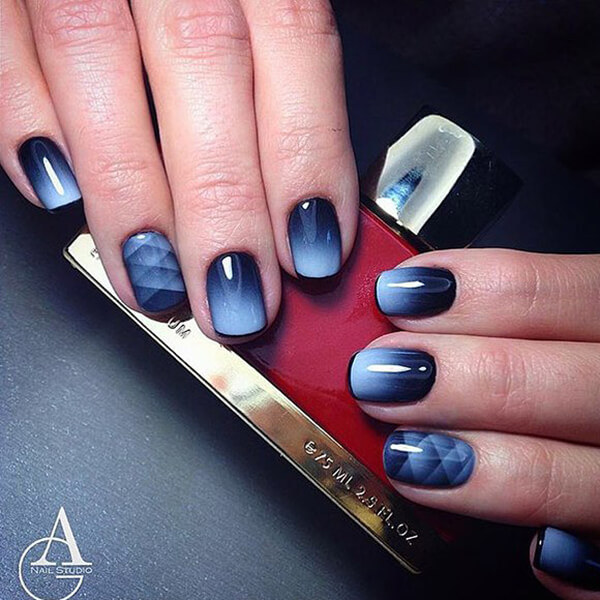
Volumetric ombre is created using different shades of the same color, each of which is applied to a separate nail, and the lightest shade should be on the little finger, and the darkest and most saturated one should be on the thumb. It is this technique that is considered the most successful and stylish. The main thing here is the right color and its shades.
Monochrome ombre- this is luxurious grace and sophistication. In this technique, you can use two or more colors of varnish. One color of polish is applied from the base of the nail to the middle, and we use the second color from the middle of the nail to its tip. You can shade the border between colors using a thin brush or toothpick.
Contrast ombre involves the use of different colors of varnish. In this case, you can make smooth transitions using a sponge or brush, directly on the nail or using improvised means.
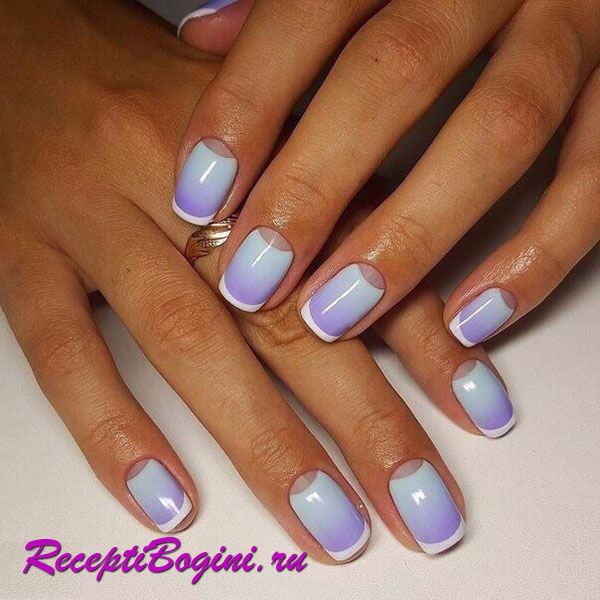
Classic French ombre- this is one of the most simple options manicure with a smooth flow of the main color into a lighter or, conversely, darker color, applied to the tip of the nail plate. You can do this classic manicure at home.
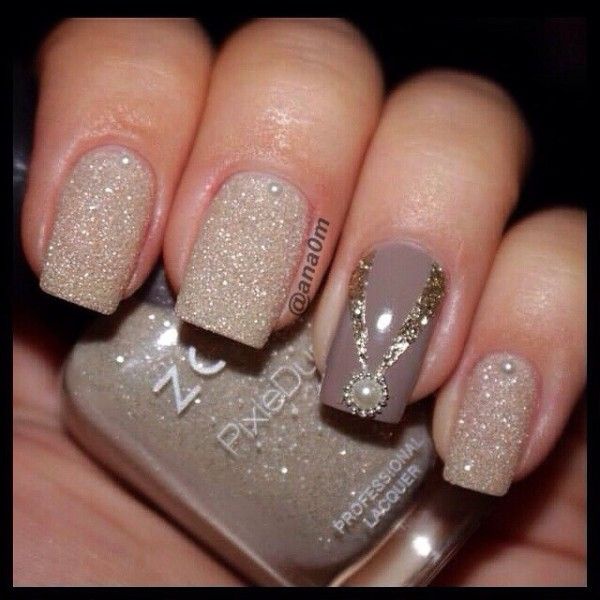
Ombre glitter manicure It is also quite simple in execution, but looks simply luxurious and stylish. Apply a small amount of glitter onto the base polish using a brush, so as to get the effect of the glitter fading closer to the base of the nail. You can fix the glitter with clear varnish.
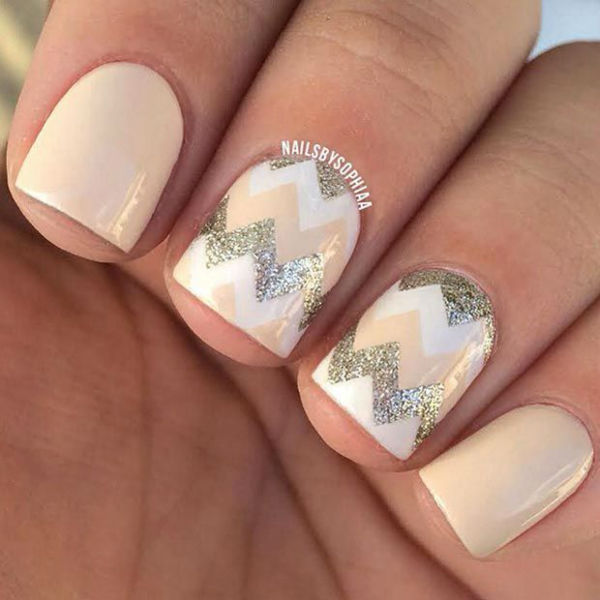
In addition to the basic ombre techniques, you can also additionally decorate your manicure with drawings, stickers and other decorative elements. In this case, on top of the resulting ombre design, which has already dried, designs are applied with a thin brush or an airbrush if you use the services of a master. You can diversify the original design with rhinestones and small sparkling stones.
Ombre manicure is a huge field for the flight of your imagination, thanks to which you can create everyday, business and evening manicures, you can harmoniously complete your stylish look and give it a unique charm and originality.
Ombre technology is popular in hair coloring, manicure and clothing. Using the technique of smooth flow of colors, stylists create beautiful nail designs, giving your hands an elegant and well-groomed look. At first glance, it may seem that it is difficult to do an ombre manicure at home, but if you strictly follow the instructions, it is quite possible. What materials and tools will you need to create a gradient effect on your nails? How to make different types ombre manicure?
Features of manicure with ombre effect
Gradient manicure looks beautiful, mesmerizing and impressive, which is why many women of different ages prefer this type of nail design. The principle of the ombre technique is to create smooth transitions between shades of the same color or between contrasting tones, with the dark varnish in this design located at the top, and the light varnish at the base of the nail.
A gradient manicure is perfect for decorating long and short nails; it will look equally appropriate on the hands of a young girl, a respectable lady and a business woman. There are several ways to do it. Let's look at the features of different ombre design techniques and what tools and materials are used to create a gradient on nails.
What is needed for a manicure
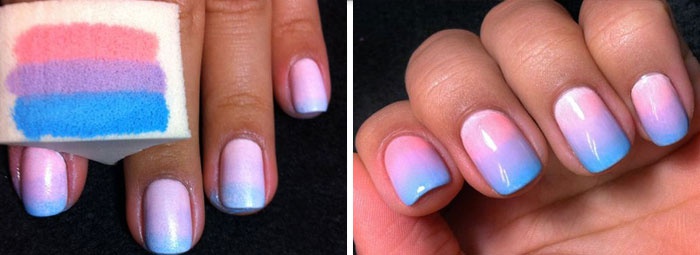
Ombre with a gradient transition is done on natural or extended nails. To perform it, different techniques can be used. The easiest way for beginners to make a gradient is to use an ordinary sponge, which must first be cut into small pieces. This technique is well suited for painting natural nails. To do this, take a new kitchen sponge or a fine-grained sponge specially designed for creating gradient transitions. Materials for ombre manicure:

- foam sponge;
- transparent/white base;
- fixative;
- 2-4 colored varnishes;
- foil/sheet of paper;
- sticks with cotton wool;
- nail polish remover.
Nail art options
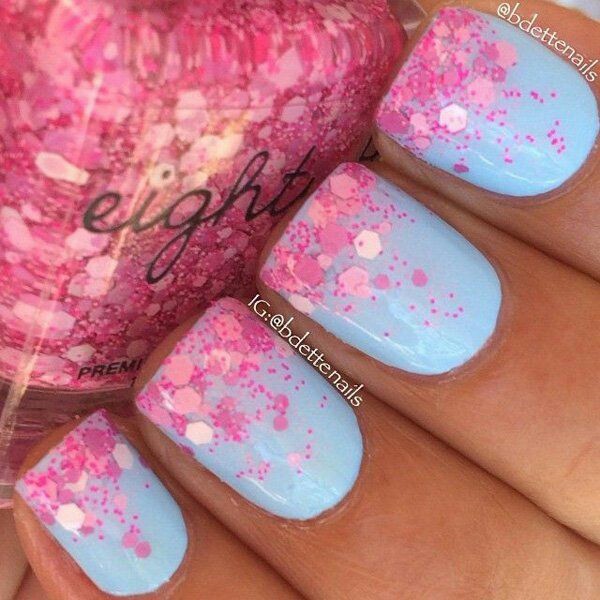
There are several types of ombre manicure. Some of them create a stunning look on the nails by smoothly transitioning shades of the same color, others play on contrasting tones, and others create an ombre effect on fingers painted in a similar palette. Ombre with sparkles looks interesting and original. To achieve this, shiny elements are applied to the main color using a sponge. top part nail All types of nail art with gradient transitions have one thing in common - they look amazingly beautiful on the hands. Let's look at the features of popular ombre techniques.
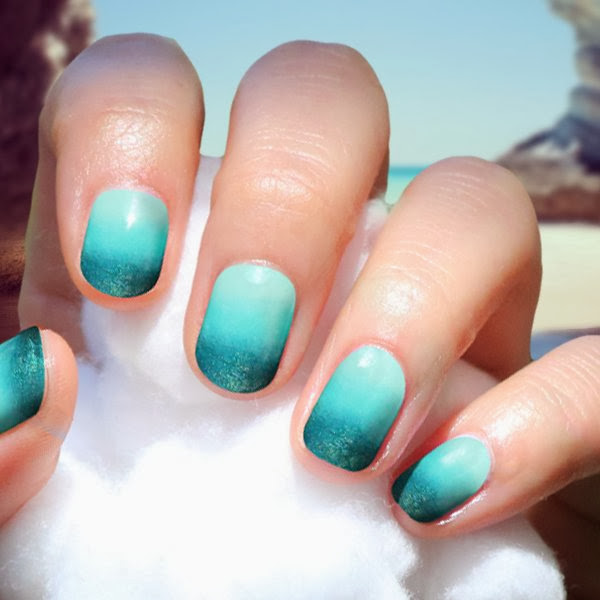
Smooth transition from light to dark
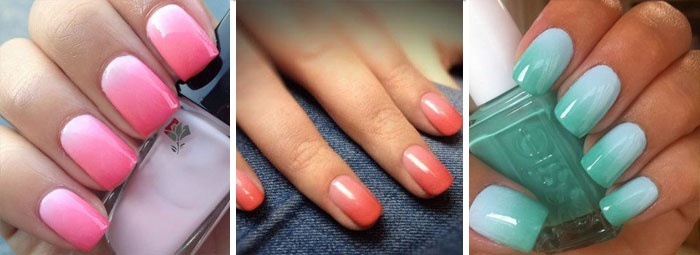
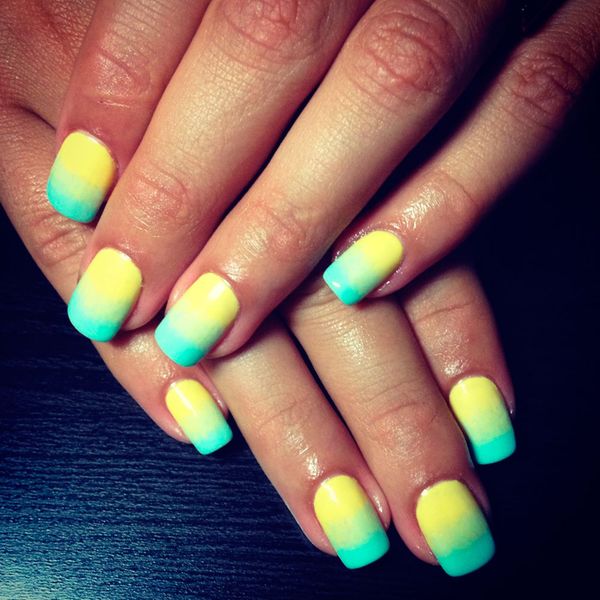
Color transitions using ombre technology can be carried out within one shade (from light to dark). This type of nail art can be horizontal (it is performed with a transition of colors from the base of the nail to its tip) or vertical (shades change into each other from left to right). For a gradient flow of colors, use either 1 varnish, which is diluted to obtain less bright shades, or 2 nail coloring products of a similar tone. For this type of manicure, scarlet and soft pink, light green and pale light green, light blue and turquoise are suitable.
If you want to make a gradient transition in one palette, then prepare several varnishes that are similar in color. color scheme. Next you need to go through several steps:

- First, do a hygienic manicure and lubricate your hands with cream.
- Then paint the nail plate with a transparent base.
- On a sheet of foil, paint stripes with different varnishes that are similar in palette.
- Next, take a sponge and dip it in this blank of different shades and apply it to the nail, patting it lightly.
- To design each finger, you need to draw new stripes on the foil, dip the sponge in paint and reprint them onto the nail plate.
- After painting all your nails, let them dry thoroughly, and then use a cotton swab with acetone to remove excess paint.
- The last stage This design will involve applying colorless varnish to the entire surface.
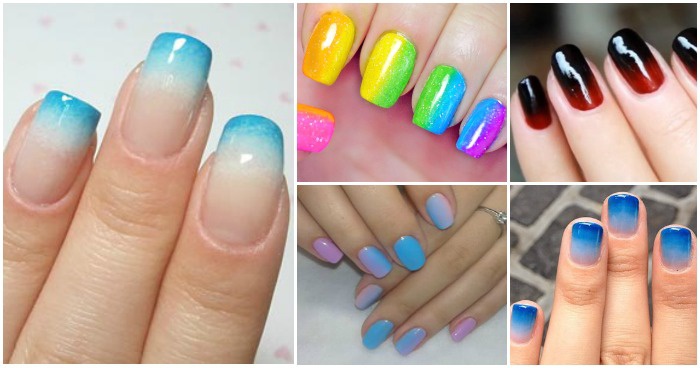
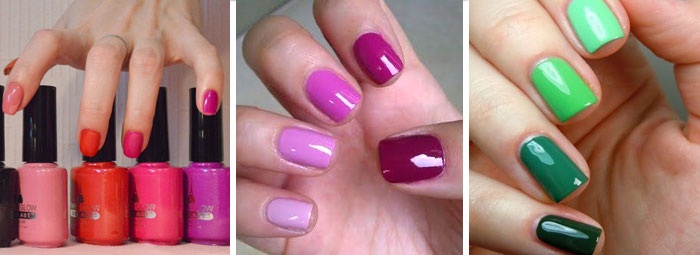
Two-tone contrast transition

To perform an ombre manicure, 2 contrasting colors can be used. To make a two-color contrasting transition, first choose two well-combined varnishes. So, lilac and yellow, dark blue and orange, light green and scarlet look harmonious together:
- The first stage of this type of gradient begins with completely painting the nails in one of the selected shades, which, according to your idea, will cover the tips.
- When the first layer dries, the sponge is moistened with a different color and applied from the base to the middle of the nail plate.
- Next, use a brush with nail polish remover to stretch the second layer to the length of the nail.
- When everything is dry, cover the surface of the nail plate with a hardener.
A two-color contrasting manicure looks elegant and bright, so it’s suitable for both everyday life and creating a festive look.
Transition of colors on each finger
The gradient transition of colors on each finger looks unusual, but harmonious, provided that the shades are chosen correctly. The technology of this nail art is that each finger of the hand is painted with a color specially selected for it, which differs only by a few tones from the shade of the others. In this case, a more saturated color is applied to thumb, and the most delicate and light tone is on the little finger. The border between shade transitions is not clear, but blurred.
So, a gradient manicure made using 5 shades of beige (from brown to light nude) will look impressive on your hand. It will be easy to make a smooth gradient of colors on each finger at home. To perform this ombre technique, you need to choose one polish with a rich color. Let's take a quick look at how to make the transition from red to soft pink on your hand:
- First, degrease and cover all nail plates with base. Then paint the thumb red.
- Then pour a little scarlet varnish into a glass plate and add 1-2 drops of white thinner to it, stir. Use the resulting mixture to paint your index finger.
- Next, again add 1-2 drops of white thinner to the already lightened red varnish and paint the next finger with it. We do this every time before applying paint to the next nail. By adding a light product, we lighten the red tint, turning it first into a less saturated scarlet, and then into a soft pink.
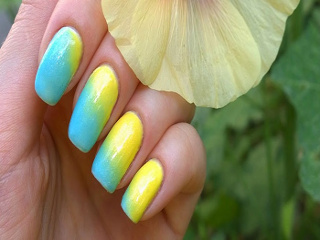
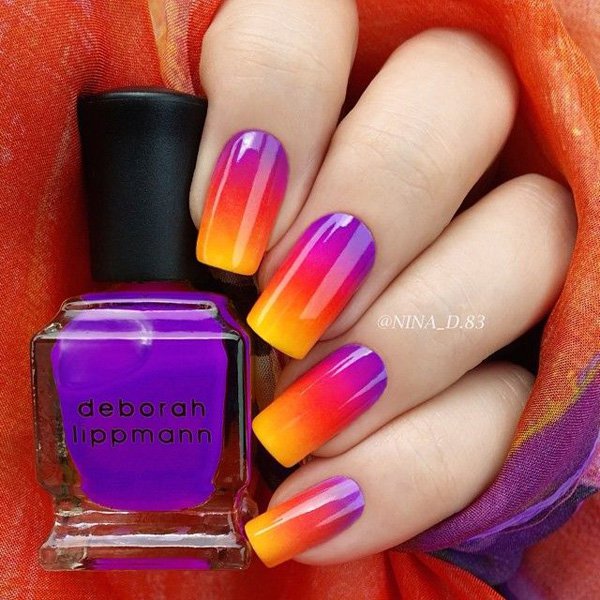
Multicolor Gradient
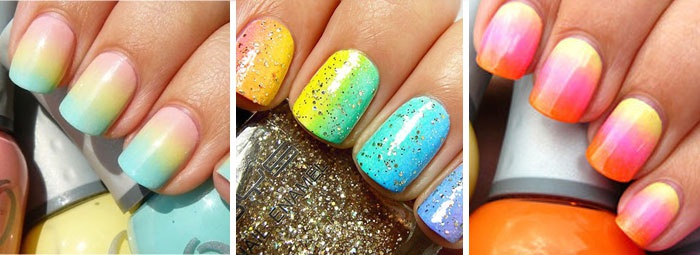
Rainbow nail art looks bright and impressive. To create this type of ombre, up to 5 colors can be used. The shades of varnishes are chosen either in the same or in a contrasting palette. To create a multi-color gradient, you will need a sponge on which strips of different varnishes will be applied one above the other, and then a sponge with paints will be applied to the nail and the overlay of shades will be adjusted using it. detailed instructions How to perform a rainbow manicure is given below.
How to make ombre at home: step-by-step instructions
Let's take a step-by-step look at how to make a classic ombre at home with horizontal color transitions. If you want to make a multi-color gradient, then prepare several varnishes that harmonize in color, a small sponge, cotton swabs, nail polish remover, a sheet of paper, a base varnish, and a fixative. Instructions for making a multi-color home ombre:
- Get a hygienic manicure. To do this, carry out the cuticle removal procedure and give your nails the desired shape with a nail file. Then apply cream to your hands.
- Paint the nail plate with white base varnish.
- Apply strips of different varnishes one above the other on paper or foil.
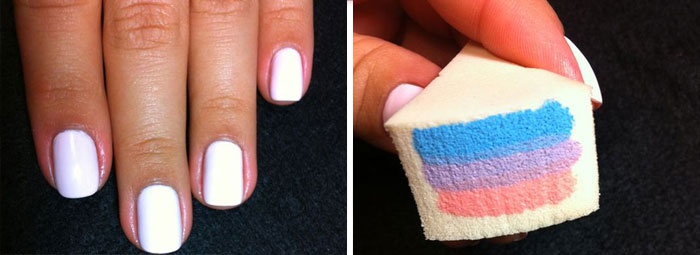
- Take a sponge and dip it into a blank of strips of different shades.
- Using a sponge, lightly apply the paint onto the nail. To design each finger, you need to draw new stripes on paper, dip a sponge in them and reprint the polish onto the nail plate. It is advisable to make 3 layers, each time letting the previous one dry.
- After painting all your nails, let them dry.
- Then use a cotton swab with nail polish remover to remove excess paint from the skin.
- Cover the gradient with clear varnish.
Video: master class manicure in ombre style with gel polish
If you want to do an ombre manicure at home, then first you will have to understand the technology for performing this type of design and purchase the necessary materials. To see how gradient nail art is done correctly, watch the master class in the video below. The specialist shows in detail all the stages of performing this manicure with gel polish. After watching the video, it will be easy for you to repeat ombre shellac at home.
A manicure in the amber style “captivated” modern fashionistas last year. But to this day this design remains relevant. To be on top and fit fashion trends, it is not at all necessary to visit expensive salons, spending a lot of time and money on it. You can do an ombre manicure at home, with your own hands. The main thing is to have a little patience and a little free time. This article will tell you in detail how to create a gradient effect on your nails or, simply, beautiful color transitions with regular polish. After all, such nails look simply stunning and delight others. Some people call this manicure “lunar”, which is also very attractive and unusual.
So, read where to start, how to make ombre nails, and also see photos, videos and instructions.
Before you make amber on your nails at home, you need to have an accurate idea of what it is. An ombre manicure is a combination of several shades that are similar in color on one nail in such a way that the effect of a very smooth transition is created. The colors seem to flow into one another. This design is otherwise called a gradient.
This effect is achieved through a special varnish application technique. You can create a color gradient both vertically and horizontally. But it is the last version of the amber design that looks better and more beautiful. You can make a gradient on any nails: long, short, oval, square, extended or your own. You can also create amber with gel polish. It can be a light manicure, bright or dark, the main thing is that the colors of the varnishes combine well with each other.
What an ombre manicure looks like, look at the photo:


How to do an ombre manicure at home?
Learning how to make an amber design on your nails at home is not at all difficult. But for this you need to prepare all the necessary components.
To do this you will need:
- Varnish of 3 or 4 similar colors;
- Foil (you can use an old disk, thick cardboard or a piece of plastic);
- Sponge, sponge or nylon (piece of fabric);
- Acetone or nail polish remover;
- Cuticle oil;
- Cotton buds;
- Toothpick.
Option 1. Application technique - step by step instructions:
- Make a neat manicure on your nails, trim the length, cover them with colorless varnish;
- Apply cuticle oil to the skin around your nails. This is necessary so that the varnish stains your fingers less;
- Next, everything will need to be done quickly: on foil (or any other dense surface), apply stripes of 2-4 colors of varnish, moving from dark to light or vice versa;
- Lightly mix the colors together with a toothpick (you can see how to do this in the photo below);
- Immediately dip the sponge in these colors and stamp on your nails. The sponge or sponge must be made of nylon, or it can be a piece of nylon fabric, otherwise the varnish will be absorbed into the material and will not transfer the color to the nails well.
- When all the nails are covered with a gradient, without waiting for it to dry, cover everything with colorless varnish;
- If the rollers become dirty, remove any excess with a cotton swab dipped in acetone.
How to do an ombre manicure, look at the photo:

Tip: To get the moon effect, which is currently at its peak of popularity, use colors so that the base of the nail has a light tone. It is precisely for the color highlighting of the lunula (the hole on top of the nail, which absolutely everyone has), that this manicure received the name “lunar”.
What the lunar design looks like, look at the photo:

Option 2. Application technique - step by step instructions:
- Cover the nail with the base color of the varnish, which will serve as the basis for the gradient, wait until it dries;
- Next, you need to apply 2-3 colored stripes onto the foil, also using the base color;
- Lubricate the skin around the nail with oil, and transfer the color to the nails with a nylon sponge, as in the instructions described above;
- If necessary, remove excess with a cotton swab dipped in nail polish remover.
How to do this, look at the photo:

This option has a smoother color transition effect. The boundaries of tones are more blurred.
See also detailed video tutorials on how to do amber manicure at home:
How to do an Ombre manicure with gel polish at home
In order to easily create ombre nails with gel polishes, you should first practice on regular polishes, because if you don’t succeed the first time, it will be difficult to remove the gel polish.
To work with the gel you will need:
- Ultraviolet lamp;
- Gel system set (base coat, colored gels, top coat);
- Primer or bondex;
- Polishing buffer, soft nail file;
- Cotton swabs, acetone.
Step-by-step technique on how to make ombre with gel polish:
- Cover your nails with base gel and dry it in a lamp;
- On the foil, make stripes of 2-3 colors of gel polish, lightly mix the boundaries of the tones with a toothpick;
- Use a nylon sponge to transfer the gradient onto your nails;
- Remove excess gel polish on the skin immediately, otherwise the color will harden in the lamp and it will be difficult to remove;
- Dry your nails in the lamp and repeat the procedure with color;
- Cover everything with top gel, dry it longer.
Making a design with an ombre effect or a moonlit manicure with gel is more difficult, and it requires skill, so watch the video carefully and practice on tips first. (video on how to do ombre with gel polish)
The photo below shows the most successful and spectacular colors for lunar manicure and ombre design:

After gel polish was invented, it became easier for many busy business ladies to care for their nails. At first they covered them with a single color, and over time, they began to make ombre nails with gel polish. In fact, it is very convenient; one session is enough for almost a month, depending on the type of activity.

The masters did not stop there and made various changes. They complemented the manicure with a variety of rhinestones and sparkles, and came up with interesting patterns with drawings. They combined different colors that added their own flavor to the designed design. Today, gel polish with a constriction on the nails is very popular. It is also called gradient manicure. The essence of this gradient is to make a smooth transition from one color to another. Before doing this at home, you should practice well, since not many people succeed the first time. But, after several attempts, you can quickly become a professional in this matter.
Technological process
There are two options for creating such a manicure, which are used by experienced masters. The first method requires a thin brush. This technique is very painstaking, but it is worth it, as everyone will be happy with the result. Let's describe it step by step.
- First you need to tidy up the nail plate, trim the cuticle and polish your nails with a special file - a buff. And only after the procedures have been completed, degrease the nail plate.
It is necessary to apply a product that promotes good bonding of the material. Then the base, after which we keep the nails under an ultraviolet lamp. Once finished, you can safely begin applying gel polish. - Apply one-color gel polish and dry them again in the lamp.
- On nails with a constriction, apply to half of the nail.
- Afterwards you need to start stretching the gel with a brush and dry it a little.
- The second layer is applied in the same way.
- Following the same technology, we apply gel polish to the remaining parts of the plate; to fully transfer the color, it is worth covering the nail with three layers.
- After this, the finishing layer is applied. Use a napkin or cotton wool to remove the sticky layer; there are special products for this that will not harm the new manicure.
To learn more about the technique, watch this video tutorial.
The second method is much easier, but more material is needed to complete the task.
- As in the first method, prepare the nail for application and degrease the surface.
- Apply the base and dry.
- Gel polish needs to be applied to some surface and the border shaded.
- First you need to dip the sponge into the gel and then apply it to the nail; after this procedure, two colors remain on the nail.
- Dry the applied mixture well.
- Carefully remove the sticky layer without leaving any lint.
- Finally, apply a sealing layer and dry well.
For this method, one layer is enough, so you can get a beautiful manicure; it should be medium in density. It is important that if the gel thickness is increased, wrinkling may occur during drying.
Note!
If you choose the first method, wipe the brush every time to maintain pure shades. If you want to save time, use a thicker brush. The best assistant for a beautifully executed French manicure is colorless varnish. It will retain a white tint. If you choose the second method, treat the skin around the nail with any cream in advance; this will help you easily remove any remaining polish.

How to make a stretch with glitter?
Previously, many girls could get a manicure that shimmers with shiny rhinestones only for an important celebration or event. Today, you can please yourself with different compositions with glitter on weekdays.
You can use both unusual sparkles and long-familiar ones. Thanks to the large assortment of glitter in stores, you can dilute any tone of gel polish. Such decorations can be found in crumbly form and are included in the varnish itself. Many craftsmen say that it is much easier to work with sparkles, especially for gradient banners. In order to make a stretch, you will need glitter of different colors.

Work execution technology
- First you need to do a manicure, then apply a degreaser.
- Cover the nail plate with base and dry.
- You will also need a tube with the tip cut off at an angle. You need to collect glitter in it and sprinkle it on the nail, tapping it with your finger.
- Then they can be distributed over the surface, both lengthwise and crosswise, and dried under a lamp.
- After applying another layer, follow the same procedure applying a different type of glitter to the tip of the nail.
- Alternate each application with subsequent drying.
- After applying the final coat, be sure to remove the sticky layer.
The result of the work can be seen in the presented photos.

Video on the topic of the article:
Nail modeling gel how to use


