Ornaments for wood burning. Wood burning patterns: a selection of ideas for a fun pastime.
In this article you will find beautiful pictures for wood burning. Here you can see various paintings, and even poems, and everything you like burned on wood. Another name for this craft is pyrography. To achieve success in this matter, you need to practice. Practice and patience will allow you to master this craft and achieve success.
Collection of pictures for wood burning
Have you ever been to an exhibition where various crafts were demonstrated? Now you can see such works in the photo. You can write poems or anything else on wooden signs of various shapes. Make inscriptions such as “gone fishing” or “don’t call me, I’ll call myself.” No matter what you write, a little humor won't hurt.
You can also burn pictures onto the lid and sides of the box, onto picture frames, wherever your imagination dictates. You can also add color by painting them with watercolors.
Start practicing on any old piece of wood to become proficient in this art. Keep in mind that some types of wood will be easier to work with than others. Once you understand the process, buy everything you need from special store. And if you are happy with your results and want to continue, then take on more difficult options.
You can buy different types of wood, some pieces may have bark on the outside, which will add originality to your work.
How to transfer a drawing to wood
There are thousands of different templates. The easiest way is to find pictures of animals, birds, airplanes, looking through children's drawings or books. There are plenty of suitable samples there.
You can also download templates from websites or buy them in special stores. Or use your imagination and create your own images. The choice is yours. Once you select your design, you need to transfer it onto tracing paper. Place a piece of carbon paper, ink side down, on a wooden surface, then lay down your design. Without moving the paper, redraw the template onto the tree.
Burning tools
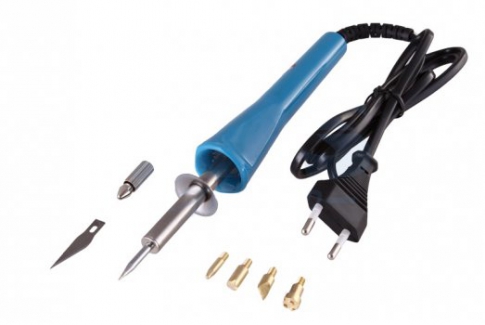
You need to buy the tool in a special store or order it online. When purchasing, ask the seller to advise you on which tool to buy. The size of the pin depends on the type of wood you are going to work with.
The burning device looks like a regular pen with a plastic holder and a nib that heats up at a constant temperature. Controllers regulate the increase or decrease in heating during various operations.
Burn the drawing
![]()
Before starting work on good tree, practice on something unnecessary. If there is no one to show you how to burn, ask the store to advise you. Finally, join some club of similar interests.
Be careful not to press too hard with the hot pen, you may burn too much. As you gain experience, you will even be able to vary the colors in your work.
You can finish your work by coloring it for added effect and making it look more professional.
Other types of pyrography
On the skin– in some ways it might be simpler. You have to be careful as the skin burns easily.
Advice– when working with leather, use a thin tip; a wider one will burn hotter and leave a darker pattern.
Burnout-pumpkin- This is burning on dried fruits.
Drawings for download
This Labrador pattern will give you the opportunity to experiment with the depiction of fur texture. Burn the outline of the dog first, then burn the background, making it darker to create a sense of depth.
Download >>
Snowflake pattern

This collection of 50 snowflakes is very relevant in winter.
Download >>
Download part 2 >>
This sample I still haven't completed it. If you make it, please send me a photo and I will show it here.

Size 40 by 45 cm
There are 4 pages here. Just click on each page, when the page loads, right-click and select print. Set your printer to print “portrait” and the print area to “maximum”.
1 year ago
Pyrography, in other words, or simply put, wood burning is a fairly ancient art. For burning in the old days, they most often only used engraved stamps and metal rods that were heated over a fire.
In today's time there is a large number of special devices for burning, but if desired, such an organization can be made independently from an ordinary soldering iron.
It is best to use a commercial nose that has removable tips. You can make some pin attachments yourself from nichrome wire. This is done quite simply - you need to cut a piece of wire and use pliers to give it the desired shape. After this, it is necessary to carefully sand the surface of the pin attachment, which will communicate directly with the wood.
Selecting drawings and sketches for wood burning
It is not recommended to take on complex compositions when burning in one sitting. It is best to start by practicing points, lines and other simple elements. When drawing lines, it is extremely important to move the pin very smoothly, without making any effort, and to stand at the same speed all the time so that the drawing does not become charred. When burning straight lines, the handle of the burning device should be held at an angle, like holding a pencil, and when burning curved lines, the handle should be perpendicular to the surface.
The presence of beautiful interior elements is simply a necessary condition for making the house seem cozy and welcoming. And many people, trying to make their home environment original, decorate it not only with purchased decorative items, but also with masterpieces created with their own hands. Works made in the style of pyrography are excellent for this purpose.
Wood burning is a wonderful activity that is suitable for both adults and children. Such a hobby develops motor skills, speech, imagination, and teaches patience and accuracy.
But do not forget that pyrography is working with a hot tool. Take the time to learn and explain to your child the simple rules for safe wood burning:
- You cannot work on wet or damp wood; you must remove all liquids and wet objects from the work area; your hands must also be dry.
- Do not leave children engaged in burning without adult supervision.
- You should not rush while working - not only can it be impossible to erase an incorrectly drawn line, but you can easily get a small but extremely unpleasant burn.
Similar to drawing, pyrography can become not just an easy hobby, but also in a great way additional income. The main thing is the experience and drawing skills acquired over time.
Many may think: “How can you even begin to create masterpieces if you don’t know how to draw beautifully yourself?” But precisely for these purposes, there is an unimaginable variety of ready-made stencils and sketches of the most different levels difficulties.
For beginners, an excellent training material can be the burning of letters, which later form entire inscriptions and even quite long texts:

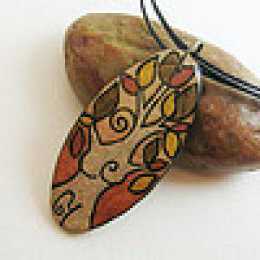
As many psychotherapists advise: “If you’re tired, draw flowers.” Burning flowers on a wooden plank really helps you take a break from the everyday hustle and bustle, think about abstract things, and at the same time create a beautiful, durable work that will remind you of carefree minutes spent with its entire appearance:

Pictures with animals always attract the attention of guests and, despite their spectacular appearance, they are very easy to execute. Animal motifs presented on the tree will perfectly complement the home of a hunter or professional breeder. A wonderful gift would be a scorched picture created based on a photograph of the recipient’s pet.

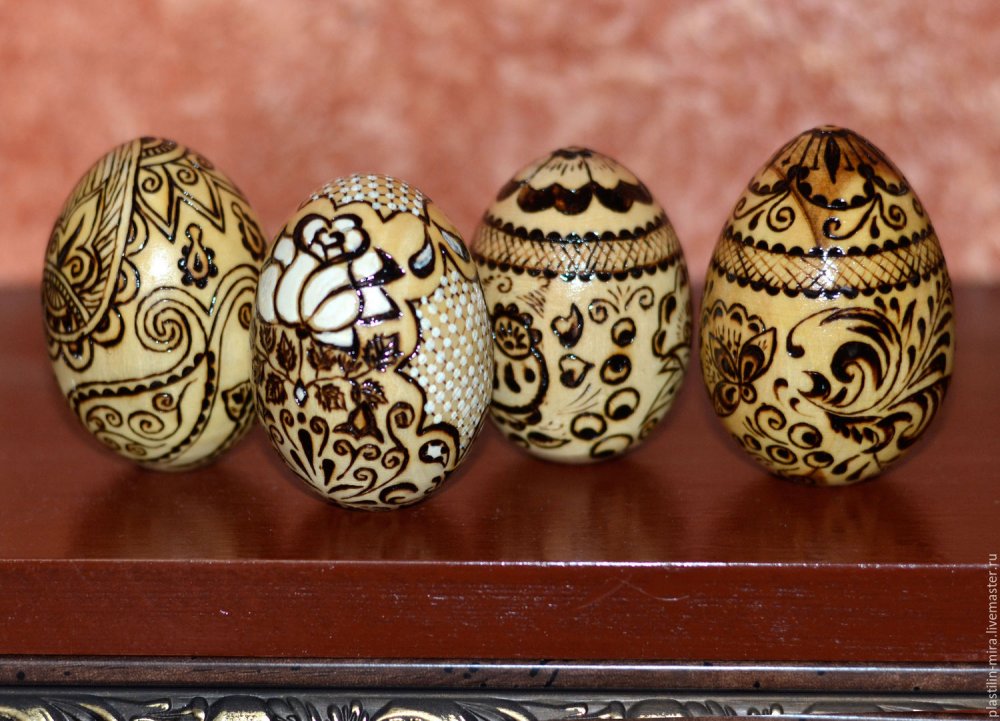
And of course, for any holiday, a thematic drawing will always be in place. For example, it has become a wonderful tradition to burn beautiful designs on wooden eggs and give them to friends and family for Easter. Just look how thin and smooth the work is. Be patient, and over time, you will learn to do this no worse than any old Russian experienced master:
Any type of creativity and handicraft can become not just a hobby or an emotional outlet, but also bring joy to your loved ones, and sometimes a good income. The main thing is to approach any business with your soul!
Video selection with interesting ideas for wood burning
Julia Pyatnitsa
Wood burning - an old new art
More recently, wood burning - pyrography - has found a second life. Perhaps this is due to the emergence of new professional devices for work. Or maybe people have begun to pay more attention to hand-decorated items. In any case, the wood burning technique is simple enough that even a beginner can master it!
Wood burning: materials
Every woodworker faces the problem of choosing wood for the background. Use several parameters to choose the best background blank.
Color
The lighter your background, the better the design will contrast with it. If desired, you can use darker varieties. But when the work is coated with varnish, the image will become less distinct.
Texture
Many artists prefer to work on backgrounds with the least amount of texture. The smooth surface without veins or protrusions makes it possible to easily create any design.
But if you show your imagination and use texture in your work, the result will exceed all your expectations. For example, you can use texture stripes like ripples in water.
Hardness
Wood burning directly depends on the power of the device used. The more powerful the device, the harder the background you can process.
Still, it is better to give preference to soft types of wood that are easy to work with with any burner.
Form
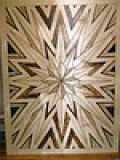
The shape of the background blank should be selected depending on what you want to do with the work in the future. If the workpiece will hang in a frame, choose workpieces of the correct geometric shape. These can be found among construction boards and unnecessary parts of old furniture.
Sometimes original saw cuts of irregular shape appear in specialized stores. The bark that frames them can become an excellent frame.

The best varieties for wood burning are linden, beech, aspen, cedar, cherry, cypress and maple. All trees have fairly light wood, a smooth or fine-grained cut without veins.
Wood burning: tools
The main tool of a woodworker is a specialized pyrographic device with a pencil-pen for burning. There are 2 main types of such devices:
- pencils with hard nibs;
- pencils with wire nibs.
Instruments with hard pens usually have constant temperature heating Although they come with additional nibs, these devices perform better in background burning due to the width of the nozzle.
Wire nibs are more comfortable - thanks to their thinness and temperature control, you can perform different types works: from subtle and unnoticeable to wide contrasting strokes.

Both solid and wire feathers come in 3 main forms:
- oblique feather;
- writing pen;
- retouch pen.
An oblique pen has a beveled, straight surface. Use it to draw thin, clear lines. The writing pen is rounded at the end: it is also convenient for drawing lines and words, for example, writing poetry on wood. Unlike the first two, the retouching pen has a flat, wide surface and is designed for burning out backgrounds or wide elements.
Execution techniques
Wood burning is not limited to one technique. If you get acquainted with at least a few high-quality works, you will find that each of them is distinguished by the use of some special artistic technique!
Below you will see a list of basic wood burning methods.
Standard
This is the basic method with which beginners begin mastering pyrography. A drawing is applied to a wooden base using a graphite pencil or copy paper. After this, the master begins to burn the image along the contour, giving it contrast in relation to the background.
Negative
The negative pyrography method is based on highlighting the design with a light color by contrasting burning of the background. This method can be done in two techniques: by adding a background and by adding a picture.

In the first case, the background is burned out around the prepared design. The second method involves completely burning out the background, after which the artist cuts out a design on it, forming light areas.
You can combine these techniques to give your product extra volume.
Pre-thread
Masters use this method so that, as in the case of a negative one, the drawing becomes embossed. To do this, the image is cut out on the base according to a previously transferred sketch and only then cauterized in certain places.

In addition to these methods, there is also wood burning with hot metal and sunlight through a prism. But due to the complexity of implementation, few people use such techniques.
Master class for beginners
If this is your first time encountering wood burning, try simple drawing. To do this, select a simple stencil in the form of an image outline without small parts and complex patterns.
- The surface of the background workpiece should be cleaned using sanding or a blade.
- Draw the drawing by hand using a graphite pencil or redraw the finished sketch using carbon paper.

- Start burning the image along the outline. If you can't complete the job in one sitting, the finished outline will tell you where best to retouch.
- After the outline, start finishing the background - darken it evenly with a retouching pen or gradiently using different types of pens.
- Wait until the drawing cools down. When finished, brush off any excess and use an eraser to wipe away any remaining pencil.
Cover the finished product with clear varnish to seal the result and slow down the aging process. After mastering the basic techniques, try wood burning with a more complex design, as in the master class in this video.
While working on your drawing, do not forget about safety precautions. Try to work for a limited time to avoid overheating of the burning device. And do not touch the heating elements - this can cause burns.
show more
If you are interested in wood burning, you will probably be interested in an article about wood burning patterns. Such patterns are applied with a special device - a pyrograph - onto a wooden surface. This is absolutely not difficult task, which is suitable for both adults and children.
Wood burning is very exciting, because in this way you can get very beautiful handmade products, which in the future can be presented as gifts for all kinds of holidays, from New Year to Mother's Day. Sketches for wood burning are easy to find on the Internet, and there you can also find many different master classes for both beginners and experienced pyrographers.
Before you start burning, here are a few important tips for this fun activity.
- For beginners, it is best to choose light and soft woods for their first jobs. They are easy to burn due to their softness and do not require strong pressure on the burner pen due to their lightness. These species include poplar, chestnut, and birch. Also, for the first experiments with a pyrograph, ordinary plywood is suitable.
- If you want to burn patterns or ornaments on a cutting board, you should choose it for the same reasons as in the first point. It will be easier for you to work with a soft and light board, and the drawings will turn out more expressive and interesting.
- For children, you can buy special kits for pyrography (wood burning), which are sold in hobby hypermarkets or handicraft stores. These sets are not too expensive and will be an excellent holiday gift for your child.
- Before work, be sure to clean the board from excess knots and burrs. Sandpaper will help with this. Apply it over the entire area of the board, then cover the board with furniture varnish, and then sand it again with sandpaper. This way you will protect yourself and your child from unwanted splinters in the fingers.
- Make sure that the tip of the pyrograph pen does not touch your skin. It is hot and can damage the skin; you need to work with it very carefully. It is very important that your hand holding the tool rests on a solid surface when you apply the design. If the pen comes off, it could ruin your drawing or burn you.
What can you burn on?
If you want to give someone a gift in the form of kitchen utensils, and even decorated with your own hands, you may need items such as rolling pins, wooden spoons and plates, and cutting boards.
You can burn simple and complex ornaments, various natural motifs, flowers, animals, dedicatory inscriptions enclosed in frames, and so on on them. There are many options, and some of them are shown in the photo below.

![]()


Most likely, the recipient of the gift will not use it in everyday life, but your work is guaranteed the most prominent place!
When burning on rolling pins, the work will be a little difficult, because a rolling pin is a voluminous object. Therefore, for convenience, place several pieces of plywood under the hand with the pyrograph, and with the other hand hold the rolling pin by the handle and scroll when the design requires it.

If you want to burn the text and enclose it in a frame so that the frame is even, you can use adhesive tape: stick it on the wood, giving it the shape that you want to give to the bottom edge of the frame, and then burn along the line of the tape as an outline.
Burning on wooden spoons is also quite problematic, so it is best to secure the spoon. Patterns for burning on spoons can be different: flowers, landscapes, ornaments, and words of congratulations. To hang such a spoon on the wall, you need to drill a hole on top and insert a cord. Twine will look beautiful with a wooden spoon.
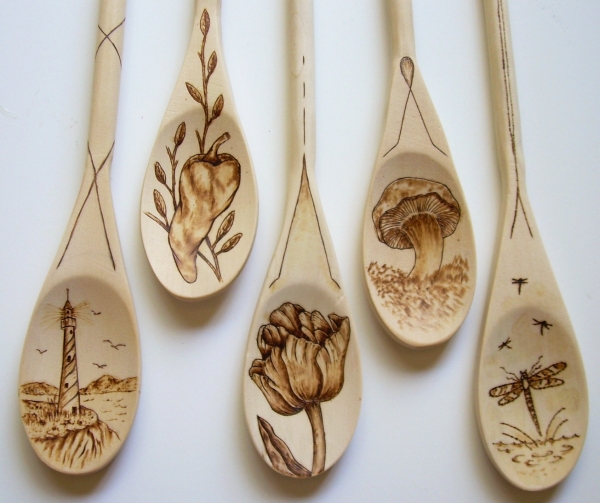

Wooden spoons are usually easy to find and quite cheap, so the whole value of such a gift is that you had a hand in creating a masterpiece.
You can also easily handle burning on a cutting board. It can be used in everyday life, or can decorate the owner’s kitchen. Beech boards are not the best choice for those who want to burn a design with small details; it is best to burn words, names, etc. on such boards. For small parts, it is best to choose a board made of elm or linden; they are quite simple and pleasant to handle.
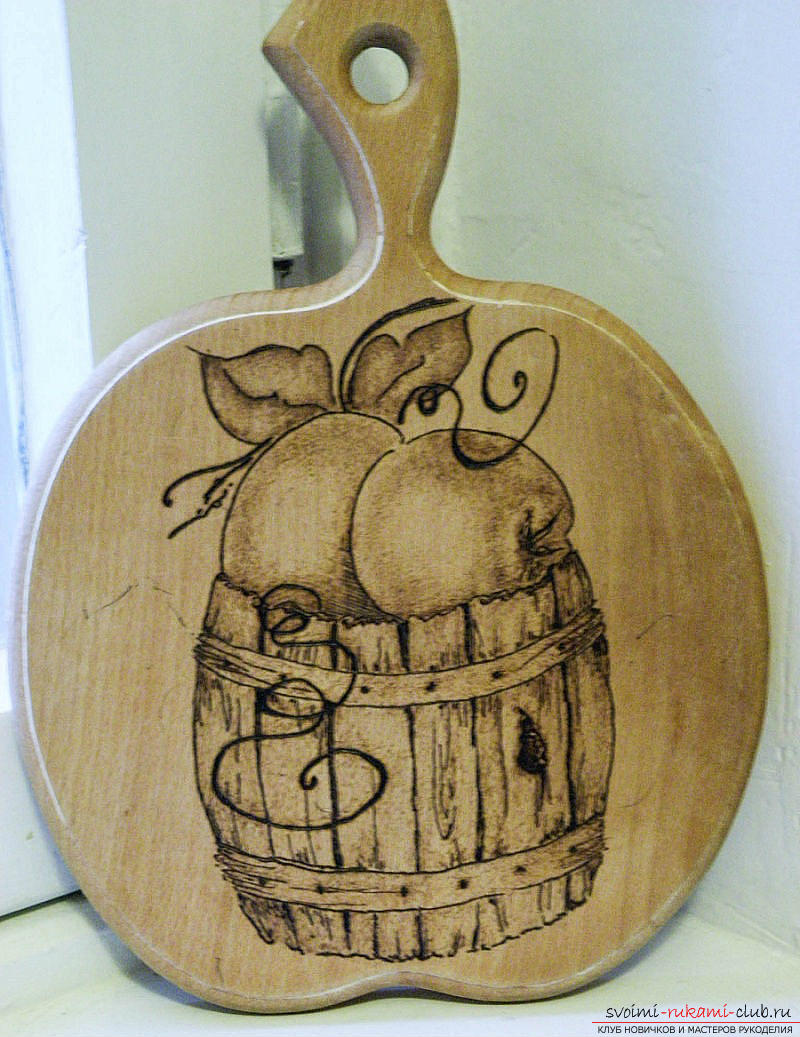

As for patterns, it is best to burn flowers, landscapes, fruits and anything that reminds you of the kitchen on wooden boards. You can also burn portraits of animals and congratulatory inscriptions.

You can make a beautiful drawing with a pyrograph with your own hands on any wooden surface; you just need to be patient and have the desire to create beauty. Therefore, remember that everything is in your hands! Happy creativity!
Video on the topic of the article
If you are interested in the topic of wood burning, check out the video collection on this topic.


