The stove is rough - and the house is warm! Remodeling the stove into a fireplace
IN last years Fireplaces are becoming increasingly popular among the population. Their appearance not only creates a cozy and relaxed atmosphere, but also fills the house with warmth in cold and inclement weather. How nice it is in the evenings to enjoy the play of flames or listen to the crackling of burning wood. Many residents of private houses want to install a fireplace in their home themselves, but do not know how to do it correctly.
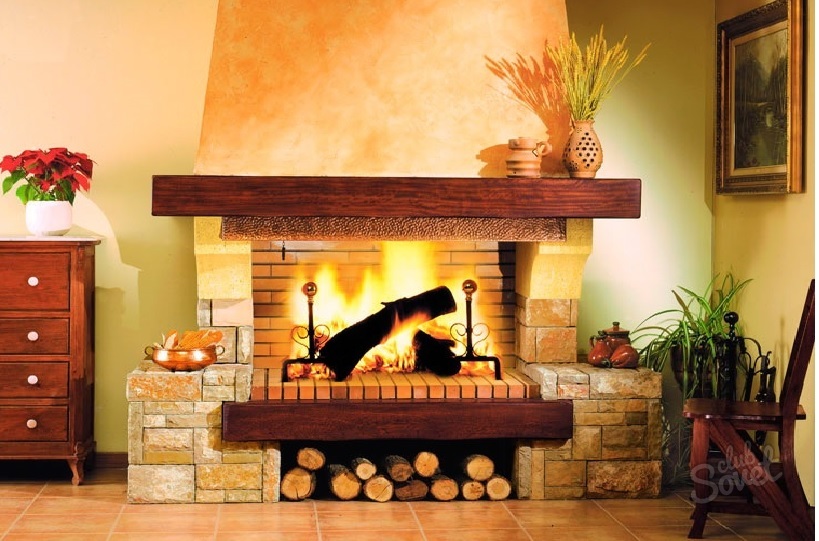
In this article we will try to describe in detail how to build a corner corner correctly. do-it-yourself fireplace stove for home. Its construction will significantly decorate the interior of the room and reduce the cost of calling a stove-maker.
The best location would be the corner of the room, especially if it is small. This will free up a lot of free space and give the room an original look.
Corner stove fireplace for home can be erected on an external or internal wall. In this case, the main attention should be paid to the place where the fireplace pipe will come out. When placing the chimney near the internal walls, you need to think carefully about whether it will rise above the ridge of the building's roof. When building a fireplace on the outside, you should obtain permission in advance from the relevant services. When erecting on walls wooden house we need to think about the opposite fire safety.

For large premises, the best option would be to build a structure similar in cross-section to a triangle. In small and medium-sized rooms, a structure resembling a rectangle will look good.
A less common option are three-way radiant stoves, which heat only near or when ducts are installed to distribute heat. Such fireplaces are in no way superior to fires in terms of heat transfer.
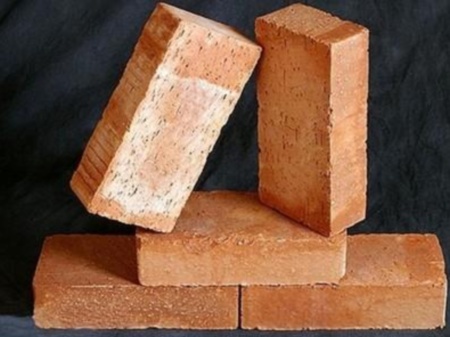
The best option when building a fireplace is considered to be red brick. When performing work, you should choose smooth, uniform bricks without chipped corners. Additionally, it must be checked for sound. If it is clean, the brick is high quality. A dull or high-pitched sound indicates incomplete heat treatment or overcooked product.
Tools and materials
In addition to bricks, to build a fireplace from materials you will need:
- roofing felt;
- cement;
- quarry sand;
- crushed stone;
- reinforcement and steel corners;
- smoke damper;
- spark arrester;
- grate;
- screen;
- clay, special mixtures or fireclay powder.
Required tools:
- level;
- mason's and rubber hammer;
- Bulgarian;
- containers for mortar, mixing concrete and soaking bricks
- trowel of any size.
Stages of work
The quality of fireplace installation directly depends on strict consistency and correct execution. Inexperienced workers should first make arrangements - drawings of the masonry layer by layer. It is done on a standard A4 sheet. Ordering will reduce errors when doing masonry and will allow you to get your hands on before actually performing the work.
The size of the fireplace is determined based on the size of the heated room. The firebox must correspond to 1:50 of the volume, the depth of the firebox is 1:2, the height is 2:3. For example, for a room of 15 m2, the firebox opening should not exceed 0.3 m2, while the dimensions are 56x40 cm. The size of the chimney is calculated based on the area of the firebox within 1:10 (for a square pipe shape), 1:15 (for round). The height of the pipe should be 4-5 meters and protrude 30-50 cm above the roof level.
It is also necessary to ensure that the proportions are observed, since as the depth increases, the heat transfer decreases several times, and a decrease leads to smoke. But even if all parameters are met, you should not count on too high an efficiency. It is usually around 30%. After all, the main purpose of a fireplace is aesthetic appearance, and not heating the entire room.
To increase heat transfer and increase traction, the side walls of the firebox are specially laid out at an angle. There is also a protrusion above it that prevents frosty air, soot and smoke from entering the house.
Foundation
The main attribute of the construction work is the construction of a separate base for the fireplace, given that its weight reaches over 600 kg. It is best when the fireplace design is carried out directly during the construction of the house, this allows you to immediately calculate the load on the main foundation.
The base of the fireplace is made 10-15 cm wider than the foundation and with a gap of at least 55 cm from the main one. The gap is immediately filled with sand and the foundations are not allowed to be tied, otherwise cracks may occur due to different shrinkage of the foundations.
The first stage of work is digging a hole 60 cm deep (for a 1-story house) and 70-90 cm (for a 2-story house). After which the bottom is leveled, compacted and a cushion of sand and gravel is made in several layers. Each of them is moistened, compacted and leveled.
Then formwork is done, the inside is sheathed with thermal insulation, large stones and gravel are placed on the bottom and filled with mortar.

Immediately after sheathing, a layer of waterproofing is made and cords are installed in the corners to control the verticality of the process. Experienced stove masons make masonry from carefully selected bricks, laying them dry in a row, chipping the surface and marking them with a marker. When laying the initial layer, a solution of cement and sand is used, and for subsequent layers a sand-clay solution is used.
Before starting work, you need to prepare good material. To do this, the bricks are dipped in water and waited until the bubbles stop. This process usually takes 2-3 minutes. At the same time, a solution is prepared. Then the bricks are laid out in a row, according to the drawings, without mortar. This is necessary to avoid mistakes when starting installation immediately.

The bottom row is laid out in continuous layers on edge, the second row is laid out flat, leaving space for a niche where the ash tray is placed. In the 3rd row, the ash collection compartment is covered. In the fourth row, a tray is made and a grate is installed. Row 5 is necessary to form the overlap.
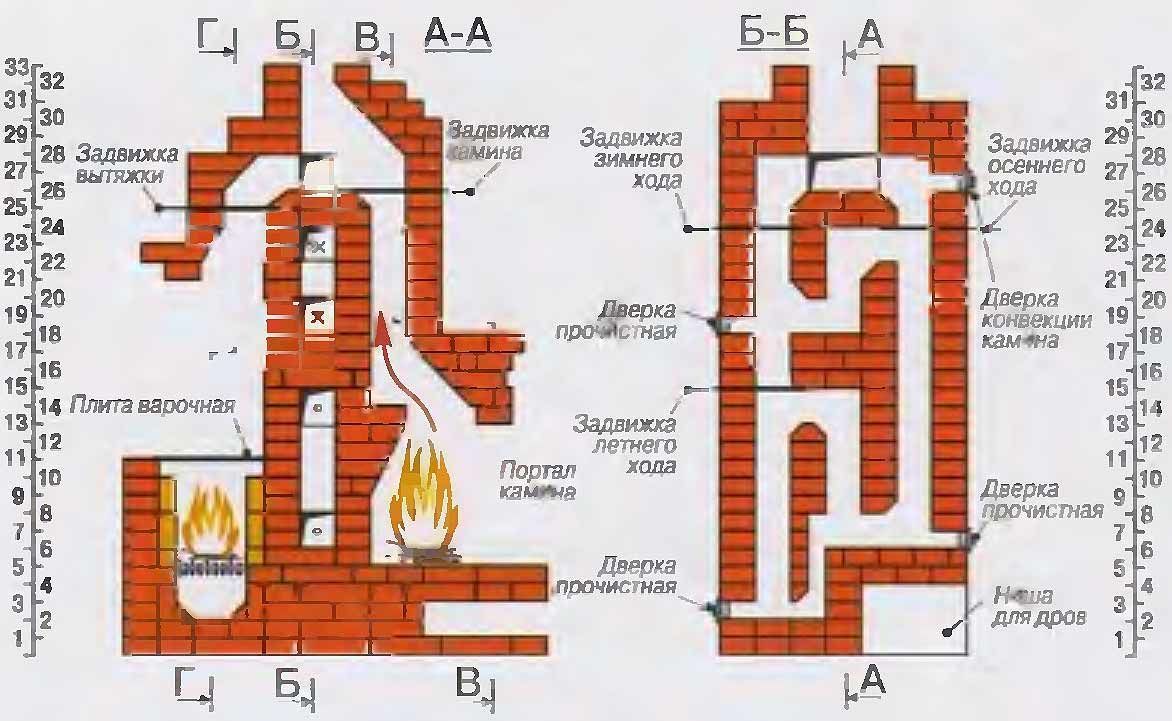
From the sixth to the ninth row the fuel chamber is laid out. When performing work, you should not pay attention to the verticality of the fireplace walls. From rows 10 to 12 we continue to make the firebox and outer walls. On the 13-14th row, make the base of the mirror and complete it by the 19th row, moving the bricks several centimeters forward or placing them vertically at an angle. In the 19th and 20th rows, moving the bricks forward, we make the firebox narrower.
Important information! In order not to confuse the numbering of the rows, they must be marked with chalk.

In the 21st row we proceed to the stove tooth, for this we leave a protrusion at 20 0. We continue its construction until row 24. Then the next two rows of fireplace masonry, installation of the stove grate and chimney.
Under the floor or behind the wall, you need to build a blower duct (there may be several of them), which is needed to supply air and the combustion process.
Chimney
It refers to the part of the fireplace that looks like a hood. Consists of a steel pipe that turns into a chimney. The rear wall of the chimney is vertical, and the side wall is made with a narrowing of 45-60 0. The walls are made wide to reduce losses during heat transfer. The chimney height reaches 5m. At a height of two meters, a valve is made in it. To reduce condensation and the risk of fire, heat and thermal insulation is made in the chimney.
You can remodel the stove with your own hands, however, to do this you need to understand the features of dismantling the old structure, the stages of constructing a new fireplace and its finishing.
A stove inherited from your grandmother can be converted into a fireplace with your own hands. Practice has shown that a fireplace built from a previous stove has practically no different in operational characteristics - it also copes well with heating the room. From the article you will learn how you can redesign a Russian stove into a modern fireplace.
What points should you pay attention to?
There are two ways to remodel the stove: call specialists or build a fireplace yourself. When remodeling yourself, attention should be paid to:
- Condition of the old heating structure. Special attention we turn to the chimney - it should pass smoke well and not have problems with the cross-section;
- The old stove door does not fit modern fireplaces, so it will have to be redone. For remodeled equipment, you need to make a lattice or glass door from fire-resistant glass;
- Inspect the stove body. The absence of defects indicates that this part does not need to be redone. It should be noted that even small cracks in the stove body are considered irreparable defects, which, of course, need to be repaired.
Remodeling options
The most in a simple way remodeling is considered a method of expanding a structure. Its peculiarity is that the old stove will have to be thoroughly cleaned, and the equipment itself will have to be made more modern - the outdated finishing material will have to be replaced with a new one.
The biggest difficulties arise with the redevelopment of the firebox of the previous furnace. Experts advise using cast iron plates or fire-resistant bricks to cover the firebox.
Remodeling the oven completely is the most difficult task. Work begins with the complete dismantling of the entire structure. After which the foundation is considered. If its quality meets modern requirements, then it does not need to be dismantled. The old and cracked foundation will have to be redone.
It is worth noting that complete dismantling of the building must also be carried out correctly:
- The superstructure is completely dismantled from ceiling to floor;
- Whole and good bricks are set aside (they can be used during the construction of a new structure);
- Dismantling the old stove should not be accompanied by severe destruction of nearby walls and interior items;
- Keep a close eye on the old firebox. During the dismantling process, try not to damage its doors or chambers. Damaged equipment will have to be thrown away and new equipment made.
Conversion instructions
You can convert a stove into a fireplace only if you have the required tools and materials. Necessary tools: grinder, heavy hammer, trowel, spatula, building level. Required materials: 3-4 bags of cement, several buckets of clay, facing tiles, fire-resistant bricks, metal pipe.
Fireplace stove, fireplace stove. what kind of design is this?
The fireplace is built strictly according to the drawing. The first step is to make space for laying the podium. At this point, you can redo the old foundation or build a small setup from brick.
Sequencing

When remodeling the stove, it is recommended to install tempered glass doors in the future fireplace. Due to this material, it is possible to increase the heat transfer of future heating equipment by 20-30%.
Fireplace finishing
To give the constructed structure a presentable appearance, it needs to be remodeled to meet modern requirements. If the old stoves did not need facing materials, then it is advisable to plaster the constructed fireplace or seal it with ceramic tiles. Don't forget about the base of the stove. It can be decorated with decorative doors made of metal or fire-resistant glass.
It is worth noting that finishing the firebox is not accompanied by exclusively decorative work. Also, do not forget about safety - it is better to cover the floor around the heating equipment with ceramic tiles or other non-flammable material. The wall behind the stove is also covered with ceramic tiles or modern non-combustible materials.
Results
As you can see, the oven can be redesigned in several ways: simple and complex. It is clear that the complex method requires a lot of resources and time, but it is worth it. The constructed equipment will become a source of pride for the owners and a source of warmth and home comfort.
Video: Russian stove
Secrets of treating joint pain from our regular reader.
Hello!
My name is Genady Alekseevich. I am a stove maker with over 20 years of experience. I am engaged in both repair and construction of Russian stoves and fireplaces. I always perform the work very efficiently and carefully, which negatively affects the condition of the joints. As I grew older, the pain began to get worse, to the point where I could no longer work. Having tried many medications and folk ways treatment, I realized how serious my disease was, since there was no positive effect. Until I came across one remedy that I want to tell you about.
This is a unique mixture of the rarest and most powerful natural healing substances. This remedy has proven its effectiveness not only for patients, but also for science, which has recognized it as an effective drug. Pain in the joints and back goes away in 10-15 days, as studies have shown. The main thing is to strictly follow the instructions in the method. You can order the product in original packaging, with a quality guarantee, at
shallow grooves with a grinder or notches with a depth of 2–
3 mm for better glue tenacity. Then the entire surface of the oven is thoroughly wiped with a damp sponge.
The stove, grate or fireplace is primed with a primer for mineral surfaces.
According to the instructions, the primer must be completely dry before puttying work, but some manufacturers make low-quality products and the primer, after complete drying, can form a slippery film on the surface to which the glue will have poor adhesion.Therefore, the primer should be tested first on a small piece of the stove and wait until it dries completely. If, after the primer has dried, a slippery film has formed on the surface, then you either need to change the primer, or do not wait for it to dry completely and move on to the next stage.
Take this issue seriously, as the quality and durability of the applied coating, as well as your reputation as a specialist, depend on it!
Putty stove, rough or fireplace
Putty preparatory work should be performed on a warm stove (from 25 degrees), but not hot.
Holes and dents are filled with putty. This can be done with the same heat-storing tile adhesive that you will use for stamping later. After the primer has dried, a metal or fiberglass plaster mesh is applied. If it is very small, the mesh is attached with a small layer of mixture, on which horizontal grooves are made across the entire surface with a small spatula-comb (approximately 3x3mm) so that the thick layer of glue on which stamping (embossing) will be done does not slide down. vertical surface. After drying (it’s better to set aside a day for this), you can move on to decorative oven finishing, coarse, barbecue or finishing fireplace under natural stone or masonry using a polyurethane stamp for concrete and plasters.
It is not recommended to apply a layer of glue more than one and a half centimeters onto the stove, as this may affect heat transfer. Therefore, it is advisable to choose a stamp with a shallow relief, about a centimeter.
Stamping (embossing)
A layer of glue is applied to the surface of the stove, stove or fireplace, after which it has partially dried (it should not stretch behind your finger), the polyurethane stamp is pressed (embossed) into the glue, due to which the relief conveyed by the stamp is imprinted on the surface. The stamp is treated with a release agent (water + Fairy type detergent). This compound prevents the adhesive from sticking to the polyurethane concrete and stucco stamp. The glue is applied to small areas of the stove, grate or fireplace that you have time to process. After the relief has been applied to the entire required surface, it is edited with a special tool (usually various types of wooden sticks or any other tool convenient for these purposes).
You can read more about the stage of stamping (embossing) with polyurethane stamps and surface editing on the page “
Once upon a time it was difficult to imagine a cozy home without a real hearth, which served as a source of heat and light. Today, stoves and fireplaces are coming back into fashion, being not only a decorative element, but also a good heater. Building a brick fireplace with your own hands is not the easiest task, but someone who has already dealt with brickwork can do it.
There are several schemes for constructing fireplaces, the principle of which is the same, since this is one of the simplest types of stoves in which the firebox does not close. A properly made heater will not smoke, and the room will warm up well.
Let's find out where to get started.
Project preparation
First of all, it is important to choose the place where the fireplace will be located and decide on its size. Usually it is placed near the outer wall or in the corner between the inner and outer wall, because its rear part will get very hot. Against front door or it is better not to install windows, since in this case the formation of drafts is inevitable.
The size of the fireplace is calculated based on the volume of the room in which it will be installed. If the room size is up to 80 cubic meters. m., then the size of the combustion hole will be approximately 36x52 cm, that is, 1/70 of the size of the room.
Other important parameters are the depth of the firebox and the size of the chimney. If the area of the combustion opening is 0.4 sq. m, then the depth should be approximately 35 cm. A firebox that is too shallow will cause smoke to enter the room, and a firebox that is too deep will cause heat to be lost. The length of the chimney must be at least 4 m, and its area must be 10 times less than the area of the firebox, that is, 0.04 square meters. m.
The main material for masonry is building brick of standard sizes. For certain elements, you can use double sand-lime brick M 150, as it is quite durable, economical and will provide the fireplace with a beautiful and neat appearance. It is important to calculate exactly how much it will be needed, taking into account chips, halves and possible defects.
For calculations, an order is drawn up - a detailed layout of each row. Above the firebox you will need to lay out a gradually narrowing smoke chamber, and between them there is a pass part - this is the name given to the protrusion that prevents sparks from entering the chimney and smoke from entering the room.
The photo shows exactly which rows the future fireplace with a straight chimney will consist of.
The back side (wall) of the fireplace will need to be insulated for fire safety purposes. To do this, a thin metal sheet is installed on it.
Preparing and building a fireplace
To make brick fireplaces with your own hands, you will need:
- A solution prepared from purified sand, oven clay, and M300 cement. The sand must be thoroughly washed to free it from dust and foreign debris;
Advice! The best option for an inexperienced stove maker - Cambrian blue clay, as it is the easiest to work with. Local material can only be used by someone who already has experience in properly preparing the solution.
- Construction bricks, and halves or quarters must be counted as whole bricks, and approximately 5% in the future will inevitably have to be written off as defective;
- Metal smoke damper and reinforcement rods.
Pouring the foundation
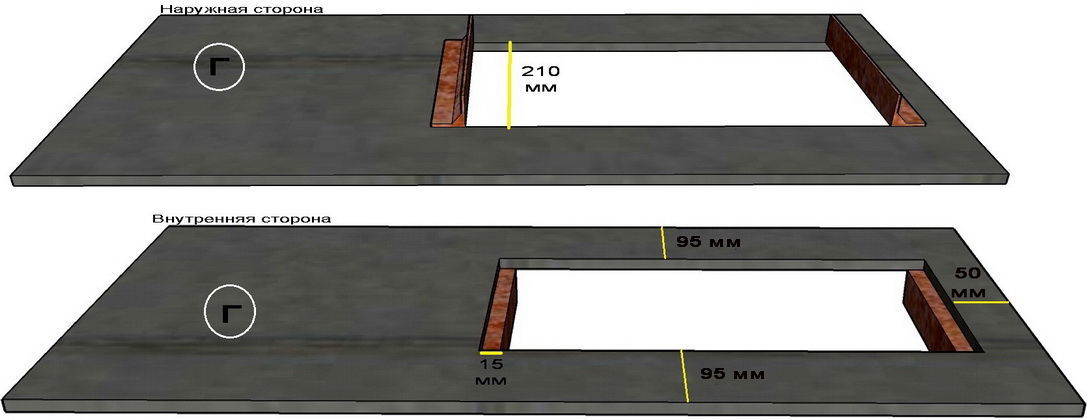
The fireplace foundation should not be connected to the general foundation of the house, in addition, there must be a gap between it and the wall. The distance between the foundation of the fireplace and the building itself is filled with sand; the width of the base should be 10 cm greater than the width of the base.
To create a foundation, you need to dig a hole at least 60 cm deep. A layer of fine crushed stone is placed on its bottom, which is then carefully compacted. For pouring, formwork is installed around the entire perimeter, rising 15 cm above the level. It is lined with roofing felt to ensure waterproofing, after which concrete mortar is poured, the ratio of sand and cement is 3:1.
Concrete must be poured gradually, smoothing and leveling each layer well. The top edge should ultimately be 6-7 centimeters lower flooring. The foundation is left for a week to allow it to dry thoroughly.
Fireplace masonry
After the foundation has completely dried, it is necessary to lay waterproofing on it - roofing felt in at least two layers. After this, you need to prepare a solution for the stove masonry from water, clay and sand. The clay is soaked in water and all lumps are thoroughly broken up. Pebbles and debris from the solution will have to be removed manually.
If the clay is very oily, then sand is gradually mixed into it. Mixing is completed when the solution no longer sticks to the shovel, but flows off it. Immediately before work, the mass must be thoroughly mixed again.
Advice! If you carefully sift the sand and clear it of debris in advance, then you won’t have to waste time removing small pebbles and other impurities from the solution.
To lay the first row, it is recommended to add cement to the solution to give it greater strength. Percentage– up to 30% of the total mass of the solution. For external masonry and creating arched channels, not whole bricks are used, but their shares. Chips and edges often need to be sanded to ensure they have a smooth, neat surface.
Instructions for building a fireplace with your own hands:
- Before starting laying, the brick must be carefully calibrated, choosing units that are as similar in size as possible. Bricks must be cleared of any debris; before laying, they must be additionally immersed in water so that they do not begin to draw water from the mortar;
- Lay the first row, and then, using a square and a building level, be sure to check how evenly the bricks lie;
- After this, subsequent rows are laid out in order, each new row is checked with a level and plumb line, and the uniformity of the diagonal is checked using a tape measure or ordinary twine. When laying continuous rows and a plinth, a trowel is used, but inside the chimney the mortar is laid out manually so that any pebble or defect in the masonry can be instantly noticed;
- Internal walls The inside of the channels, firebox and smoke collector must be thoroughly wiped, removing the remaining solution. You cannot plaster the fireplace from the inside;
- To make the fireplace arch look beautiful, it is formed using a gradual “lap” of bricks. To obtain temporary lintels, a circle is created - temporary formwork. The laying begins from the center, and then continues in two directions. After the construction of several new rows, the wooden lintels must be removed;
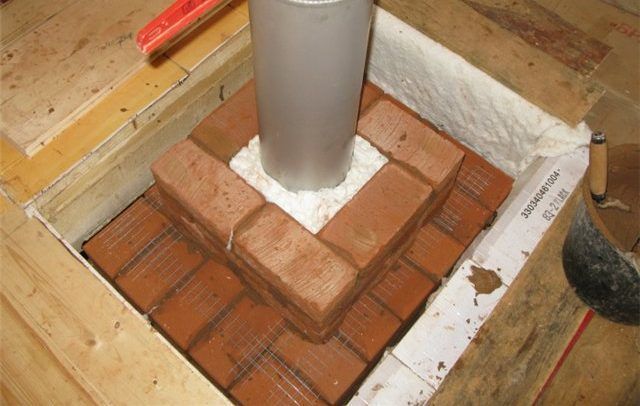
- The chimney must run strictly vertically, so each new row laid out is checked with a plumb line;
- Where the pipe will pass through the roof, you need to take care of fire safety. To protect the ceiling from fire, a special barrier made of non-combustible materials is installed between it and the pipe.
All the work takes a lot of time and requires conscientious, painstaking work. This is the only way to guarantee that the fireplace will be both beautiful and functional. And about that, read in other articles on our website.
Finishing a finished fireplace
There are a lot of options for finishing a finished fireplace, but their prices can also be very different. The most expensive and solid option is cladding natural stone. Usually granite or marble is used for this purpose; they look very beautiful, such a fireplace will not only warm, but also truly decorate the room.
Laying the finishing begins from the bottom, while it is better to protect expensive materials from damage in advance by wrapping them in thin cellophane. This will help avoid accidental chips and scratches. To attach marble or granite cladding, regular tile adhesive is used.
A simpler option that allows you to hide any flaws in the masonry is plaster. It will make it possible to level the walls and will also look quite good. On top of the fireplace, you can paint it in a chosen color that harmonizes with the tone of the walls and flooring. Plaster itself can perform decorative functions.
Fireplace without decorative trim
The fireplace is often further decorated with wrought iron grates, sculptures and other decorative accessories. It is important to remember that any wooden decorations can be placed in the room only at a significant distance from the stove. They catch fire very easily, so to avoid danger it is better not to take risks.
Conclusion
Building a fireplace in your own home yourself is not an easy task, so if you are not confident in your skills, it is better to invite specialists. In any case, all work must be carried out as carefully as possible, otherwise the structure may turn out to be non-functional.
The slightest curvature of the chimney can lead to smoke starting to enter the room, and an incorrectly designed firebox can cause extremely low heat transfer. However, more and more people are mastering this tricky science, literally building their home.
Another interesting solution is a brick fireplace with a water circuit, which can also replace a heating boiler. It heats not only the room in which it is installed, but also the radiators throughout the house. However, this option becomes quite labor-intensive to use and does not have the highest efficiency.
In the video presented in this article you will find additional information on this topic, where all stages of the work on creating a fireplace masonry are discussed in detail.
Fireplaces, like stoves, serve to heat the room and also act as a decorative element. They create a cozy atmosphere at home. It is much easier to convert an old stove into a fireplace than to create one from scratch. The advantage of such a restructuring is the presence of an existing chimney.
First of all, you need to check the serviceability of the chimney and the presence of good draft, which is necessary for the fireplace. To do this, you can contact a stove-maker or check it yourself. The traction force depends on many factors. The first and most important is the height of the chimney - the pipe must be at least 4.5 m, the higher the better. Weak draft occurs when the cross-section of the chimney is small, and its most optimal shape is round. Much also depends on the inner surface: the smoother it is, the better the traction, and protruding bricks, soot, deposits and ledges reduce it. If the chimney is not suitable for one reason or another, you need to redo it, and only then deal directly with the fireplace.

Making a fireplace from an existing stove is easy, but the main difficulty arises when decorating it. A very important point is the selection of quality materials. You shouldn’t skimp on this, because a fireplace is a homely hearth, looking at it you feel warm and cozy.


