How to enable viewing of hidden files in windows 7. How to show hidden folders
Today we are solving a problem with hidden files in Windows 7. Because after that a lot of things remain incomprehensible and unknown to us users.
Show hidden files in Windows 7
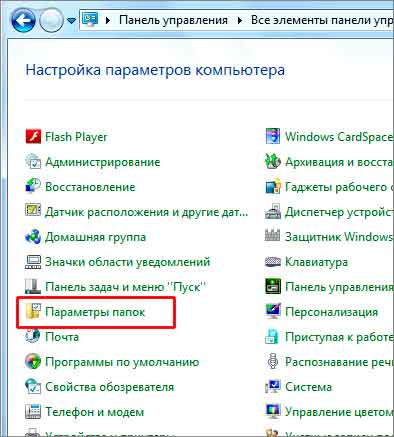
Option 1. We go to the Control Panel - and first, for convenience, change the view to “Small icons”, and then look for the icon - “Folder Options”, see the screenshot more clearly (click to enlarge):
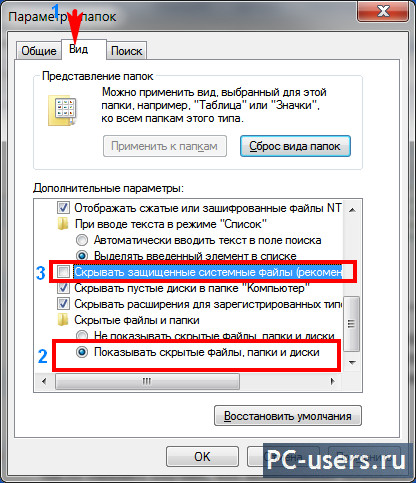
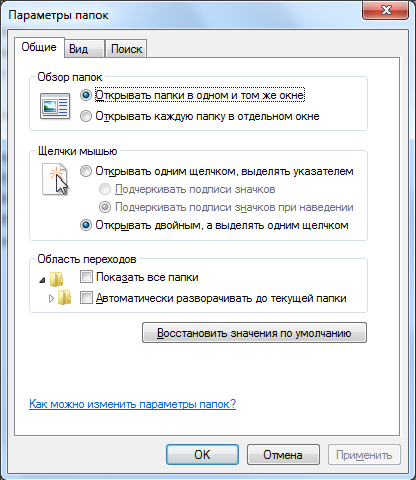
In the window that opens, go to the “View” tab - in the “Additional parameters” field, go down to the very bottom and check the box "Show hidden folders and files" also, if necessary, here you can uncheck the box so that the system files, more details in the screenshot:
Click “Apply” - “OK” and you’re done. All files will be visible.
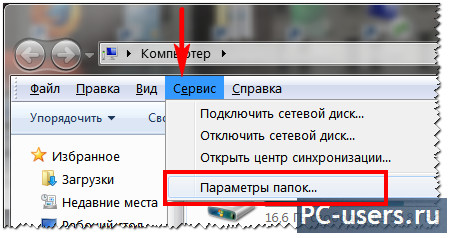
Option 2. There is another way to get here. Namely through “My Computer”. We go into my computer - press the “Alt” button and we will see the top menu as in the good old one:

Click on “Tools” - “Folder Options”:
and we will see the same window as in, and here we do the same thing.
Option 3. In the same “My Computer” window, click on the “Arrange” button (in the top menu) and select “Folder and Search Options”:

Well, for starters, another way to see all these files and folders is to use some kind of file manager, for example, my favorite is . But first, you still need to go to the settings and check so that all files are displayed. To do this, click on the “Configuration” menu - “Settings” - and on the “Panel Contents” tab - check the “Show hidden / system files” item:

In the Windows operating system, the display of system files is disabled by default, since an inexperienced user can accidentally delete them. In addition, they will distract you from searching for the desired folder and clutter up your “Desktop”. In general, it’s better and more convenient when you don’t see them.
However, in some cases it becomes necessary to show hidden files in Windows 7 so that you can, for example, clean out the system “Temp” and “Prefetch” folders, thereby slightly increasing the performance of the operating system.
You can enable the display of such files very easily by using one of the methods described in we'll talk Further. In fact, in each method, only the sequence of actions required to access the “Folder Options” will change.
Via the "Service" menu
So, you have Windows 7 installed. You can show hidden files and folders in this operating system as follows:
- Log into “My Computer” and press “Alt” on your keyboard. A panel will appear where you need to select “Service”. By clicking on this button, a drop-down menu will open in which you need to go to “Folder Options”.
- Now select the View tab and scroll down to the bottom of the list. Here you will need to uncheck the checkbox next to the “Hide system files” option and check the function responsible for showing hidden folders.
- By clicking “Apply”, a warning will appear that deleting such files may negatively affect the operation of the operating system. If you are confident in your actions, then click the “Yes” button.
![]()
That's all! Now you know how to show hidden files in Windows 7, so you can use this knowledge if necessary.
Via "Control Panel"
The second method differs in the algorithm of actions, since to open “Folder Options” you will need to enter the “Control Panel”.
So, open the Start menu and go to PU. If you have set the display by category, then select the “Design and Personalization” section. In the “Folder Options” subsection, click on “Show hidden files.”

Now, at the bottom, check the box that will allow you to see non-displayed folders, and uncheck the box next to the “Hide protected files” option. Last step- the “Apply” button, and then in the window that opens, click “Yes”.
If, after opening the PU, you see that you have large or small icons displayed, then simply find the “Folder Options” element and go to it. The further algorithm of actions is absolutely identical to those discussed above.
Now you can show hidden and system files of Windows 7 using the Control Panel.
Using the Run command
The third way to enable the display of such files is to use the Run command. To launch this tool, press the "Win" and "R" buttons.
Now in the window that opens you will need to insert the “control folders” command and click “OK”. This will open the Folder Options, where by going to the View tab and following the steps above, you can show hidden Windows 7 files.
Some people like this method the most, since all you have to do is remember one command or write it down. Although there is nothing complicated in the first two methods.
Conclusion
So, now you can show hidden files in Windows 7. If the need arises, you can turn on the display of system folders at any time and adjust their contents at your discretion.
With all this, it is worth remembering that it is not recommended to make any changes to these files unless necessary, and especially without certain knowledge.
Surely every user personal computer sooner or later I came across such a phenomenon as disappearance some files or folders with hard drive or other storage device. You cannot find them where they simply must be.
In such a situation, most ordinary PC users immediately have only one thought - someone deleted the data. However, their sudden disappearance may be associated with more than just this. Often they just invisible.
Later in the article we will look at the main ways to show hidden folders and files using the operating system as an example Windows 7(however, this will also work in XP, Vista, 7 and 8). But first, let’s tell you why such situations arise.
Attributes of files and folders or how data becomes hidden
As you know, any modern operating system has many features for managing files and folders. These are not only well-known operations for creating, deleting, copying and moving data, but also operations for setting them up. Each file or folder can be assigned a so-called attribute, responsible for certain properties of an object. For example, a file can be assigned an attribute such as " Only reading", and the user will no longer be able to edit it, since the system itself will not allow him to do this.
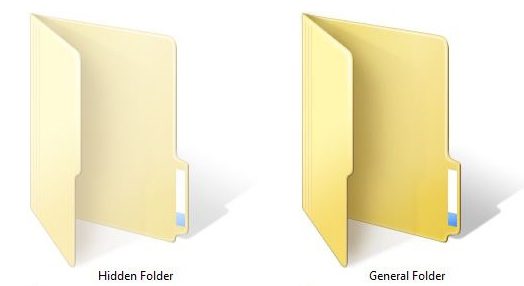
These also include the attribute - “ Hidden" As the name suggests, it will make the object invisible. And if the system is not configured to display such objects, the user will not see elements hidden in this way.
Making files or folders invisible is quite simple. To do this you just need to go to properties the desired object and assign this attribute to it.
Let's try:
This suggests conclusion - Any user can make any element hidden.
But if I didn’t hide my files and folders and no one else uses my computer, what then?
If in your case any elements from the disk disappeared on their own, then the answer is obvious - virus programs were at work.
Unfortunately, manage attributes files can not only be used by users, but also any programs. There are many different virus programs on the network that, once they get into the system, can do whatever they want with its settings and data stored on the disk. If in your case such viruses have hidden some of your folders or files, then do not be upset - there are more of them can I return.
There are many ways to open hidden folders in Windows 7. Let's look at the simplest of them.
Setting up the system
Every operating system (including all Windows versions from XP and even earlier to the 10th) has internal settings that are responsible for displaying any data stored on the disk and any other media. So, to make files and folders visible, you need to do the following:

This method is suitable if files and folders hidden on your computer only had the attribute “ Hidden" Usually when they are working viruses, they additionally make objects systemic, which will still be impossible to see even if you enable viewing in this way. To detect such files, in the menu " Folders settings"You need to additionally uncheck the box " Hide protected system files", as it shown on the picture:

If you try to uncheck this item, the system will issue a warning that this is not recommended. It's okay - we just agree.
Unfortunately, and it doesn't always help, since some viruses can easily change system settings immediately after the user tries to enable or disable certain OS parameters. In such cases, programs that can “see” hidden objects come to the rescue. One of these is Total Commander. This is a file manager, very similar in functionality to the standard " Windows Explorer».
Using Total Commander
Finding this program on the Internet is not difficult. Although it is paid, you can use it for free for a while - this is more than enough to see all the hidden folders or files on the system.
To get started, download Total Commander and install the application. After launching it, you will see a window divided into two panels - they display the folders and files on the disk.
Initially, the program does not allow you to view hidden elements - you must enable this function. To do this, open the menu “ Configuration" (at the top of the window), and then click on the item " Setting...».
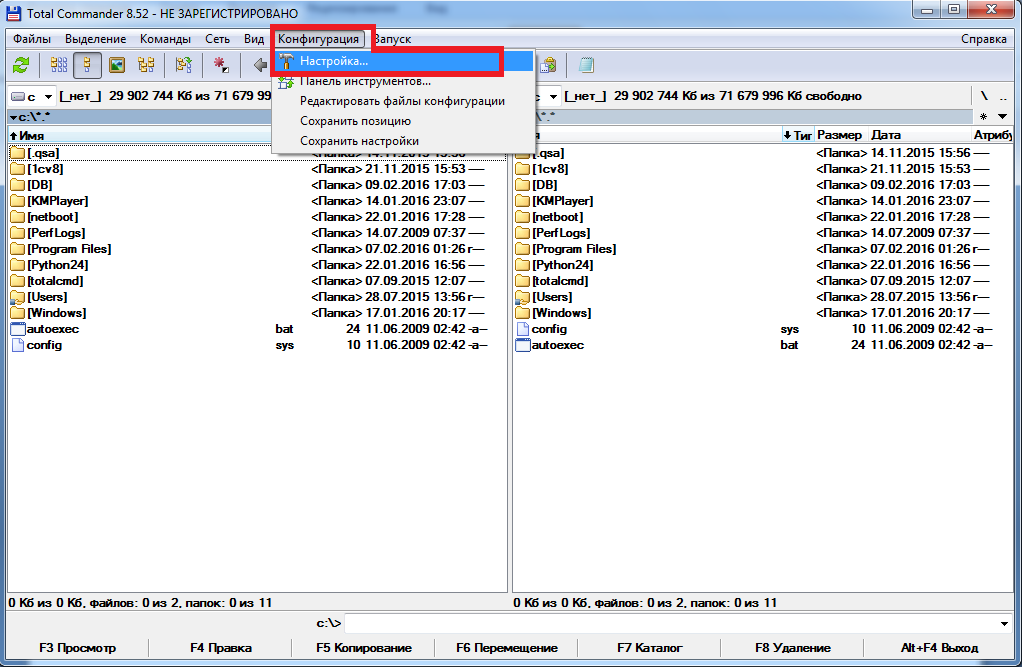
All that remains is to find the item “ Panel Contents" We go into it and put a tick on “ Show hidden files" And " Show system files", then click Apply. Now the program will see hidden objects.

In the image below, you may notice that some folders are displayed with a red " ! ».
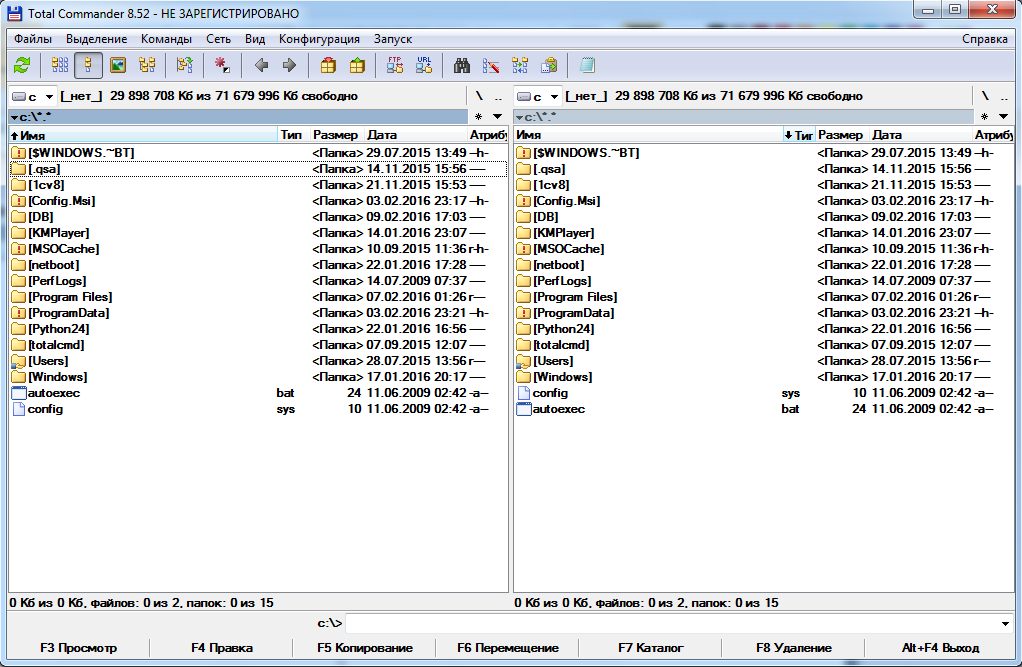
These are the hidden folders.
Video on the topic
These are folders that have the Hidden attribute set. Typically, folders with this attribute are not displayed in Explorer. In order for hidden folders to begin to appear, you need to make changes to the operating system settings. In this material you will learn how to show hidden folders in Windows 7.
In order to force the Windows 7 operating system to show hidden folders, we need to open any folder and press the ALT button on the keyboard.
After pressing the ALT key, a series of drop-down menus will appear below the address bar: File, Edit, View, Tools and Help. Here we need to open the “Tools” drop-down menu and select “Folder Options”.

After this, a small window called “Folder Options” will open in front of you. In this window, you can configure all the basic settings that relate to the display of folders, files and drives in Windows 7 Explorer.
It should be noted that if you are unable to open the “Folder Options” window through the drop-down menu, then you can use the search in. To do this, open the Start menu and type “Folder Options.” After this, the Windows 7 operating system will find the desired program and offer to open it.

So, you have opened the “Folder Options” window, in order to show hidden folders in Windows 7 you need to go to the “View” tab and find the options that are responsible for displaying hidden folders.

You need two parameters:
- “Hide protected system files” – you need to disable it;
- “Show hidden files, folders and drives” – you need to enable it.
After making changes, close the window by clicking on the “OK” button to save the changes. After this, you will be able to see hidden folders and files. Now, if there is such a need, you can remove the “Hidden” attribute and the folder will become normal. To do this, right-click on the folder and select “Properties”. After that, disable the “Hidden” function and close the window.

Once you have cleared the “Hidden” attribute, you can disable the display of hidden folders. From now on this folder will be displayed in any case.
Are you interested in the question of how to view hidden files and folders in Windows 7?
If yes, then you are in the right place. In this lesson we will look at how to see in your hard drives All hidden files and folders inWindows 7. In fact, it is very simple, I have already touched on this topic once, I wrote, . Well, today we will do all this in the Seven.
So, let's go. Enable viewing of hidden files and folders in Windows 7.
Let's go to " Start - Control Panel».

In the folder that opens, change the view type to “Small icons”.

Now we find the item “ Folders settings" and open it.
In the window that opens, go to the “View” tab, then go down to the very bottom and put the switch on the item “ Show hidden files, folders and drives"Then save by clicking "OK".

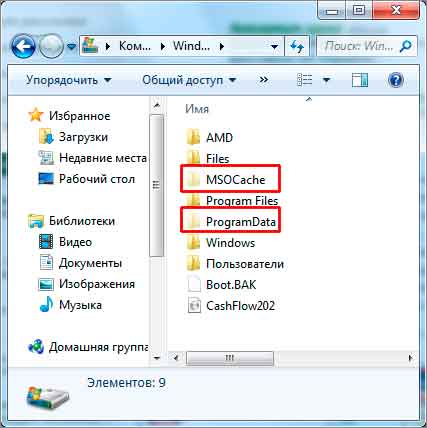
Now let's check. I go to the drive (C:) and already here I see, Hidden folders are shown.
This is how, with a few clicks, we made hidden folders and files visible in Windows 7. But in general, I recommend enabling this feature only if necessary.
If we have any hidden folder inWindows 7 and we need to access it, then we enabled the ability to view hidden files and folders. As soon as we did all our work, we immediately turned off this option.
That's all I have!


