Degree of charge of the battery by voltage table. How to properly charge a car battery
Question " how to check a car battery“occurs, as a rule, in two cases: when purchasing a new battery or if some kind of malfunction is discovered in the battery already under the hood. The cause of the malfunction can be either undercharging or overcharging of the battery.
Undercharging occurs due to sulfation of the battery plates, which occurs during frequent trips over short distances, a faulty voltage regulator relay, and when the heating is turned on.
Overcharging also occurs due to a faulty voltage regulator, only in this case it supplies too much voltage from the generator. As a result, the plates fall off, and if the battery is of a maintenance-free type, it may be subject to mechanical deformation.

Battery diagnostics - checking voltage, level and density.
So, how to check the performance of a car battery?
To do this you need to know how:
- carry out a visual inspection;
- check the electrolyte level in the battery;
- check the density of the electrolyte in the battery;
- check the battery voltage with a multimeter;
- check the battery under load.
How to visually check the battery
Inspect the battery case for case cracks and electrolyte leaks. Cracks can occur in winter if the battery is poorly secured and has a fragile plastic case. When working on the battery, moisture, dirt, fumes or electrolyte drips accumulate, which, together with oxidized terminals, contributes to self-discharge. You can check if you connect one voltmeter probe to “+” and run the second one across the surface of the battery. The device will show what self-discharge voltage is available on a particular battery.
Electrolyte leaks can be eliminated with an alkaline solution (a teaspoon of soda per glass of water). And the terminals are cleaned with sandpaper.
How to check the electrolyte level in a battery
The electrolyte level is checked only on those batteries that require servicing. To check it, you need to lower a glass tube (with marked divisions) into the battery filler hole. Having reached the separator mesh, you need to pinch the upper edge of the tube with your finger and pull it out. The electrolyte level in the tube will be equal to the level in the battery. Normal level 10-12 mm over the battery plates.
Low electrolyte levels are often associated with “boiling over.” In this case, you just need to add water. Electrolyte is topped up only if there is confidence that it has somehow leaked out of the battery.
While operating a car, we periodically face the question of how to check the battery. This usually happens in two cases: when purchasing a new battery and when problems arise with the battery during operation.
So I advise you: if you don’t want problems, especially in winter, check the battery in a timely manner to ensure its functionality as a source of EMF for your car, since in some operating modes the battery can quickly become unusable. The reason for this is frequent undercharging or overcharging of the car battery.
The reason for undercharging may be frequent trips over short distances, turning on the warm-up mode in winter, as well as a malfunction of the car's generator voltage regulator. As a result, such an unpleasant phenomenon as sulfation of the battery plates occurs. The phenomenon is bad and this is the topic of a separate article, so if you don’t want to miss out, subscribe to new issues of ELECTRON magazine at the bottom of the article.
Now about recharging. Overcharging can lead to shedding of the plates, and if the battery is not maintained, then to its mechanical deformation. And overcharging occurs if, as a result of improper operation of the voltage regulator, an excessive voltage is supplied to the battery from the generator, as well as as a result of long and protracted trips at high engine speeds.
I hope I have convinced you that you should know the question of how to check the battery, so as not to turn your battery into a piece of lead worth 300 rubles (in best case scenario) and take timely measures to increase battery life.
In general, I would recommend carrying out the battery testing process by following the following points.
1. External inspection of the battery
2. Checking the electrolyte level in the battery
3. Checking the density of the electrolyte in the battery
4. Measuring the voltage on the battery with a voltmeter or multimeter
5. Checking the battery with a load fork.
So, let's begin.
External inspection of the battery
I recommend carrying out an external inspection of the battery at any opportunity when you look under the hood of your car. The reasons for this action lie on the surface of the battery. Namely, during operation, dirt, moisture, and electrolyte drips accumulate on the surface of the battery (evaporation during boiling).
All this leads to the occurrence of battery self-discharge currents. And if we add to this the oxidized battery terminals, as well as leakage currents on the car’s electronics, then if you do not recharge the battery in time, the battery will be deeply discharged, and frequent deep discharges are a direct road to sulfation of the plates and a decrease in battery life.
You can verify the presence of self-discharge by connecting one voltmeter probe to the battery terminal and running the other one across the surface of the battery, and the voltmeter will show some voltage corresponding to a certain self-discharge current of the battery.
Usually, electrolyte drips are removed with a solution of soda in water (a teaspoon per glass of water), which is understandable: the electrolyte is an acid, the soda solution is an alkali (for those who don’t remember chemistry!).
The terminals are cleaned with fine sandpaper and the reliability of their connection to the wires and battery is checked.
Well, pay attention to the body as a whole. If the battery is poorly secured, especially in cold weather, when the plastic case is quite fragile, cracks may occur in the case.
Checking the electrolyte level in the battery.
The next step, after checking and eliminating the self-discharge of the car battery, is to check the electrolyte level in it. Of course, this only applies to serviceable batteries.
The electrolyte level is checked using a special glass level tube, and the electrolyte level should be within 10-12 mm above the battery plates.
A level tube is an ordinary glass tube with divisions in millimeters marked on it. In order to measure the electrolyte level, you need to place the tube in the battery filler hole until it comes into contact with the separator mesh, pinch the upper end of the tube with your finger and pull out the tube. The upper electrolyte level in the level tube will correspond to the electrolyte level in the battery.

Basically, a low level is a consequence of the electrolyte “boiling away”; in this case, the electrolyte level is adjusted by adding distilled water.
Topping up the battery directly with electrolyte is done only when you are sure that the drop in level was due to a spill of electrolyte from the battery.
Before proceeding with further testing of the battery, it is necessary to assess the degree of its charge and carry out further testing of the battery after it is fully charged.
The degree of charge can be determined in two ways: either measure the density of the electrolyte in the battery, or measure the voltage on the battery.
Checking the density of the electrolyte in the battery (for serviced batteries)
A device for checking the density of electrolyte in a battery is called a hydrometer.
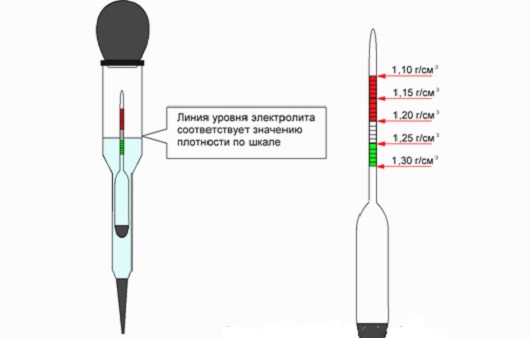
To measure the density of the electrolyte in the battery, it is necessary to place the hydrometer in the filler hole of the battery, use a bulb to draw the electrolyte into the flask so that the float floats freely and take the density reading on the hydrometer scale in accordance with the upper level of the electrolyte.
![]()
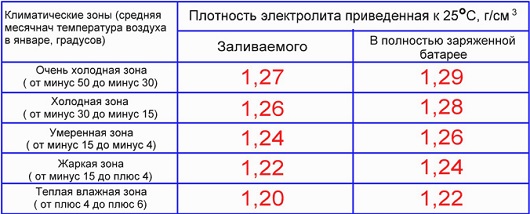
The density value for a 100% charged battery will depend on the temperature operating conditions of the battery.
Table 1. Determination of electrolyte density for various climatic zones.
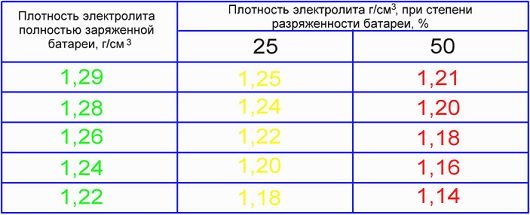
Moreover, you should know that a decrease in density by 0.01 g/cm3 from the nominal value corresponds to a battery discharge of 5-6%.
Table 2. Degree of battery discharge at different electrolyte densities.
However, the values given in the table will be correct if you checked the density at an electrolyte temperature of 20-30 ° C. If the temperature differs from this range, then a correction should be added (subtracted) to the measured density value according to the table.
Table 3. Correction to the hydrometer reading when measuring density at different temperatures.

Typically, in car batteries that you can buy in a store, the electrolyte density is 1.27 g/cm3. Let’s say that when checking the density of the electrolyte in the battery, the hydrometer showed a value of 1.22 g/cm3 (that is, the density dropped by 0.05 g/cm3), this means that the battery was discharged by 30% of the nominal value.
In this case, the battery must be charged. After this, if the battery is in good condition, the electrolyte density will be restored to the nominal value. The most important thing is not to let the battery discharge by more than 50%.
It should be noted that its freezing temperature depends on the density of the electrolyte.
Table 4. Freezing point of electrolyte of different densities.
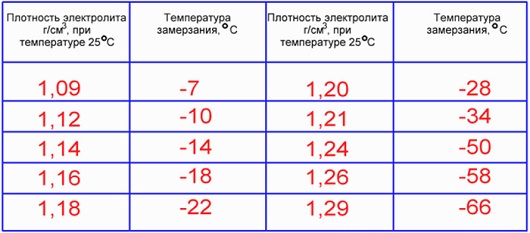
Therefore, the low density of the electrolyte in winter leads to its freezing, rapid loss of battery capacity, and sometimes even to physical deformation and the appearance of cracks.
Measuring battery voltage with a voltmeter or multimeter
You can assess the state of charge of the battery by measuring the voltage on it. To do this, you need a voltmeter or a device that is popular nowadays - a multimeter. To measure voltage using a multimeter, turn it into DC voltage measurement mode, and set the range higher maximum value voltage on a charged battery.
For example, for the popular inexpensive multimeter DT-830 (M-830) series this is 20 volts. Next, connect the black (COM) probe of the multimeter to the minus of the battery, the red (positive) probe to the plus of the battery and take readings from the multimeter display.

The voltage of a fully charged battery should be at least 12.6 volts. If the battery voltage is less than 12 volts, its charge level has dropped by more than 50%, the battery must be charged urgently! Deep discharges of the battery should not be allowed; this leads, I repeat once again, to sulfation of the battery plates. A battery voltage of less than 11.6 V means the battery is 100% discharged.
Again, you cannot be rigidly tied to a specific voltage value, since it is related to the density of the electrolyte in the battery.
A car battery consists of six cells connected in series. The voltage of one bank can be calculated using the formula:
where, ρ – electrolyte density;
Then the voltage on the battery will be equal to:
Uakb = 6*(0.84 +ρ)
With a battery density of 1.27 g/cm3, the voltage on the battery will be:
Ub = 6*(0.84 +1.27) = 12.66 volts
Accordingly, with different initial densities of the electrolyte in the battery, the voltage on it will also be different.
Checking the battery with a load fork
However, simply checking the voltage on the battery is not enough to fully and qualitative assessment its performance.
The next step is to check the battery’s ability to perform its functions when a load is connected to it. After all, there may be a case when, when measuring the voltage, it is determined that the battery is fully charged, but the engine “turns” poorly or does not “turn” at all. It can be assumed that such a battery has lost capacity as a result of long, and more often incorrect, use and it discharges so quickly that it “dies” in one second.
So, to check the operation of the battery under load, a load fork is used. The load fork diagram is shown in the figure.

That is, the load plug is a voltmeter that can be connected in parallel with its load terminals. For starter batteries, the load resistance is selected in the range of 1-1.4 times the battery capacity. This is considered the maximum discharge current for the battery. Not to be confused with starter current.

First, the battery voltage is measured without load and the degree of its charge is determined using a table.
Table 5. Dependence of battery charge level on voltage Idling. (The battery is left at rest for at least 24 hours).

The second stage is to measure the voltage on the battery with a load connected and determine the degree of charge according to the table. The reading under load is taken at the end of the fifth second from the moment the load is connected.
Table 6. Dependence of the battery charge level on the voltage at the end of 5 seconds of testing with a load fork.

The values in these tables are taken directly from the load fork instructions.
Thus, with a 100% charged battery, the voltage measured under load should not be less than 10.2 volts. Otherwise, the battery is considered to be undercharged and needs to be charged.
If such a situation occurs that without a load the battery shows the voltage of a 100% charged battery, and when the load is turned on, the voltage drops significantly and is very different from the values indicated in the table, then this means that there is a malfunction in such a battery (sulfation, short-circuited plates etc.).
Therefore, it is necessary, if possible, to fix the malfunction or purchase a new battery so that one day it does not let you down.
If the following instructions are followed, the buyer will not have problems with his battery for many years. Before installing the battery on the machine, read this manual and follow its recommendations.
- Safety instructions.
- The mixture of hydrogen and oxygen released during battery charging is EXPLOSIVE. Therefore, it is STRICTLY PROHIBITED to smoke near the battery, use open fire, allow sparks to form, including shorting the battery terminals.
- Do not tilt the battery more than 45° to prevent electrolyte from leaking.
- Electrolyte is an aggressive liquid. If it gets on unprotected areas of the body, immediately rinse them with plenty of water, and then with a 5% solution of soda and ammonia. Seek medical attention if necessary.
- Connecting and disconnecting the battery from the vehicle's on-board network must be done with the consumers disconnected. First, the positive terminal is connected, then the negative one; disconnection is carried out in the reverse order.
- The battery must be securely fastened in the car's standard socket, the connecting terminals are tightly clamped to the pole terminals, and the wires themselves are loosened.
- Preparing for work.
- The battery filled with electrolyte and charged is ready for use.
- Before installing the battery on the car, it is recommended to recharge the battery.
- It is recommended to charge at a constant current equal to 1/10 of the battery capacity. The charge is considered complete 2 hours after the battery voltage reaches 16.0 V.
- Preparing a dry-charged battery for operation.
- An acidic battery electrolyte is used to fill a dry-charged battery. The recommended electrolyte density is 1.28 g/cm?. ATTENTION! The use of electrolyte of higher density leads to rapid failure of batteries
- Fill a dry-charged battery with electrolyte with a density of 1.28 g/cm? to the MAX mark on the monoblock (15 mm above the edge of the plates). The temperature of the electrolyte and battery must be at least 18? C.
- After 40 min. After filling, tilt the battery slightly several times (to allow air to escape). If necessary, add electrolyte to the mark. If the temperature rises above 20 °C, it is necessary to give the battery time to cool down.
- Check the density of the electrolyte in the battery. If the density has decreased by no more than 0.03 g/cm?, then the battery is ready for use; if the density has decreased by more than 0.03 g/cm?, then the battery should be charged until the required density is achieved.
- Battery operation.
- The battery should be kept clean.
- Once every three months, check the reliability of the battery in the car's standard socket.
- Do not allow the battery surface to become dirty. If necessary, wipe the surface of the battery with a damp cloth.
- The pole leads and terminals must be clean. After cleaning, it is recommended to lubricate them with technical Vaseline or other thick neutral lubricant.
- Start the engine with short (5-10 seconds) turns on the starter. In winter, disengage the clutch. The breaks between start attempts must be at least 1 minute. If after 3-4 attempts the engine does not start, check the serviceability of the ignition and fuel supply systems.
- When operating cars and other vehicles, the charging voltage level must comply with the requirements of the instructions for vehicle and be within 13.9 - 14.4 Volts, regardless of the operating mode of the engines and switched on consumers. It is NOT ALLOWED to operate batteries in UNDERCHARGED mode, i.e. at a voltage below 13.9 Volts, and in OVERCHARGE mode, i.e. when the voltage is above 14.4 Volts. Therefore, check the charging voltage level at least once every 2 months. If the charging voltage differs from the above, you must contact a car service to bring it to the specified level.
- The battery should be kept charged. At least once every 3 months, and also in case of unreliable engine starting, it is necessary to check the state of charge using the equilibrium open circuit voltage (OCV) for the batteries.
- Measurement of the equilibrium NRC must be carried out no earlier than 8 hours after turning off the engine. For a fully charged battery, the NRC value is 12.7 - 12.9 Volts at a temperature of 20 -25 ° C.
- The NRC measurement should be carried out using a high-resistance voltmeter with an accuracy class of at least 1.0. After measuring the NRC of the battery, the degree of its charge should be determined according to Table 1, taking into account the ambient temperature.
Charge level
Degree of discharge
Electrolyte density
G/cm3 (**)1,28 12,7 1,245 12,5 1,21 12,3 40% 60% 1,175 12,1 20% 80% 1,14 11,9 0% 100% 1,10 11,7
A battery whose state of charge is below 75% in winter and 50% in summer should be removed from the vehicle and charged. - If for any reason the battery is deeply discharged, it must be immediately fully charged as indicated in clause 2.2. of this Instruction. It is unacceptable to leave the battery in a state of deep discharge. This leads to a significant reduction in its capacity, and at subzero temperatures to freezing of the electrolyte and destruction of the battery case.
- Long-term (more than 1 month) operation of the battery under overcharge conditions is NOT ALLOWED, i.e. at a charging voltage above 14.4 V, since this leads to the decomposition of the entire electrolyte supply and, as a result, can lead to an explosion of the explosive mixture and destruction of the battery.
Rechargeable batteries used in automotive vehicles have an unpleasant feature: during the charging process, at its final stage, the electrolytic decomposition of the water contained in the electrolyte begins in the battery. This releases gases: hydrogen and oxygen. Hydrogen and most of oxygen comes out of the electrolyte to the surface, creating the appearance of boiling and accumulates under the covers in each battery cell. This mixture of gases comes out through the ventilation holes (unless, of course, they are clogged with dirt and there are no other obstacles). The ratio of oxygen and hydrogen is such that it is an explosive mixture, which, in the presence of a spark from faulty electrical wiring or an open flame from a cigarette, instantly explodes. The force of the explosion and its consequences depend on the amount of gas accumulated at that moment. For example, with an increased charging voltage from the generator of more than 14.5 Volts or with a low level of electrolyte in the battery, the intensity of gas formation inside the battery and, consequently, its release increases.
It can be concluded that violation of safety regulations, malfunction of the vehicle's electrical equipment and lack of control over the battery are the reasons for the explosion of the battery with the destruction of the battery housing.
Dry-charged batteries can be stored in any unheated room subject to the following conditions:
- no direct sunlight or bright light on the battery case
- the plugs must be tightly wrapped, and the sealing tabs or plugs must not be damaged to prevent moisture from entering the battery
The warranty on the battery is issued in case of detection of a manufacturing defect (open circuit, short circuit of one of the cans). IN service center After checking the condition of the battery, they will help you identify the cause of the failure. If manufacturing defects are detected, the battery is replaced with a new one of a similar brand with the issuance of a new warranty card, if the operating conditions of the battery are observed and its maintenance is carried out on time. A discharged battery cannot be considered defective. Therefore, charging the battery at the service center is carried out at the expense of the client using that battery.
In order to answer this question, you need to periodically visit the warranty service for professional diagnostics of your car’s electrical system, where they will check the functionality of the generator, starter when starting the engine, and current leakage in the car, which will help subsequently avoid problems with constant battery discharge.
The warranty on the battery does not apply in the following cases:
- There is no warranty card, it is not filled out or filled out with corrections, there is no seller’s stamp, no marks on checking the battery during sale, no signature of the seller and buyer.
- Mechanical, chemical or thermal damage to the housing or terminals, as well as leakage of electrolyte from the housing due to poor fastening of the battery.
- In case of violation of the rules of operation, maintenance and storage of the battery specified in the battery operating instructions.
- Destruction of plates due to charging with high charging currents, expressed in large quantities sludge and turbidity of the electrolyte.
- Inconsistency between the technical data of the car and the battery.
- Negative balance of energy supply associated with the use of abnormal consumers that do not correspond to the power of the generator.
- Artificially low or high electrolyte density, as a result of unqualified battery maintenance.
- Lack of control over the electrolyte level, which leads to evaporation of water, exposure of the plates and, as a consequence, to the melting of the active mass.
- Failure to follow the instructions leads to a battery explosion, a drop in the density of the electrolyte and its freezing in the cold season.
- When plates are sulfated due to improper storage of uncharged batteries.
The ETN designation was developed European Union battery manufacturers as an aid to battery identification. The purpose of the development was to help manufacturers and consumers to unambiguously identify the battery.
The ETN number is a system of 9 digits divided into three groups. Each group consists of 3 digits.
For example, the battery has an EN number
First three digits - group A (555)
The next three digits are group B (065)
Last 3 digits - group C (042)
Group A. Voltage and rated capacitance
Group A structure
- For 6-volt batteries, the 3 digits in this group represent the rated capacity.
001-499 -> Ah...499 Ah
- For 12-volt batteries, the nominal capacity can be obtained by subtracting 500 from the 3-digit number. As a result, 12-volt batteries have the number first
5 (capacity from 5 to 99 Ah)
6 (capacity from 100 to 199 Ah) or
7 (capacity more than 200 Ah)501...799 -> 1 Ah...299 Ah
Group B. Identification number determining dimensions, polarity, type of attachment to the bottom, etc.
Group B structure.
Physical characteristics such as
- body dimensions
- polarity (location of current carrying terminals)
- cover type
- type of fastening to the bottom, presence of handles
- gas exhaust system
- discharge current
- vibration strength
- resistance to charge-discharge cycles
Group C. Discharge current at -18 s according to EN standard
Group C structure:
The value in this group multiplied by 10 gives the discharge current in Amperes. Discharge current in new system EN is measured using a new technique, different from the DIN (GOST) standard. To convert the discharge current EN to DIN, it is necessary to divide the current value EN by a factor of 1.7
| Group C | Current EN |
| 033 | 330 A |
| 042 | 420 A |
| 054 | 540 A |
| 105 | 1050 A |
So the number
indicates that the battery has a rated voltage of 12 V, a capacity of 55 Ah (group A), and a discharge current of EN 420 A (group C), the unique number of group B informs that the battery has “Russian” polarity, mounting type B3 (specified in catalog).
Charge level | Degree of discharge | Electrolyte density G/cm3 (**) | Battery voltage V (***) |
| 1,28 | 12,7 | ||
| 1,245 | 12,5 | ||
| 1,21 | 12,3 | ||
| 40% | 60% | 1,175 | 12,1 |
| 20% | 80% | 1,14 | 11,9 |
| 0% | 100% | 1,10 | 11,7 |
Let's consider the charge of the battery removed from the car. We connect the positive wire (terminal) of the charger to the positive terminal of the battery, and the negative wire to the negative terminal.
There are many methods for charging batteries, all of them are based on charging at a constant current, at a constant voltage, or a combination.
Charge at constant current
The charge is carried out at a constant current equal to 1/10 of the battery capacity. That is, if we charge a battery with a capacity of 60 A*h, the charge current should be 6 A. To maintain this value throughout the charging process, it is necessary to use special charging device with manual control of the charging current value or with a current stabilization function in automatic mode.
Manual control of the current can be with smooth or stepwise (depending on the charger) adjustment of its value. In the case of step adjustment, it may not be possible to accurately set the current value to 1/10 of the battery capacity. In this case, it is necessary to set the initial charge current to be greater than the nominal capacity of the battery (6-8 A for a battery with a capacity of 60 Ah).
During the charging process, the current gradually decreases. Therefore, it is necessary to control and regulate the charging current, keeping it at a given value. This is due to the fact that the battery has internal resistance and as the charge of the battery increases, the resistance increases.
At a constant current value, the charging voltage gradually increases. When the voltage reaches 15-15.5 V, active gas evolution begins (battery boiling). Therefore, it is necessary to reduce the current by 2 times from the initial one (3 A for a battery with a capacity of 60 A*h) and continue charging. (see figure 1)
picture 1
For maintenance-free batteries (without plugs for topping up water), it is advisable, when the voltage reaches 15-15.5 V, to reduce the current value by four times
(1.5 A for a battery with a capacity of 60 Ah).
You can check the charge level of the battery by the density of the electrolyte in the jars or using a load plug. First de-energize the device and disconnect it from the battery. The battery is considered charged when the current is less than 1 A, and the voltage at the battery terminals is 14.4 - 14.8 V.
Disadvantage of this method. The need for constant monitoring and regulation of the set current, as well as gas evolution (battery boiling) during the charging process.
Charge at constant voltage
With this charging method, the voltage is selected depending on the discharge and wear of the battery. The required voltage value is determined by battery developers and modern chargers are oriented towards their requirements. It is recommended to set the voltage to 14.4 - 14.6 V, which is lower than the intense gas release voltage.
As charging proceeds, the voltage at the battery terminals gradually approaches the charger voltage, and the charging current decreases. At a current of less than 1 A, it is necessary to increase the voltage to 15 - 15.5 V for a deeper charge of the battery.
Disadvantage of this method. The need for very precise selection of charge voltage. At low voltage, the battery will not be fully charged; at high voltage, there will be active gas evolution (battery boiling) and overcharging.
Car battery charge
When using a battery in a car, it is charged at a constant voltage. Car manufacturers, in agreement with battery developers, set the charging voltage level to 14.6 V, which is lower than the intense gas emission voltage. Exceeding this threshold can lead to failure of the vehicle electronics. As the temperature decreases, the charging efficiency at a constant voltage decreases due to an increase in the internal resistance of the battery. Therefore, car batteries do not always restore their capacity after being discharged. Typically, the battery charge level in winter is 70-75%. if the voltage at the battery terminals is 14.6 V when the engine is running. Therefore, in winter conditions (with low temperatures, frequent and long engine starts, short runs), it is necessary to periodically (preferably at least once a month) charge the battery from a stationary charger.
Combined method
This method is a combination of constant current and constant voltage charging methods. It is embodied in chargers with “Automatic” mode. You only need to set the initial current (equal to 1/10 of the battery capacity). The device will automatically maintain it at the set value. When the voltage reaches 14.4 V, the charger goes into the mode of stabilizing this voltage. At the same time, the current begins to decrease. (see Figure 2)
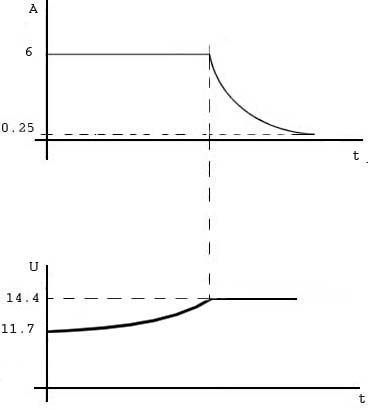
figure 2
This mode can be used to store batteries with self-discharge current compensation.
However, it should be noted that in order to charge the battery as quickly and fully as possible, it is optimal to have a charger with both manual and automatic control modes. Upon completion of charging in automatic mode, it is recommended to recharge manually with a voltage of 15 - 15.5 V.
How is this beneficial?
- We do not need to constantly monitor and regulate the amount of charging current.
- The battery will be fully charged (100%).
This article outlines the generally accepted (classical) methods for charging a battery. However, before you start charging, it is recommended to carefully read the operating instructions (how the manufacturer recommends charging the battery). It will also be very useful to read the charger's passport. Possession of these necessary knowledge will allow you to charge the battery as quickly and successfully as possible. We should not forget about safety precautions. The fact is that during the charging process, the electrolytic decomposition of the water contained in the electrolyte begins (battery boiling). This releases gases: hydrogen and oxygen. The ratio of oxygen and hydrogen is such that it is an explosive mixture. Therefore, sparking should not be allowed near the battery.
We offer: Modern charging and diagnostic devices, chargers, as well as a wide range of
Ever since cars began to be equipped with batteries, they began to create specific problems. They are few, but they are significant. The main one is the inability to start the engine. As people say, the battery “does not last.”
To prevent this from happening, every driver knows (but not everyone does) that the battery must be operated according to certain rules and its condition and parameters must be checked from time to time. It is better, of course, to do this at a service station, during preventive technical inspections. But what to do if the service station is not available? How to check the battery yourself?
Checking battery charge
The charge level is an indicator of the health of not only the battery, but the entire electrical system. After all, undercharging may be due to a malfunction of the generator. Therefore, this indicator needs to be monitored. The latest models have built-in charge level indicators. The so-called “eyes” among the people.
As the battery discharges, the “eye” changes color. This is, of course, wonderful! But in electrical engineering it is not customary to completely trust pre-installed devices. Their readings must be periodically rechecked either with another device or in another way. Therefore, the readings of the “eyes” can always be rechecked the old fashioned way.
A multimeter will help with this. Or rather, a voltmeter. “Checking battery charging” consists of measuring the voltage at the battery terminals when there is no load. A reading of around 12.6V is considered excellent, which is a full charge. Readings around 12.2 V indicate that the battery does not interfere with recharging, it is half charged.
If the multimeter shows a voltage of around 11.8 V, this will mean that the battery has not passed the “battery charging test” and needs to be charged urgently. Well, readings below 11 V are a distress signal. The battery is deeply discharged. Most likely, it is unusable. Even if the car starts with it (which happens very rarely), there is a risk of burning out the alternator or charger.
Checking battery capacity
Capacity is the main parameter of a battery. He talks about how long this battery can produce electricity a certain strength. Therefore, capacity is measured in ampere-hours. Just like the battery charge, you need to monitor its capacity. How to check the capacity of a lead-acid battery? Now this is done in one of three ways.
The first way to check the battery
The first method is considered classic. The battery capacity is checked using a test discharge. A fully charged battery is loaded in such a way that the discharge current is calculated as specified in the passport. An ammeter is included in the electrical circuit. And then the time after which the current strength decreases by more than 50% is recorded.
In modern batteries this happens shortly after the estimated, certified time. If this happens earlier, it means that the battery is losing its capacity. If the current decrease occurs shortly before the estimated time, it is suitable for operation. But if this happens already halfway through the estimated time, this is a reason to replace the battery.
The disadvantages of this method are obvious. There is some complexity: you need to calculate the load and select it. This type of verification takes a lot of time.

The second way to check the battery
The second way to check the battery is also not very simple, but faster. The tools and accessories you will need are a multimeter and a load. The capacity of any battery is known. The load must be selected in such a way that it takes approximately half the current for which the battery is designed. For example, if the battery capacity is 7A/h, then the load should be something that consumes at least 3.5A at 12V.
Simple calculations will show that this could be, for example, a lamp from a car headlight with a power of 35-40 W. Of course, these are approximate calculations. With a larger or smaller capacity, the load will be different.
Testing the battery with a multimeter is carried out on a fully charged battery. First you need to connect the load to the battery and wait 2 minutes. If a light bulb is used as a load, it may be possible to observe a dimming of the light during this time. If this happens, the check can be completed there. This is a great demonstration of a dead battery. If this does not happen, then after 2 minutes you will need to measure the voltage at the terminals without disconnecting the load.
The battery can be considered working if the multimeter shows a value greater than 12.4 V. It has full capacity. Or almost full. In any case, it is serviceable. And if there is a problem with the engine starting system, then the battery is to blame, verified, this is not the case. The reason is something else.
Readings in the range from 12 to 12.4 V indicate that the battery capacity is already far from the rated value. You can probably still use it, but it’s better to replace it at the first opportunity. Well, if the readings are less than 12 V, then this battery must be changed immediately. It has lost more than 50% of its capacity. At this point, checking the battery with a multimeter can be considered complete.
By the way, a similar circuit is located inside the device that is used to test batteries in stores and service stations. It's called a load fork. Consists of a set of loads and a built-in voltmeter. To check the battery, you need to set the desired load, connect one terminal of the device to a terminal and press the second terminal to another terminal for a few seconds. The voltmeter reading must be at least 13.5 V.

The third way to check the battery
The third, modern method of checking battery capacity is faster and easier. This means checking using special modern instruments. All that is needed to test the battery is to connect the device to its terminals. Within a few seconds, all the information of interest will appear on the display. And not only the battery capacity, but also its voltage and even the condition of the plates.
The operating principle of such devices is based on a special form of signal that the device sends to the battery. The response impulse carries all the necessary information. The device decrypts it and displays it on the display. How best to check the battery is up to drivers to decide.
And finally, if it turns out that the battery is no longer usable, do not throw it away. As garbage it will poison for a long time environment lead oxides. It is better to recycle the battery. It's more profitable and safer. I would like every driver to remember this.
We'll tell you how to properly check a car battery for serviceability using a multimeter and a load fork, what methods exist.
Checking a car battery using a multimeter
You need a multimeter - a device for measuring voltage. If you don’t have it, you can ask your friends or buy it in a store. The device is not expensive, and if you carry out repair work on electrical equipment more than once, it will come in handy. I recommend buying a digital multimeter, because... it is more convenient to use.You should not rely on measuring the battery voltage using the car's on-board computer, because they are wrong. This happens because these voltmeters are not connected directly to the battery, which means losses are possible. Therefore, the voltage on them may appear less than on the battery itself.
Checking the battery with the engine running
We first measure the voltage with the engine running. Normal voltage should be between 13.5 and 14.0 V.If the battery voltage is greater than 14.2 V when the engine is running, this indicates that the battery is low and that the generator is working overtime to charge the battery. This does not always happen, for example, in winter there may be increased voltage, because... The battery may have drained overnight due to cold temperatures, or the electronics sense the air temperature and give more charge to the battery.
There is nothing wrong with increased battery voltage. If everything is normal with the electrical equipment of the car, then after 5-10 minutes the electronics will drop the voltage to normal: 13.5-14.0 V. If this does not happen and the voltage is not gradually reset to the optimal value, then this may result in overcharging the battery. It will work at maximum output, which threatens to boil the electrolyte.
If the voltage is less than 13.0-13.4 V when the engine is running, this indicates that The battery does not charge completely. You shouldn’t immediately run to a car service center; first, the measurement should take place with all consumers turned off, which means turn off the music, lights, heating, air conditioning and all energy-consuming devices.
What is the current voltage on the battery when measured with a multimeter? During normal operation of the car’s electronics, it should be in the range from 13.5 to 14. If it is lower, this means that the car’s generator is not working. Especially when the voltage with the engine running and consumers turned off is less than 13.0 V.
Low voltage may occur if the battery contacts are oxidized, so check the contacts and sand them down.
How else can you check the operation of the battery and generator? There is one way. With the engine running and consumption sources turned off, the battery voltage is 13.6. Now turn on the low beam. The battery voltage should drop slightly - by 0.1-0.2 V. Next, turn on the music in the car, then the air conditioner and other consumers. We do everything gradually and every time you turn on the consumers, the voltage on the battery should drop slightly.
If the voltage drops significantly after turning on the car's power sources, this means that the generator is not working at full capacity and the generator brushes are worn out.
With all consumers turned on, the voltage on the car's battery should not fall below 12.8-13.0 V. If it is lower, the battery is discharged and requires replacement and the purchase of a new battery, and we will discuss how to check this below.
Checking the battery with the engine off
We check the battery voltage with the engine off using a multimeter. If the voltage is less than 11.8-12.0, the battery is discharged, the car may not start and will have to be repaired.The normal voltage on the battery when the engine is not running should be from 12.5 to 13.0 V.
 There is an old and simple method to find out the battery charge level by voltage. So, a voltage of 12.9 means that the battery is 90% charged, a voltage of 12.5 is 50% charged, and 12.1 is 10 percent charged. This is an approximate method for measuring the charge level, but it is effective, as confirmed by our own experience.
There is a nuance when measuring voltage with the engine not running. If the measurement is taken after the engine is turned off, then one reading is possible, but if the next morning, the voltage will be different. It is better to measure the voltage on the battery before driving.
The battery charge level indicates its ability to hold voltage for some days. If the battery is fully charged, then even if you have not driven for more than a week, the voltage will not drop much. Otherwise, if the car's battery is discharged, the voltage will drop quickly.
Testing the battery using a load fork
This method of testing a battery using a load fork is an effective way to check the performance of a car battery. It is based on its results that you can declare whether the battery is charged or not. How to check battery charge? To do this, connect the load plug, observing the polarity. The joining time should not exceed 5 seconds. At the beginning of the measurement, the voltage is 12-13.0 V. At the end of the fifth second, the voltage should be more than 10 Volts. Such a battery is considered charged and capable of operating under load.
If the voltage drops below 9 volts when checking with a load plug, the battery is considered weak and unreliable. IN in this case You'll have to think about buying a new car battery.


