How to install mods for the game spin tires. How to install mods on spin tires
Alexander Davidov
First, download any modification of SPIN TIRES 2014, usually it is located in a .zip archive (you can open the archive using programs such as Winrar, 7zip)
Next, extract the entire contents of the archive to any location on your hard drive.
After that, open the folder with your game SPIN TIRES 2014 installed, if you installed it by default, then it is located at: C:\Program Files (x86)\Steam\SteamApps\common\Spintires, if you installed it manually, then the folder with the game where you installed it.
In the game folder, open the ZIP Archive - WinRAR (.zip) under the name Media.

The Media archive in the game folder contains a set of folders; similar folders are contained in the mod archive; your task is to replace the files in these folders.

Please note that it is not the entire folders that need to be changed, but the contents of these folders, that is, the files.
Next, open the textures folder in the game’s Media archive as an example and click “add”

In the window that opens, select the textures folder from the mod archive and open it (you previously extracted it and other folders), then select all the files in this folder and add them with replacement.
In a similar way, we manipulate all folders of the mod archive.
After we have completed all the manipulations with the installation, go into the game.
Note:
This instruction is shown as an example licensed version SPIN TIRES 2014, the contents of the non-licensed version may differ.
If you did everything according to the instructions, but the mod does not appear in the game, restart the game several times; if the mod is still not there, do the following:
Go to the folder C:\Users\USER\AppData\Roaming and delete the "SpinTires" folder there. The AppData folder is hidden! Need to open hidden folders or enter it in the address bar)
Let's start the game.
There is no Roaming folder in the file!!!
For xp: C:\Documents and Settings\USER\Application Data\SpinTires
If you installed the mod, but the equipment has no sound, parts, etc., then you missed one of the folders.
Keep in mind that most modifications replace the original game model and many modifications do not support multiplayer play and achievements (as a rule, this is all written in the description of mods), so before installing modifications, make yourself a backup “clean” copy of the game.
However, despite the long period after release and the wild popularity of the game, many players continue to be tormented by the question of how to install mods on Spin Tires version 03.03.16. It is worth noting that installing mods on latest version Spin Tires does not have any fundamental differences from previous updates, so let’s look at the sequence of installing mods point by point.
Mod installation instructions:
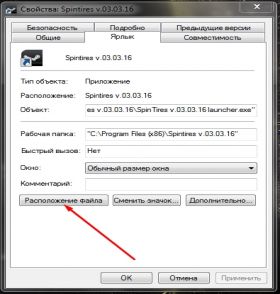
1. Go to the root folder with the game. To do this, right-click on the game shortcut and select properties from the drop-down menu. Next, click the “File Location” button. After clicking, you will be taken to the root directory of the installed game.
For the Steam version, the path to the folder will be approximately as follows: C:\Program Files (x86)\Steam\SteamApps \common\Spintires
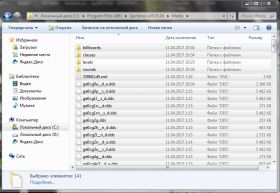
2. Open the Media folder, this is where we will install the mods.

3. Download the mod you like, but please note that the mod must match the version of the game. Usually, developers indicate the required version of Spin Tires in the description of the mod; in our case, v 03.03.16 is required.
4. Copy all the contents of the archive with the mod to the Media folder.

5. Clean the game cache, this can be done by double-clicking the “Full clear SpinTires.bat” file in the root folder of the game.
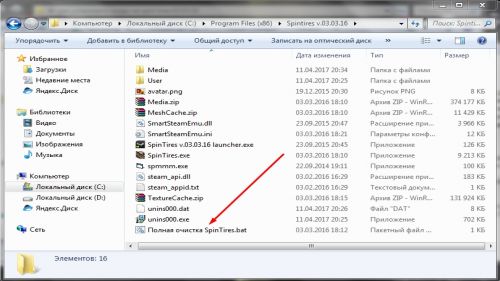
6. The mod is installed and you can start the game by launching it using the shortcut.
When the game starts to get a little boring, many players wonder how to install mods on Spin Tires. In this guide, we will look at several ways to install modifications for the Spin Tires game of any version.
There are several ways to install mods: automatic, semi-automatic and manual. Let's first look at more convenient (automatic) methods.
Installing Mods Using the Mod Manager
The best option if you are wondering how to install mods on Spin Tires is to use a mod manager program for Spin Tires. With its help, installing game modifications will become an easy task.
Downloading and installing the mod manager
First of all, you need to download the mod manager for the game Spin Tires. You can do this using the link below.
After downloading, you will find an archive on your computer that will contain several files and folders.

You need to copy these folders and files to the folder with installed game Spin Tires. By default the game is installed at:
C:\Program Files (x86)\Steam\SteamApps\common\Spintires
If you have a pirated version of the game installed, or you manually specified a different installation location, then find it on your computer and copy the mod manager files to it.

Downloading mods and installing them
Now you know how to install mods on Spin Tires, which means that the game will sparkle with new colors for you and give you a lot of new impressions.
Computer games very often have code that allows you to write modifications for them. Therefore, some projects have a large number of mods that add new items, objects and even locations. For example, in the Stalker project you can go through a dozen different campaigns created by ordinary gamers. But in this article we'll talk about one particular game called Spin Tires. Its development was announced quite a long time ago, but it was released quite recently. Accordingly, its graphical component is a little outdated, which is perfectly compensated by the process itself - you get a unique opportunity to try out great amount on the most severe off-road conditions. But at the same time, many gamers have questions about how to install Spin Tires mods. And then a dilemma arises: what modifications can such a game have in principle?
Mods for Spin Tires
Before you deal with Spin Tires, you need to understand what exactly they can give you. Some gamers believe that the basic game itself is enough to get enough fun. But they have no idea what opportunities the modifications will open up for them. First of all, you should pay attention to the fact that with the help of mods you can add even more interesting and impressive vehicles to the game, which will allow you to overcome serious off-road conditions. Secondly, you can significantly diversify the catalog of routes available for passing. No matter how varied the game is, sooner or later it will run out of tracks, and you will have to go through everything again. If you install a couple of mods for yourself, then you will have even more possibilities, and you will not have to return to the old racing segments. And, of course, as with all things, you can install mods that will change your look at game world- they can add certain devices to the dashboard of your car, diversify it, and so on. Well, now you are unlikely to have any questions about the need for modifications. So we can move on to the question of how to install Spin Tires mods.
Downloading modifications
If you want to find out, then you will need the material with which you will work. You need to find reliable sites. which have already been verified by other users, and download those mods from there. that you would like to use. They will be saved on your computer as an archive, so you will also need an archiver to extract them. Now almost every user has their own archiver, but for those who do not own one, this reminder will be very important. You need to unzip the folders to any location on your computer - you will work directly with the game folder a little later. So, you have downloaded the modification, and now you need to find out how to install the mod on Spin Tires 2013.
Installing the mod
![]()
You have a ready-made folder with mod files, so now you need to find where exactly your game is installed. There should be a folder with modules in it - it is recommended to make it so that if problems arise, you can return everything to its original state, and not completely reinstall the game. Now that you have a backup copy, you need to select the same modification files that you unzipped a little earlier and move them to the modules folder. In this case, the system will give you a window in which you will be asked if you want to replace the folders and files that are being copied. You need to agree - only in this case everything will work as it should. That's all, now you know how to install the mod on Spin Tires 2013. Dev Demo is a popular modification that opens up many possibilities for you - it is recommended to try it first.
Activation of the mod
Fortunately, activation is not required for modifications. After installing them, you can launch the game, and it will already load with all the mods installed.
If you are looking for an answer to the question: how to install or add new map to the game Spintires 2014; then this instruction is for you. It has become possible to knead mud not only on standard maps that are already in the game, but also to install and add your own.
So, the instructions:
For new versions of the game
IN versions of Spin tires 2015 and 2016 installation of new ones is much easier than in older versions. In order for new cards to be added to the list of cards you need:
- Find a map to your liking and make sure that the map version matches your version of the game Spintires
- Unzip archive
- We transfer the contents from the Media folder from the archive to the game’s Media folder (Spintires\Media), agreeing to the replacement
- Let's start the game. Find the added card from the list. Let's choose. Let's play
For older versions of the game
- Open the folder with the game (license C:\Program Files (x86) (or another folder in which you have Steam)\Steam\SteamApps\common\Spintires; to pirated version you need to go to the folder where you installed the pirated software.)
- Open the Media archive (not a folder, but an archive)
- Go to the levels folder. We throw the map we need here with the extension (.stg)
- Also in this folder (levels) we find the Maps folder, here we throw the map we need with the extension (.dss)
- Important! So that the map files have the same name (up to the dot). For example, "level_hill.stg" and "level_hill.dss". If we throw cards into the game from the map editor and the files are named "ref_hill.stg" and "ref_hill.dss", then you need to replace "ref" with "level". ("ref_hill.stg" and "ref_hill.dss" should be renamed to "level_hill.stg" and "level_hill.dss" and only then added to the Media archive)
- Next, you need to change the extension of the files that we added to the archive.
- Open the file with the extension (.stg) using Notepad++ (if not, then it is advisable to download it)
- On license. In the first line at the very beginning of the opened file we find signs like “?R” (there may be others), but always before the number “3”. We delete everything that comes before the number “3”, then enter “uz” in English. You should get “uz3...” when prompted to update the archive, click “Yes”
- On a pirate. You need to go into the game files with the extension (.stg) using Notepad++, which were originally in the game. Copy the characters preceding the number “3” in the first line, but do not touch the number “3” itself. Paste the copied characters into the files with the extension (.stg) that we want to add. We agree to update the archive.
Important! Maps will launch if you did not add new objects in the editing/creating map mode. That is, the files that are originally included in the game must be used!


