Correct installation of bindings on skis. Instructions for installing semi-rigid ski bindings. What determines the choice of fastening?
Having become the happy owners of a pair of skis, people usually think about going or going out of town, into the winter forest, to have a ride with the breeze. Yes, so that the sun shines brightly, so that the light frost slightly tingles your cheeks. Such a pastime always promotes a good mood, and is also very good for health.
So, you have skis - now you need to buy ski boot bindings for them, otherwise it will be completely impossible to ski without bindings. Usually, when purchasing skis, store salespeople recommend that customers contact a service center to install special bindings on the skis. Also, in the instructions for bindings, it is usually suggested that in order to install these same bindings, you need to figure out how to properly install the bindings on skis.
Take time to decide what you would like to do with your equipment. This is very important, especially when you need to choose skis and boots. You will surely have more fun with newbie beginners. Your boots won't bother you, they should be comfortable and certainly not too heavy. Here are some quick shopping tips: Go to the store during the day rather than in the morning to try out the boots. Feet tend to be swollen in the morning, so you may have a hard time finding a pair of boots that fit!
Another important point: whether you want to spend the day in the park, or you want to have fun in the backcountry, make sure your equipment is in place. During your day in the park, don't forget your helmet, umbrella, and shorts and caps. Don't venture into fresh snow without proper avalanche equipment - your life may depend on these things!
It is possible without resorting to services service centers, install ski bindings at home, and these bindings, after installation, will serve for many years.
How to install bindings on alpine skis?
To install bindings on alpine skis you will need: screws, drill, screwdriver, ruler, pencil and attentiveness.
First, the center of gravity on the skis is located, then a longitudinal center line is drawn, strictly in the center. Next, a place for drilling for screws is marked. Here you need to be especially careful to ensure that all the screws go into strictly designated places. Then holes are drilled for these same screws.
Let them refer you to experienced salespeople at your trusted stores. The staff is always up to date with the latest technical developments and will be happy to help you choose the right equipment! This makes for a soft and maneuverable shrink shoe. However, make sure you remove the slab first because it won't withstand those temperatures.
Once you have "cooked" your inner shoe, put it back in the boots, insert a wrapped piece of paper and press down on the tip so that it creates a space between the end of the shoe and the toes, and then the boot with a pair of socks, and close the strings. as if to climb right onto your snowboard table. Wear the boots until the inner shoe returns to room temperature and you will find a patterned boot on your feet for exceptional comfort.
First of all, you need to drill holes for fasteners in the front part of the mount, then, setting the middle position on the mount itself and trying it on the ski, drill holes for the rear part of the mount. The most important thing is not to rush, because the work is very important.
After these manipulations, the fasteners are screwed into place, and the screws must first be dipped in special ski glue for better sealing.
Yes, you can choose this option. The attack you selected based on the download length you ordered. We build attacks solely based on the data you provide. No, shipment will not be delayed. Please note that the delivery time will be the same as that of your set with a longer delivery time.
Sole length is measured in millimeters and is usually printed on the bottom or underside of the shoe. It varies from manufacturer to manufacturer. If you can't find or read it, you can always measure the length using a tape measure. If you order ski boots along with ski and canopy kits, we can customize the attack based on the sole length of your new boot.
The installation of fastenings on ridges is also carried out. The most important thing when installing ski bindings is the exact alignment of the bindings.
How to install bindings on cross-country skis?
When installing ski bindings on cross-country skiing similar actions are performed as when installing fastenings on mountain or skating skis. The essence is the same - choose the right center of gravity of the skis, then when using the skis they will only bring pleasure and not problems.
The higher the value, the more the attack will be set back from the center of the ski. The emphasis is on the center of the ski, and this is useful during a trick in the park, for example. On the piste, however, a centered build reduces the ski's stability at high speeds and increases the likelihood of the skis losing traction during curves. This mounting position is best suited for advanced racers or pros with at least some freestyle experience and those looking to change up their equipment. for the actual installation of the park.
The Producer Recommended position offers you a balanced ski run. If you want to call the entire mountain home and don't want to be limited to just one specific terrain, this mounting position is the right choice for you. Riding in a switch is no other way. When in doubt, the recommended mounting position is best.
Installing ski bindings - every Soviet citizen had to master this art, because during the USSR there were no special workshops for this. And it never occurred to anyone, especially an experienced tourist, to seek paid help in this elementary matter. Moreover, before, as now, the kit included instructions for installing ski bindings.
This setback provides the float you need in deep snow, and the rear position of up to 5cm allows you to float through soft illibate snow. You can do freestyle action with any mounting position, but when using freeride, try to avoid landing in the switches during backcountry tricks, as the sci-fi tends to sink into powder easily. We mount your attack at the exact location you choose.
Note that the higher the value, the higher the attack position will be. The mount location is where your attacks are mounted on the skis. The starting point is the center of the ski and, depending on the position, you will find the value in centimeters. -1 cm, for example, is the position of your 1 cm from the center of the ski to the tip. 5 cm - shifted position by 5 cm from the ski center to the tail. The Questor's last position is considered unsuccessful. The correct mounting position depends mainly on the terrain you want to ski and your skills.
Correct installation of ski bindings begins with reading it, which is usually done. We advise you to strictly follow step-by-step recommendations, where the specifics of installation are taken into account depending on their type.
But if you managed to lose the instructions, read our story with step by step photos, which describes in detail the installation of semi-rigid ski bindings.
No, your kit is not ready to use when you receive it. It's simply installed, but not calibrated to suit your specific needs. In theory, you could calibrate these values yourself, but we strongly recommend that you not do so. In the event of an accident, you must take full responsibility and your insurance may deny any claim.
One of the most important components for skiing safely is correct setting ski binding system so that, in the event of a fall, the boot becomes detached and thus avoids injury to the skier. Please enter your weight regardless of any clothing or backpacks. Use the buttons to change the unit of measurement for those more congenial to you.
Useful articles:
Semi-rigid ski binding: how to install correctly?
 Step 1. Find the center of gravity of the ski by placing it on any small object, such as a construction angle or the handle of a screwdriver. It should be balanced - the toe and heel should hang in the air. Draw a line on the ski above this place. This will be the center of gravity.
Enter your height without taking into account any clothing. Neither the heel of the shoe, send Use the buttons to change the unit of measurement for you more congenial. Ski potential is determined as follows. Enter the length of the shoe sole in millimeters. To get it, you can measure the boot using one meter or often place it on the heel side. If you do not know this information, you can still calculate the approximate release value by inserting the required number of shoes, using the units of measurement that are most congenial to you.
In this case, the installation is purely indicative. Choose your perfect legs and bars, then add more options. Enter your details and we'll show you what's best for you. Our professional accessories are designed specifically for professional use in demanding environments. Bring your tools and everything you need for an intense day of work and travel.
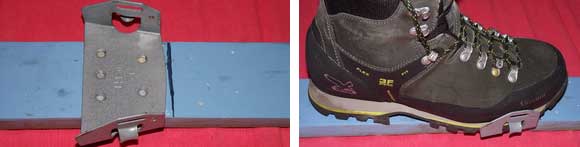 Step 2. Take the binding and place it on the ski so that its leading edge lies on the outlined line. Carefully, without moving the mount from its place, insert into it the boot in which you are going to go hiking (if you are going to go in shoe covers, then). Adjust so that the sole of the boot, its toe and heel are in the center of the ski. Only in this case you are guaranteed correct installation ski bindings.
If there is not enough space in the trunk of a car, it is most often used as an additional roof area. We have to install the roof rack to work and use it in a variable way. The times of the classical gardens are placed in the door frame, and the roof streams are placed in the titams. Although assembly was simple and quick, their features and safety are already behind the times and not suitable for today's purposes. Already in production, vehicles are equipped with roof support points, integrated longitudinal gutters or guide grooves.
That's why we buy media by car model and type. To be compatible, they are homologated and must be certified for each car model, which will help in selection. Once we have a roof rack, we can install a roof box or various brackets. The box is suitable for small items that were not in the trunk, longer shipping boxes can also be used for skis. If the skis don't count, the box gets wider and shorter, it's important to be light and aerodynamic.
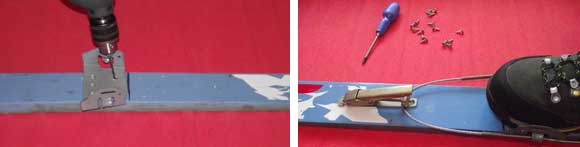 Step 3. Carefully, holding the mount in this position, remove the boot. Immediately place marks with a pencil through the holes in the fasteners. Using these marks, drill small holes with a drill (drill 1.5-2 mm in diameter). Or make them with an awl.
A box that is too long restricts the opening of the fifth door, and if it is more than a meter at the front or rear, it must be properly marked. Even in a box, loads must be properly secured, thinking about their load capacity and the load-bearing capacity of the roof.
In addition to boxes, the roof rack mounts ski and bike racks, boats, canoes and surfboards. This is the cheapest version of the non-luggage compartment carriage. Our market has a choice of three types: transverse, longitudinal or magnetic media. To get cheaper, cheaper clamping brackets need to be checked to tighten the bolts to avoid loosening and more expensive rivets which are more secure. It is advisable to have a built-in locking system for the faucet locking system.
Tighten the screws included in the kit with a screwdriver or screwdriver.
Step 4. Attach the cable and insert the boot into the mount. Unscrew the frog slider as much as possible so that it is at the very end of the bolt.
Insert the cable into the slider. Snap the frog and use your hand to pull it as far toward the tip of the ski as possible. Mark the location of the hole closest to the nose for installing the frog. The second will be closed by the frog, so first drill one hole (but not through, no more than 5 mm deep), screw a screw into it, then open the frog and screw the second screw in place of the second hole.
The crosspieces are self-mounted on longitudinal supports that can be built into the vehicle. They can be steel, coated with plastic or steel. Aluminum is the least noisy and lightest, and their price is the highest. Magnetic carriers are especially suitable for skis and snowboards that require a metal roof. Professional installation requires rivet rivets.
One to four wheels can be attached to a roof rack, depending on the product, but we also need to think about the load capacity of the roof. The application is universal for different shell thicknesses and wheel sizes. Roof boxes and wheels on the roof affect the behavior of the car; it is more sensitive to gusts of wind, the center of gravity moves higher, and consumption increases. Some disadvantage is the need to raise the wheels on the roof, but the favorable price largely compensates for this disadvantage.
Step 5. Tighten the slider so that the frog has enough strength to snap into place and the boot sits tightly in the mount. Place a heel pad under the heel of the boot. Insert the strap into the cheek slots. Ready! Ski binding installation completed successfully!
Of course, it is better to train the wheel on the ground first so that we do not damage the body during the first attempts. In a good way transport wheels is also the fifth door. Wheel control is easier, but installation is more difficult than a roof. However, there is a danger of paint damage that we must take into account to a certain extent. We don't have to lift the wheels on the roof, which is difficult for some to make impossible, and this is a solution for those who don't have a tow ball on their car. They go through several rounds and must be approved to move in this country.
Useful articles:


