Knit yourself a hat. How to learn to knit a women's hat with knitting needles with a detailed description
In the last few years, knitted hats have taken their place place of honor in the world of winter fashion. Now this headdress not only protects from frost, but is also a real work of art. There are a great many styles of hats, but you will never see two absolutely identical models if the knitting is done by hand by a craftswoman.
Experienced craftswomen believe that hats should be knitted from the most expensive and high-quality yarn, since you cannot skimp on your health.
Knitting a beret
If you don't know for sure, knitting for beginners, then knitting a beret will take you out of the dead end. It's quite simple to make. The only thing you need to take into account is that you need to knit a beret several sizes smaller, since it will stretch a lot during wearing.
First, calculate the number of loops that need to be cast on the knitting needles. It depends on the size of the future beret. To do this, you need to measure the circumference of your head, and then subtract two centimeters from the resulting value. Next, the radius of the circle is calculated: the circumference is divided by a constant number 6.28.
Now the obtained values in centimeters need to be converted into loops. Knitting a headdress requires skill and increased attention, so information on how to knit a hat will be very useful for beginners.
It is most convenient to start knitting on two needles, moving in a circle as you work. The first knitting needle is cast on with loops calculated taking into account the size of the head. Next, an elastic band about three centimeters long is knitted. Then the total number of rows must be divided into two equal parts. You should also calculate in advance the number of stitches to increase when knitting the first part of the product. Try to do this operation as carefully and carefully as possible, otherwise holes may appear.
The second third of the beret is knitted without increasing or decreasing, but the third part requires special attention, it’s the hardest thing to do. After reading the article on how to knit a hat for beginners, you can easily figure out this issue. To begin, divide all the previous knitting into six equal parts. Let's say you have 60 loops, dividing them into 6 parts, it turns out that one part is equal to 10. We knit together the first and second loops, the tenth and eleventh, and so on with an interval of ten loops. You, of course, calculate your interval individually. Having finished the first row of the third part, in the second you will find yourself on the wrong side, it is knitted without reducing the loops. In the third row, you need to knit together the loop obtained from the neighboring one.
As soon as exactly half of the original number of loops is reduced, begin to double the number of loops you knit. Due to this reduction, the top of the beret will be flat and neat. Finally, join the seam located in the middle of the headdress.
Difficulties that arise when knitting
Even if you read about how to knit a hat for beginners, it will be difficult to do it the first time, but with time and practice, experience will come and you will be able to create wonderful hats. And if the desire arises, then even earn money from your work. You can start by knitting men's patterns, and then learn how to knit a double hat with knitting needles.
Knitted hats have always been and will remain a subject of admiration among others. Along with experience, your imagination will expand, and you yourself will be able to tell your friends about how to knit a woman’s hat with knitting needles. Therefore, even if you have never picked up knitting needles, after reading our article, try to repeat the knitting steps and make a wonderful beret or hat. And remember, you will succeed!
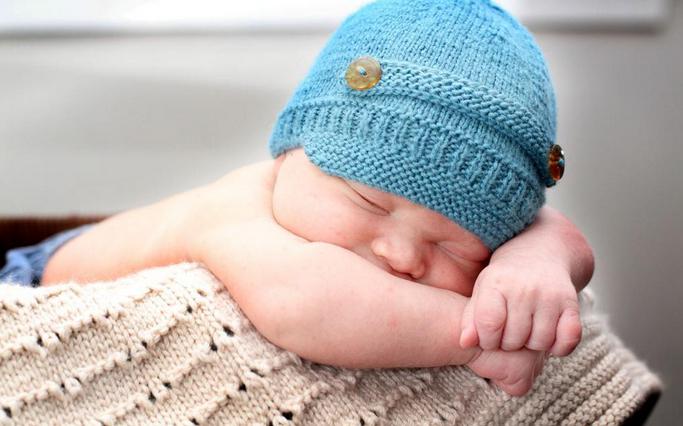
How to knit a baby hat with knitting needles yourself?
To knit a baby hat you will need 100-150 grams of yarn and knitting needles. It is knitted in the simplest stitch - ribbed. It is necessary to measure the circumference of the head and the depth of the future hat. Then cast on the required number of loops, based on the resulting size of the head circumference, and begin knitting (2 knit loops, 1 purl loop). You need to knit this way about 45 cm and sew the seam at the top and back. Due to this length, you can knit a hat with ears, and it will turn out to be an original rectangular shape. The ears can be decorated with anything you wish.
The second way to knit a baby hat
There is another method that will be useful to anyone who wants to learn how to knit a baby hat. First, you need to cast on about 90 loops and knit with an elastic band, then, having knitted 25-30 cm, begin to decrease the loops, therefore, you will get the bottom of the cap. Decrease is done in the front row; for this, 2 loops are knitted together every six loops, in subsequent rows after five, four, and so on. When the number of loops decreases to 17, they need to be gathered onto a thread and tightened. Then you need to sew the hat. The finished product can also be decorated to your taste. If you want to knit it with knitting needles, you can attach special ropes to it that will hold it securely on the child’s head.
Hat for newborn
It is very important that a newborn baby has a high-quality hat. Of course, you can buy it at any children's store, but some mothers prefer to knit a hat for their newborn on their own. This is very easy to do, plus in this way you can show all your love and care for your long-awaited child.
The hat should be knitted from soft threads, because the delicate skin of a newborn is especially susceptible to all sorts of allergic reactions. For knitting you will need knitting needles, a thread button hook and approximately 100 g of yarn.
First, you need to cast on 74 loops on the knitting needles, then knit with a 1x1 elastic band for about 6-8 rows. Having finished knitting with an elastic band, knit the next row with purl stitches and insert ruffles. Then you should knit 22 rows with facial loops and distribute the loops on special stocking needles.
The first rows in the circle need to be knitted with purl stitches, since there will also be ruffles here. Next, start decreasing stitches. When decreasing, knit every seventh and sixth stitch together, then every fifth and sixth stitch, and so on. Decrease must be repeated every other row until there are 10 stitches left on the knitting needles.
The remaining loops need to be pulled together and secured to the outside of the headdress.
Then, along the edge of the fabric, you should pick up new loops, which you should knit with a 1x1 elastic band about three centimeters. On the first side of this elastic band, you must remember to leave a buttonhole. 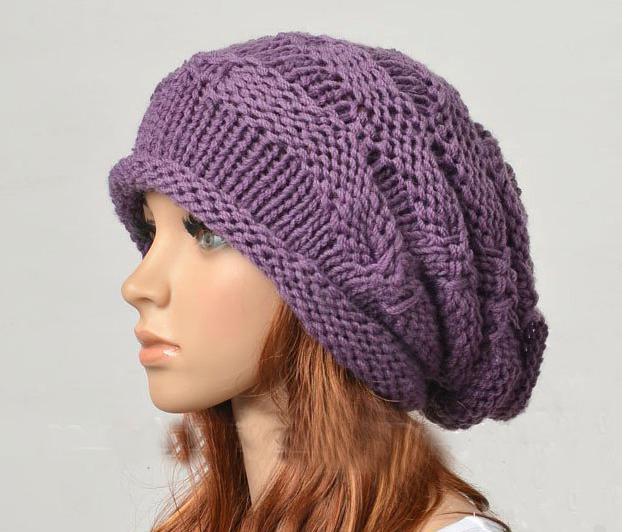 To do this, at the end of the row you need to close off 2 or 3 loops, and then cast them on again in the next row. It is better to make a button from threads to avoid chafing the baby’s neck.
To knit a button you will need a hook on which you need to pick up 3 air loops and close them in a circle. So, you need to knit about eight rows in a circle and tighten the finished button with thread.
If you don't want to make a button, you can knit special small ties for this. To do this, you need to crochet a chain of chain stitches and knit a single crochet row. Without breaking the thread, tie the edge of the cap with a special crab step.
Hat with ears
Ushanka hats have become not only a fashionable element of the winter wardrobe, but also excellent protection from severe frosts and winds. Even a novice needlewoman can figure out how to knit a women’s hat using knitting needles of a similar model.
First, you need to take measurements for your future headdress. It is recommended to use thick circular knitting needles, as well as yarn corresponding to them. Wanting to make such a model, many needlewomen learn how to knit a double hat with knitting needles to make it even more voluminous and unusual.
It is better to write down the obtained measurements and knitting density in a notebook, so as not to get confused in the future in the process of making the headdress. For example, you knitted a 10x10 square fabric in satin stitch on size 6 needles with double ply yarn. The density of such a square is fifteen loops per twenty rows. Using this pattern, you can easily understand how many stitches you will need to knit a hat headband.
When thinking about how to knit a hat with earflaps, keep in mind that it is made from the bottom up. You should start with the cords that will serve as ties.
First, cast on the stitches on double needles. Their number depends on the width of the tie, for example, five loops. Move the open loops to the opposite end of the knitting needle and pull the thread there. Knit everything with knit stitches and move them again to the other end of the knitting needle.
Repeat the above steps until you get the cord of the desired length. While knitting, carefully stretch the knitted strip to ensure even distribution of its elements.
Now you can start knitting the ears of the product. To do this, in each even row you need to make an even increase on both sides of the fabric and continue knitting in stockinette stitch.
At the beginning of this row, yarn over and extend the knitting seven times before 2 loops. The same must be done at the end of the row, that is, on the other side of the fabric, when there are two unknitted loops left there. As a result, there should be 19 loops on the knitting needles.

Once you've finished the ears, move on to the edge of the headdress. To do this, you need to cast on loops on circular knitting needles. For our example, there will be 42 such loops. Distribute 80 loops on one knitting needle: an eye from an additional knitting needle, a second eye and 21 loops from the main product.
Knit the piece in stockinette stitch in the round. In this way you need to knit approximately 11-12 cm, depending on the size. Then proceed to forming the top of the earflap hat.
Start removing the loops from the work. Make decreases in each even circle 8 times. At the front and back of the product, in the middle, remove the loop 4 times, make the same decrease above the ears. When a ring of removed stitches remains on the knitting needles, pull a thread of yarn through them and pull off the top of the finished hat.
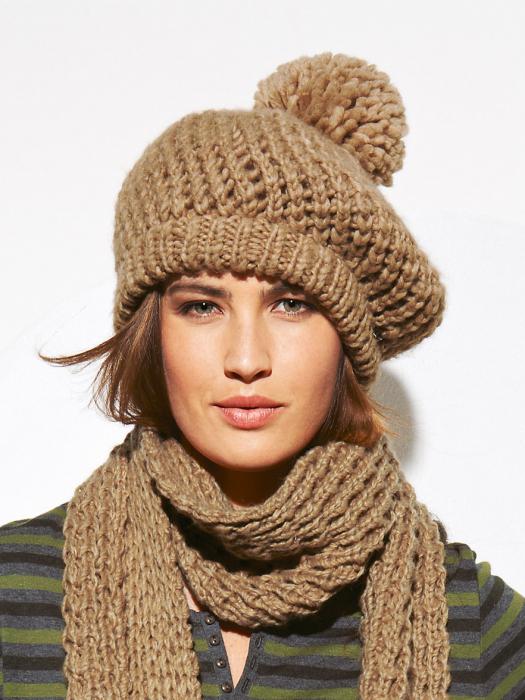
Knitted hat with pompoms
How to knit? This model is relevant not only for children, but also for adults. This headdress will complement any outfit, thanks to its playfulness and ease.
To create such a product, you will need twisted yarn. Yarn with the addition of acrylic works well; it is stronger and does not “roll up,” which is very important. Especially if you want to knit a hat for a boy.
First you need to knit a sample to determine the knitting density. Next, take a measurement of the head circumference, and using this measurement, calculate the number of loops required for knitting. The total number of loops must be a multiple of eight. Add 2 more edge loops to the resulting quantity.
Let's look at an example of how to knit a hat with knitting needles with a pompom if you have 82 loops. Place them on knitting needles and knit in stockinette stitch for about 10 centimeters. Next go to front side for regular knitting.
Knit the fabric with the main stitch for 12 centimeters, then start decreasing. The first decrease is made in each repeat of the knitting pattern. To do this, knit three knit stitches in the front row, 2 purl stitches together, slip 1 and again two loops together with the purl stitch.
Then knit 2 centimeters, without decreasing or adding anything. The second decrease is also done in each repeat, but now in the purl row you need to knit three knit stitches together purlwise.
Before the third decrease, also knit two centimeters of fabric according to the pattern. Third decrease: knit two knit stitches, the third from the purl side behind the back walls of one knit stitch.
When there are about or exactly 10 stitches left on the needles, pull the last one through all the loops and secure the thread. Next, sew the cap, the edge can be turned away.
Now you need to make pompoms for the finished product. You can make one large pompom in the middle of the hat, or several small ones.
To make a pompom, you need to cut out 2 circles from cardboard with a hole in the middle. Then wind the yarn tightly in a circle. The splendor of the pompom will depend on how many threads you wind. Therefore, wind as much as you need for your pompom.
After winding the yarn, cut it along the edge of the template. Next, you need to carefully move the cardboard blank and tie the threads well. After removing the template, fluff the pompom and trim its ends with scissors. Now all that remains is to sew it onto the finished product.
How to knit a hat with an elastic band yourself?
A cap, tied with an elastic band It should fit snugly to your head, that is, be exactly your size. You should also take into account that thick elastic tends to stretch easily during wear (especially at first). To knit this headdress you will need knitting needles and any yarn of your choice.
Now let's take a closer look at how to knit a fashionable hat using knitting needles using an English elastic band. First you need to take a measurement of your head circumference.

Next you need to knit the sample. To do this, cast on twenty loops on the knitting needles and knit several rows. Alternating the front and back loops, form the pattern of the fabric. Further, as you work, you need to knit the loops the way they look at you.
Once you have knitted 20 rows of the pattern fabric, you will be able to determine the gauge and number of stitches needed to create your hat.
Now cast on the knitting needles the required number of stitches. The first row is knitted with knit and purl stitches alternately. The second row is knitted the way the stitches are facing you. But the subsequent rows have some peculiarities. When knitting a knit stitch, place the knitting needle in the nearby bottom stitch, not in the row you are knitting. Do not stretch the loops. Your task is to achieve maximum density of the canvas, since during the work you will see that it turns out to be a little loose.
If you want your product to have a lapel, knit 6-8 cm of fabric and continue knitting the hat. Moving about 10 cm away from the lapel, begin decreasing the loops.
Decrease should be done evenly until three stitches remain on the knitting needles. Then the product needs to be secured and sewn with a knitted seam.
To ensure that the hat fits the way you want, moisten it with water and let it dry. You can decorate such a hat with a pompom, this will give it even more relevance.
Hat with lapel
For several seasons in a row it has been an integral part of the winter wardrobe of many fashionistas. This product is available in stores, but you can knit a hat with a lapel with knitting needles yourself. When starting knitting, remember that a hat of this style must be exactly the right size, and also keep in mind that it may stretch during wear.
First of all, measure your head circumference. Next, it is recommended to knit the sample by casting on 20 loops and knitting a little fabric.
Then you need to form a pattern of 20 rows, knitting alternately knit and purl loops. Then you need to determine the number of loops in 1 cm of knitting and based on this, knowing the head circumference, you will calculate the required number of loops.
Having cast on the loops, you can start knitting the hat. 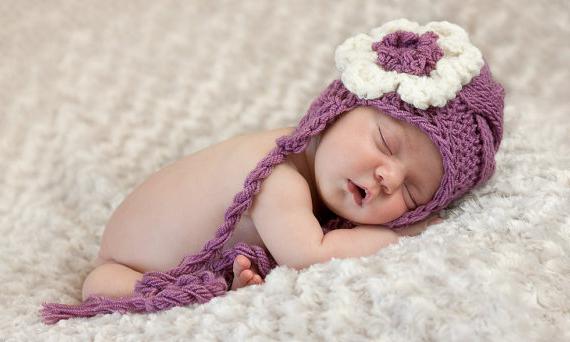 The first row is knitted with knit and purl stitches alternately. The loops in the second row are knitted the way they look at you, but in the remaining rows they are knitted according to a different pattern. So, when knitting a knit stitch, the knitting needle is inserted into the bottom loop.
In order to form the lapel of the product, you need to knit about 7 cm of fabric, then continue knitting the main part of the hat. Having moved 10 cm from the lapel, that is, 17-20 cm from the base of the hat, you should begin decreasing the loops to shape the bottom of the hat.
Decrease of loops is done evenly on both sides of the fabric and continues until 3 loops remain on the knitting needles. The remaining loops need to be secured and the seams of the hat sewn. After finishing knitting, you should moisten the headdress with water and let it dry. This will give the new item the required size.
In order for the hat to be the exact size, you need to take a measurement of the circumference of your head. Knit a sample approximately 10 cm wide. Then count the number of loops per centimeter of knitting. Now you need to multiply the resulting head circumference measurement in centimeters by the resulting number of loops. This way you will know the number of stitches needed for knitting.
Knitted hat with braids
You can knit a hat with braids with additional preliminary calculations. It is recommended to knit fairly thick visible braids with a volume of 10 loops. Next, divide the resulting number of loops by 13 and add two edge loops. If the calculation does not converge, you can add a couple more loops, this will not spoil the product.
It is better to knit the first few rows with an elastic band; this will give the hat density and will not allow it to stretch too much during wear. Having knitted 4-5 cm, you can start knitting the hat with braids. Such a model can be linked to circular knitting needles, but in this article we will tell you how to knit it with the back seam.
We begin to knit the braid: the first, then purl three loops, knit 10 and purl again. After knitting 10 rows, you need to make a cross to create braids. To do this, you need to remove the first 5 knitting loops and place them on extra knitting needle. Next we knit five knit stitches and five slip stitches. We knit the purl stitches without any changes.
You can leave the removed loops at work, then the crossed loops will be directed in the other direction. It is only important to initially choose in which direction you want the loops to cross to ensure a beautiful pattern. After completing the cross, we continue to knit the hat according to the pattern. To finish the product closer to the top, you need to start decreasing the loops. To prevent a hat with braids from losing its shape, you should start decreasing from the purl loops. To do this, we knit two purl loops together in each segment. Then we begin decreasing in the braids one loop on each side. We continue this process until there are 10-15 loops left on the knitting needles. Now you can pull them together and sew a hat.
A hat with a braid can be very decorated with a pompom, which is not so difficult to make with your own hands. You can also use your imagination and decorate the braids themselves with rhinestones, sequins or buttons. In any case, your knitted hat will turn out to be the most beautiful and fashionable.
Do you need a knitted hat, but don't want to buy it? If you have yarn, knitting needles and some free time, you can knit a hat yourself. Provided you know how to cast on, unravel and decrease stitches, you can safely get down to business.
Steps
Materials-
Select knitting needles. They are various types and sizes, and determine appearance loops Circular knitting needles work best for this job.
- Knitting needles No. 4 (4mm) are the standard size. But thinner knitting needles are also perfect for knitting a hat.
- You can use straight double-pointed needles, but they are usually used for knitting smaller items, such as socks. And for knitting a hat, circular knitting needles are best suited.
- To finish the job you will need a crochet hook.
-
Choose your yarn. Before choosing, think about the style of your future hat. One ball should be enough for you, so choose the size you need.
- Cotton is less elastic and not as warm as wool.
- If you are a beginner, choose thicker yarn, it is easier to work with and will take less time to knit.
- Make sure that a particular ball of yarn will be enough for you.
- If you are using thick yarn, then you need from 115 to 183 meters; if you have worsted yarn with a denser structure, then you will need from 137 to 275 meters.
-
Accessories.
- Scissors
- Markers or knitting pins
- Tape measure
-
Measure your head circumference. At this stage, be especially careful, since the size of your hat will depend on the number of stitches cast on.
- If you are knitting a hat as a gift, please note that average circumference head – 61 cm.
- At the beginning of knitting, it is advisable to pre-knit a sample. Pay attention to how many loops fit in one centimeter.
- To find out how many loops you need to use as a base, multiply the size of your head circumference by the number of loops per centimeter. For example, 60x2=120 loops.
- To make it easier to decrease stitches at the end of the work, round the number so that it is a multiple of 8.
- Round down as yarn tends to stretch.
Knitted hat for beginners
Knitted hat for beginners using simple knitting elements
A very easy-to-make knitted hat for beginners.
Share the culture of knitting with your friends by giving them a skein of yarn, a pair of knitting needles and a printout of a description of this simple model.
Size: S/M - L/XL
Head circumference: 53/55 - 56/58 cm.
Materials: 100 g of DROPS NEPAL yarn (65% wool, 35% alpaca, 50 g/75 m), knitting needles 4.5 mm.
Knitting density: 17 p.*30 rub. = 10*10 cm double pearl pattern.
Double pearl pattern:
Row 1 (RS): *K1, P1, repeat from *
Row 2 (wrong side): knit over knit and purl over knit.
3rd row: purl over knit and knit over purl.
4th row: knit over knit and purl over purl.
Shawl pattern: all rows with facial loops.
How to make a hat with knitting needles for beginners:
cast on 80-88 stitches on 4.5 mm needles.
Knit with a double pearl pattern to a height of 20-21 cm, finish the front row.
Knit in a garter pattern until the end of the work, AT THE SAME TIME perform a decrease in decrease:
4th row: decrease 16-18 stitches along the row (about every 5th stitch) = 64-70 stitches.
8th row: decrease 13-14 stitches along the row (about every 5th stitch) = 51-56 stitches.
12th row: decrease 10-11 stitches along the row (about every 5th stitch) = 41-45 stitches.
16th row: decrease 9-9 loops along the row (about every 5th loop) = 32-36 loops.
Row 20: Knit 2 together. along the row = 16-18 loops.
Row 24: Knit 2 together. along the row = 8-9 loops.
Cut the yarn, leaving a long tail, pull the tail through the last 8-9 loops, pull, fasten, sew a seam.
Knitting is an interesting and exciting process that can keep you busy for long evenings. With the help of knitting, craftsmen create truly unique works. But if you want to dress outside the box, then your task is to learn how to knit yourself. First, let's look at how to knit a simple hat.
Preparing to knit a hat
If you want to start creating a winter hat, then you first need to select yarn and knitting needles. Yarn can be different: wool, half-wool, acrylic. As a rule, the best option is a mixed yarn: acrylic and wool.
After selecting the yarn, you need to find out how to knit, patterns for such knitting are in the magazines “Verena” and “Sabrina”. Knitting needles can be wooden, steel, aluminum. For a beginner, it is most convenient to knit with steel knitting needles; they have no roughness, they do not bend or break.
Types of loops when knitting
When knitting hats use different types loops The most important of them are the front ones, that is, when the knitting needle is hooked under the front part of the loop and the thread is pulled through it. When knitting a purl stitch, the needle pries up the back piece to pull the thread through.
Actually, knitting consists of alternating knit and purl stitches. The most popular type of knitting - rib - is alternating knit and in the same row. That is, this is one purl and one knit, then repeat. Two knits and two purls, three knits and three purls, and so on can alternate. If you are interested in how to finish a hat with knitting needles, there are diagrams in magazines.
Another common type of knitting is knit stitch, on one side only knit stitches are knitted. But the front surface differs in that the fabric may turn out uneven.
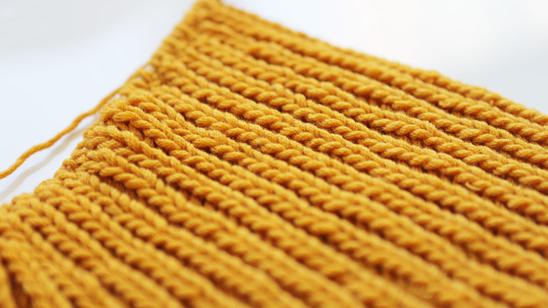
The so-called “garter stitch” is very popular, which usually guarantees an even knitted fabric. With this type of knitting, knit and purl stitches alternate in different rows. That is, one row is knitted with knit stitches, the other row with purl stitches, and so on constantly. This look is suitable not only for hats, but also for sweaters, vests, and scarves.
You can also knit a hat with braids; in this case, the rows of elastic cross regularly, and a beautiful pattern is obtained.
Knitting pattern
Before knitting a hat, the patterns for which are simple, you must first take measurements. This will be the volume of the head and its height from the ear to the top. We then knit a sample using the same yarn that will be used to create the main piece. It is small, measuring about ten by ten centimeters. Then the sample must be washed in warm water.
Then it is dried under natural conditions, and on its basis the loops are calculated to start knitting. You can now calculate exactly how many loops you will need to start working.
Knitting a hat on two knitting needles: a set of loops
To create a hat using two knitting needles you will need very little time. In addition, the product you create will be unique and exactly the right size for you or the person you are knitting for.

To make such a hat, you must find only one hundred grams of yarn, matching the needle number, a plastic needle with a wide eye (such a needle is usually sold complete with knitting needles).
After knitting the sample, we cast on the number of loops we need and begin knitting with an elastic band two by two or three by three. This elastic band will fit your head well. It consists of a uniform alternation of knit and purl stitches.
Simple hat with two knitting needles
So, the elastic band is knitted, and we are already starting to think about how to finish knitting the hat. You can simply continue knitting with stockinette stitch after an elastic band 3-4 centimeters high, and eventually make a rectangle with a height of twelve to fifteen centimeters, and then pull the edge of the fabric together with thread. Then you just have to connect the sides of the rectangle with a needle. It must be connected with a kettel seam. The finished product can be washed, dried and steamed with an iron. And now it’s clear how to knit a simple hat.
A more complex version of the hat
If you want your hat to fit better on your head, you need to start shaping it after knitting the initial rows with an elastic band. You need to know exactly how to finish the top of the hat with knitting needles. 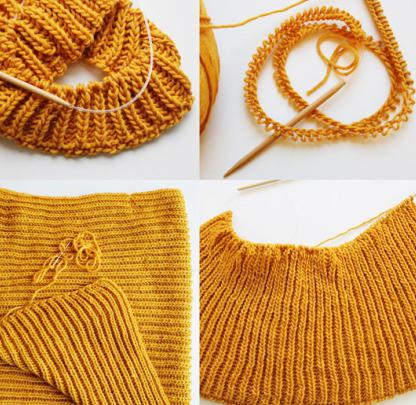
In the last row of elastic you need to somehow mark every twelfth loop, starting from the sixth loop. You can attach colored threads to these places. Now in every second row the loops marked with such threads are knitted together with the adjacent ones together with the front one. In the end, you need to decide how to finish the hat with knitting needles. As a result, you should have ten loops left on your knitting needles; you will pull them together with thread, leaving a long end. To connect the edges, you need to insert the same thread with which you knitted the product into a needle with a thick eye, and sew them together with a quilt stitch. You cannot use sewing threads, as they will prevent the hat from stretching. Then you will learn how to finish knitting a hat.
Making a pompom
Recently, hats with pompoms have come into fashion. A pom pom is an elegant solution to the question of how to finish the top of a hat with knitting needles.
To make a pompom, you will need two circles of cardboard, they are cut out with scissors. A hole is made in the middle of the circle.
The pompom may turn out curly, and for this you better take the yarn obtained as a result of unraveling the former. This will be a beautiful option for how to finish a hat with knitting needles.
The yarn is wound on cardboard circles (many layers need to be wound). After winding, the yarn is cut in the middle of the circle and tied to create a pompom. You also need to attach a thread 25-30 centimeters long to it. What is the easiest way to finish knitting a hat? Pompom!

Knitting on five needles
It must be said that a hat knitted with five knitting needles will turn out more elegant than a hat knitted with two. It is perfect for lovers of seamless things. And it’s easier to knit because you don’t have to think about how to make a beautiful seam. Of course, you still have to rack your brains about how to finish the stocking cap with knitting needles. But everything will look more elegant. You also need to decide on the answer to the question of how to finish knitting a hat.
To work you will need five knitting needles with open ends. At first, everything will seem very difficult. But over time, you will begin to enjoy knitting on five needles, most likely you will start knitting with them absolutely everything.
To do everything right, you need to know not only how to start, but also how to finish a hat with knitting needles. First, we cast on forty loops on two of them, distribute them onto four knitting needles so that each has ten loops, and knit them with a fifth knitting needle. It is necessary to ensure that so-called tracks, that is, holes, do not form between the spokes.
So we knit to a height of twenty to twenty-five centimeters, and then we begin to decrease the loops. In every second row we knit two knit stitches together every ten stitches. Then ten loops remain, which we transfer to one knitting needle and tighten with thread. That's all. You can also attach a pompom on top. And then you won’t have to think about what a hat is with knitting needles or how to finish knitting it.

You can also do it on three needles, knitting rows of the fourth, but not everyone likes this pattern. If you think about how a hat is knitted with knitting needles and how to finish it, you can come to the conclusion that knitting with five knitting needles is still more convenient.
Types of knitted hats
There are different types of knitted hats, they are designed for different people. For example, a beanie hat. It fits tightly to the head and usually combines elastic and garter stitch. When making such a product, you don’t even need to think about how to finish the hat with knitting needles, because it is quite simple. Such hats used to be often worn by people of working professions who needed functional products without frills. How to finish a hat with knitting needles with a more interesting pattern?
For example, a Norwegian hat usually also has a simple shape, but it has beautiful ornate patterns. An experienced craftswoman can knit these patterns. If you are just starting to knit, then it is better not to take on this. It usually has a pompom on top.
The tube hat is large in size and shaped like a stocking with a hole for the face. This type of hat is usually worn in severe frosts because it covers the neck well. It is easier to knit than the Norwegian one, since you can knit it by simply alternating knit and purl stitches.
The beret emphasizes femininity; it often has additional accessories. They are often knitted from mohair and wool yarn.

A hat with earflaps is usually knitted for children. It can be made to look like an animal's face. The peculiarity of this hat is the long flaps that cover the ears. If you do this, then you need to think about how to finish knitting a hat.
Knitted hats are very practical, they wash well and are easy to care for. They cost much less than leather hats, and they are also very easy to make yourself. They will help you keep warm in cold weather and decorate your look.
You can knit gloves from the same yarn and in the same style, and then your appearance will become a model of elegance. And making such a hat will bring you real pleasure. And there will be something to occupy yourself on long evenings, especially when it’s cold outside. A thing made with your own hands is a source of inner peace and a source of pride in front of others. Knitting such a thing will give you the opportunity to discover new facets of your personality.
Hand knitting is an opportunity to create fashion and influence its development. This type of needlework will never go out of fashion, and you can always gain invaluable experience by knitting the necessary things. Practice and everything will be fine. After all, handicrafts will bring happiness and harmony into your life.
On circular knitting needles? This question is increasingly being asked by novice craftsmen. And all because recently knitting clothes without seams has become widespread. It started when loose, oversized sweaters with voluminous braids and dropped shoulders (that is, several sizes larger than needed) came into fashion. For this style there is no need to fit the model, calculate the armholes and neckline. The simpler and more casual a thing looks, the better. And it is most convenient to knit it on circular knitting needles.
Of course, such devices are suitable not only for but also for large shawls, stoles, snoods, blankets, hats and even socks. Let's take a closer look at knitting with circular knitting needles for beginners (and not only).
How to choose a tool
Materials from which circular knitting needles are made:
- Metal.
- Aluminum.
- Tree.
- Bamboo.
- Plastic.
In the process of work, each craftswoman chooses a material that is more comfortable for her, fits better in her hand and allows the loops to easily slide over the surface of the tool.
The circular knitting needles are connected to each other with fishing line or nylon cable. When choosing, pay attention to the fact that the joint between the cable and the knitting needle is tight and there are no gaps or sharp cuts. The yarn will cling to such “burrs”, which can damage its quality. If you work with thick knitting needles, from 4.5 mm or more, it is important that the transition from the thickness of the tool to the cable is smooth. Otherwise, it will become difficult to transfer the loops from the cable to the knitting needle. 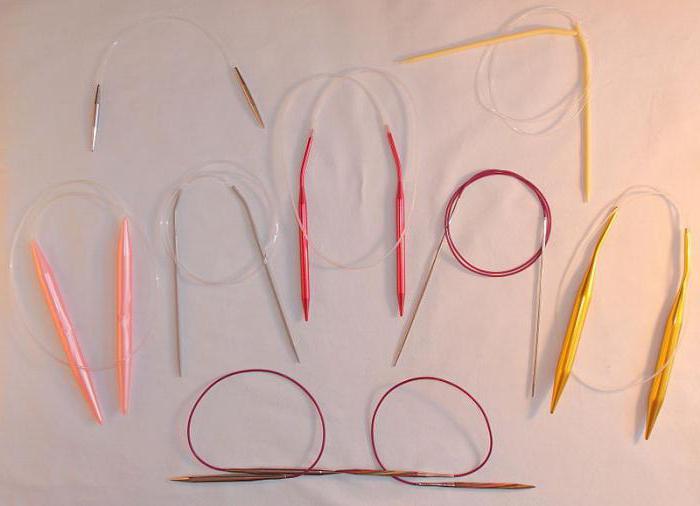
Select the size of the knitting needles based on the thickness of the yarn from which the product will be made. As a rule, the recommended size is written on the packages. But if suddenly there is no such information, or the label is lost, take a tool twice as thick as the working thread.
The length of the fishing line or cable varies, so be guided by the size of the future product. If this is a blanket, then the length can be maximum, but for knitting small-sized clothes it can interfere.
Features of working on circular knitting needles
Knitting with circular knitting needles for beginners consists of several stages. First we cast on the loops. It's not difficult to do. If the product does not go in a circle, then the work is performed as when knitting with straight knitting needles, that is, the working fabric must be turned over after each knitted row.
If the working fabric closes into a circle, then the last knitted loop of the first row becomes the first loop of the second. At this point it is better to attach a plastic marker or tie a thread of a contrasting color so that you know exactly where one row ends and another begins. Be sure to check that the row is not twisted and that all loops are facing up. 
To prevent “steps” from appearing in the place where the product closes into a circle, pull the thread tighter.
Magic Loop
Magic Loop, or “magic loop,” is a European knitting technique on circular knitting needles, in which the diameter of the product is absolutely unimportant. This could be a mitten or a cuff - those things that we are used to knitting on four or five double needles.
How to knit things with small diameters on circular knitting needles?
- We start by casting on loops in the usual way.
- Divide the number of loops by two, thread a rope loop into the middle and distribute the loops onto two knitting needles.
- Next is the knitting needle, which is in right hand, pull it out so that you can start knitting loops from the left knitting needle.
- Having knitted the left knitting needle to the end, we pull out the right one again and continue working in the same spirit.
This method will appeal to those who do not like working with double needles.
Knitted hat
We knit a hat on circular knitting needles. This is the simplest model that even novice needlewomen can handle. In the future, it can be tied using voluminous braids or arans. For a winter hat, choose wool yarn with the addition of acrylic, then the product will be warm, soft and will not irritate the skin on the forehead.
We start by calculating the loops. Knit a small pattern, for example 20 stitches wide and 20 rows high. Ideally, the sample should be washed and dried, then you will know for sure whether the hat will change in size after washing. Measure the sample, so you will know how many loops there are in one centimeter.
Measure your head circumference. Now let’s make a simple calculation: multiply the number of loops in the sample by the number of centimeters of head circumference and divide by the data indicated in the sample. This is how many loops we cast on. 
How to knit a hat on circular knitting needles? We distribute the loops on two knitting needles by pulling out the loop. We begin work using the “magic loop” method. We knit in a circle an elastic band 2*2 about 20 cm in height, more or less depending on whether you will make a lapel and what size. After the elastic band, you need to make a narrowing. Reduce about a quarter of the existing stitches by knitting two together, distributing them evenly. For example, knitting every seventh and eighth stitch together.
We continue to work only with facial loops. Having knitted about 10 cm, we make another decrease, cutting off one third of the existing loops. Choose the length of the hat as you wish: it can fit tightly around your head, or it can be a long beanie hat. Close another half of the loops closer to the edge of the product. At the end, knit all the loops in two, use a hook to thread the working thread through them and tighten. The finished hat can be decorated with a pompom.
How to adapt patterns for circular knitting needles
Often, pattern diagrams show both knit and purl rows. But when knitting in the round, there are no purl rows. This makes the job a lot easier. So how to knit on circular knitting needles according to patterns?
- IN circular knitting no, but they are indicated on many diagrams, so take this into account when making calculations.
- If you are a beginner needlewoman, then it is better to choose those patterns where odd rows need to be knitted according to the pattern. Then knit a knit stitch over each knit stitch, and a purl stitch over each knit stitch.
- Keep in mind that there are patterns that are not designed for knitting in the round. Just replace them with others that are no less beautiful and interesting.


