Types of matrices of SLR cameras. Frame size. Or about weight categories
In 1981, Sony introduced the world's first digital camera. The inventors created a digital film substitute - the matrix. This breakthrough made it possible to take thousands of photographs and save them digitally. Image quality began to depend not only on optics, but also on the size and properties of the matrix.
What are these properties? First, let's remember how an image is formed. The camera matrix is a lattice with a dense structure. It consists of tiny light-sensitive elements - photodiodes. The light collected by the lens hits the sensor. Photodiodes convert this light into electrical charge. Next, the charge goes to the processor. It “reads” the incoming charges and converts them into digital language. After this, a pixel is created. It stores information about brightness and color tone in the form of numbers and bits. Each pixel repeating the location of the photodiode is placed on the image. Millions of tiny pixels form the image that is recorded on the memory card.The matrix is the receiving part of the camera. When photons of light hit it, it converts them into electricity.
Now let's look at what matrix parameters affect picture quality:- physical size;
- photodiode size.
These two parameters affect:
- photosensitivity;
- sharpness;
- permission;
- dynamic range of colors.

If the shooting location is the same, a small matrix will crop the frame. A very common misconception is that the focal length changes.

- Take photographs at high ISO without digital noise.
- Use a faster shutter speed to get a sharp image.
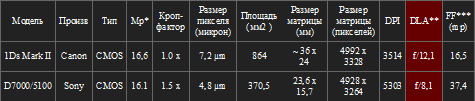
Look at the specs of the two cameras. The Canon 1Ds Mark II is full frame, but due to its large pixel size it has the maximum resolution, like the Nikon D7000/5100.
For example, a Nikon D5100 camera was used.
![]()
Based on the above, we can conclude: the physical size of the matrix and its properties are an indicator of quality. For macro photography, image detail and the number of pixels are more important. For shooting in poor lighting, a more light-sensitive matrix is suitable. For amateur photography, high-quality digital cameras with a small matrix may be suitable. Shoot with what you have. After all, in order to get good photo, no need for expensive equipment. No matter how large your matrix is, it will not provide deep meaning photo or a stunning landscape.
The matrix is a photosensitive surface on which light enters through the lens and is converted into electronic impulses, and after processing by the processor, they are stored on a memory card as photographs in the form of a digital code. You can say the function of the matrix is to digitize the light that falls on its surface; it is also called a sensor, a photosensor.
Camera matrix resolution
The camera matrix consists of pixel sensors; the resolution of the digital image depends on the number of pixels; the more pixels, the higher the detail of the frame, the more clearly small details will be visible. The number of pixels on DSLR cameras is referred to as Megapixel. Modern digital camera photo sensors have 8-24 million pixels.
The larger the camera sensor, the shallower the depth of field in the picture!
The size of the camera matrix also affects the pixel size; the pixel area of a large matrix is larger, and accordingly, light sensitivity and color rendition are better, and there is less noise. From this we can conclude that not only the number of pixels is important, but also the size. Everyone can be convinced of this if they compare a picture taken with a 12 megapixel mill and a DSLR with, for example, 10 megapixel.
Each pixel forms one point in the image, and the higher the resolution of the matrix, the higher the detail of the resulting image. The number of pixels on the matrix is called resolution and is measured in megapixel. 1 megapixel = one million (1,000,000) pixels.
If the characteristics of a DSLR camera say that the largest image size is 5616 by 3744, then it turns out that the resolution of the camera matrix is 22 megapixel (5616×3744=21026304).
The physical size of the matrix is one of the most important characteristics of the camera, which directly affects the image quality. From the name it is already clear that we are talking about geometric dimensions and the length and width of the sensor are measured in millimeters; in the characteristics of some cameras the size is indicated as the diagonal of the matrix in inches as 2/3″. The value in inches is the reciprocal, and therefore when purchasing a camera you need to choose the one with the smaller number after the fraction.
If you have to choose from 2 cameras that have the same number of 12 megapixels, but the first has a matrix 1/2.5″, and the second 1/1.8″ - it’s better to take the second one - the pixel size will be larger, and accordingly, the quality of the pictures will be better.
Here you can see a table showing the ratio of diagonal to geometric size.
Size affects quantity digital noise, transmitted along with the main signal to the matrix. The larger the physical size of the matrix, the larger its area and the more light it receives, resulting in a stronger signal from the matrix and a better signal-to-noise ratio. This allows you to get a high-quality picture with natural colors.
IN last years to indicate the size of the sensor, they also use a coefficient crop factor, which shows how many times the camera sensor is smaller than the full frame (full frame),
Below in the figure you can see and compare the sizes of matrices of different digital cameras.
Photosensitivity is a property of a photosensitive material, that is, a film or matrix. Photosensitivity is an indicator of how quickly a material “absorbs” light. According to international standards, photosensitivity is designated ISO.
When shooting with a film camera, to increase light sensitivity, film with different ISO, and in a digital camera, increasing ISO is done using buttons or menus. The scale basically has this - 100,200,400,800,1600,3200,6400,12800. The higher the ISO value, the greater the light sensitivity of the material.
The higher ISO, the less light required for shooting and the camera's ability to shoot in low light conditions improves. The matrix sensitivity indicator indicates how much the signal coming from it is amplified. This means that the higher the value ISO, the stronger the signal will be amplified, but along with it the noise will also increase. It follows from this that you should not get carried away with large values, because in this case the noise level increases, the picture turns out to be very grainy, and even useless.
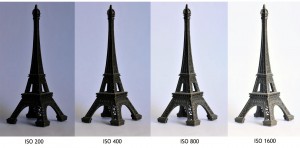
High values come to the rescue mainly at night or in the evening, in dark rooms, in clubs, even at home and when shooting fast-moving objects, when you need to shoot at high shutter speeds. Recommended ISO value up to 400 units.
Types of camera matrices
When choosing a camera, one of the important factors is type of camera matrix.
Today, world giants use two types of sensors in their DSLRs. The first one is CCD, second - CMOS.
Today's technology CMOS(Complementary Metal-Oxide Semiconductor) conquered more than 90% of the world market, and technology CCD(Charge-Coupled Device) is already fading into the background.
Benefits CMOS-technology, this is low energy consumption. CMOS sensors contain analog-to-digital converters and amplifiers, which makes the cost of the final product low.
Advantage CCD is low level noise, high pixel occupancy (about 100%) and large dynamic range.
The author of this article is Vladimir Medvedev. The article was published on the author’s personal website at:
vladimirmedvedev.com/dpi.html
However, the author decided to completely redo the site and the article disappeared.
The article covers the topic of diffraction at high aperture values very well and clearly, so the editors of the Vt-Tech website could not ignore it. We extracted the article from the archives of caching sites and posted it here.
When exporting the article, the images were slightly damaged: not all images from the original article are available.
Who is there
I made this table many years ago to visually compare digital cameras. In those years, there was a lot of confusion even with the concepts of “crop” and “full format,” not to mention compact and medium format devices. Scarce information was scattered across numerous websites of photographic equipment manufacturers, and it was almost impossible to clearly compare cameras. All this misled many amateur photographers, sparking fierce debate on specialized forums.
In order to somehow streamline the situation and bring any camera to the same denominator - from point-and-shoot cameras to medium format cameras, I decided to use the concept of pixel density - DPI (although it might be more correct to say ppi). Why did I choose this particular option, which has not been used for this anywhere before? Simply because the publicly available information made it possible to calculate it perfectly accurately, without errors. Knowing the length and width of the matrix, as well as the number of pixels, I could easily and absolutely accurately calculate their density. As a bonus, the concept of pixel density made it possible to compare a matrix of any size with the resolution of scans from film (the DPI of a digital camera and the DPI set during scanning are essentially the same thing).
An easy-to-use, visual table allowed us to move further along the path of knowledge technical characteristics matrices, and, over time, acquired a lot of additional “usefulness”. Today, the table contains a variety of parameters related to digital camera matrices. This includes the pixel size, the exact crop factor, the area of the matrix, and the diffraction limitation of the aperture. Using this table, you can easily track trends in the development of photographic equipment, predict upcoming changes, or simply choose a camera.
It is not so easy to understand the numerous parameters of the table right away. The photographer should be helped in this by special articles accompanying the table, revealing its special meaning.
Enjoy reading!
Part one. Does the crop factor increase the ability of lenses to "zoom in"?
Because I'm a wildlife photographer, it's often impossible to get close to your subject (due to the risk of scaring the animal or bird). And here the problem of the lack of focal length of lenses arises in full force (speaking in simple language- the ability of optics to “bring distant objects closer”). At the dawn of digital photography, it was an extremely common belief that cameras with a “cropped” matrix increased the focal length of the lenses by a factor of crop. Here I will try to explain why it is wrong to think this way.
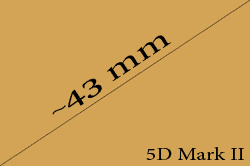
Now I have two cameras. One is full-length - Canon EOS 5D Mark II, the second with a crop factor of 1.6x - Canon EOS 20D. A crop factor of 1.6 means that the diagonal of the 20D sensor is 1.6 times smaller than the diagonal of the 5D MarK II sensor. 43mm divided by 27mm equals 1.6.
We've sorted out the crop factor. The matrix has shrunk. But the optics remained the same. A lens, for example, 300mm fits both 20D and 5D Mark II. What happens if the same frame is shot on a 5D Mk II and a 20D? The most visual and accurate metaphor is to take a large printed frame and cut out the middle of it with scissors. What's the difference between cutting a matrix or a finished frame? Like this:

Of course, the bird looks larger in the cropped frame. Often, novice photographers mistakenly perceive this property of crop as a plus. But in fact, it is not a plus at all. Why rush and “cut out the frame” before shooting? What if the bird flies closer, or do we want to cut out not the middle, but the edge of the picture? On a full-format matrix, we can cut as we like, or we can not cut at all. But the crop leaves no options. Wings that have gone beyond the edge of the frame cannot be returned, and a potentially good photo is sent to the trash.

examples of basic crop factors: 1.3x, 1.6x and 2x
I won’t argue which is better, crop or full format. Crop may be cheaper or faster. Everyone has their own decision here. Instead of unnecessary debate, I propose to answer the question, what characteristic of the camera can truly contribute to high-quality zoom? And the answer is simple - pixel density (dpi column in the table). To understand why this is so, let's look at another real-life example. This time, for convenience, we will take two full-format cameras - 5D and 5D Mark II. I would especially like to emphasize that for the final result it doesn’t matter at all whether we have a full format or a cropped format, only one parameter plays a role here - pixel density. For the 5D it is 3101 dpi, for the 5D Mark II it is 3955 dpi.
Imagine a safari: bright sunny day, low ISO sensitivity, excellent optics. And suddenly we see a wild leopard 100 meters away from us. We take a photo and the animal disappears. 100 meters is far. In order for the frame to look good, we will have to crop it a lot, leaving 1/10 of the full frame (for ease of calculation). Mathematics suggests that a frame from a 5D camera (12MP) after cropping will consist of 1.2MP (12 divided by 10), which is very small and not suitable for high-quality printing. But a picture from a 5D MII (21 megapixel) will consist of 2.1 megapixels, which is already much better! And I want to emphasize once again - it doesn’t matter at all whether we have a crop or a full format. 20D, which has a density of 3955dpi (like the 5D Mark II), a similar frame, under the same conditions, would also consist of 2.1 megapixels. Despite the fact that the matrix there is only 8 megapixels. The only thing that plays a role here is pixel density.
It is not possible to photograph a leopard simultaneously from two cameras, so I tried a simpler test to clearly show the difference in pixel density. Two test frames were taken from a tripod, from the same distance, with the same optics, with the same focal length:

the full frame looked like this

when you get very close you can see the difference
This is not a 450D vs 1D Mark III comparison. This is a comparison 3514 dpi against 4888 dpi. Under these conditions, a similar result will be obtained on any other pair of cameras with a similar pixel density. It’s just that when I wrote the article, I had exactly these two cameras, that’s all.
Ps:
- Tests were carried out in good conditions, and were viewed under high magnification. In real life, most likely, the difference will be even less noticeable. Whether it's worth it or not, it's up to you to decide.
- Of course, the quality of the 5D Mark II's 21 megapixels, compared to the 5D's 12 megapixels, will be noticeable not only when cropping heavily. I hope this is clear to everyone.
Part two. Less pixel - more noise
From the first part we can conclude - let's increase the pixel density to make the picture better. But it's not that simple. The higher the pixel density, the smaller the area of each specific pixel (this column is also in the table). The smaller the pixel area, the fewer photons of light it captures. Photons are a useful signal. The fewer there are, the worse the signal-to-noise ratio, the worse the camera sensitivity.
Let's put it simply - the cameras I've tested with pixel sizes less than 6 microns have poor sensitivity and higher noise. This is my opinion, my experience. So far I have not seen any exceptions to this rule. Perhaps someday technology will make new cameras more sensitive, but for now that’s it. The question arises, what to choose? Pixel density or sensitivity? Here everyone will have to look for their own answer. If anyone is interested in my opinion, see the next two paragraphs, but... I don’t impose it on anyone. :)
I've been analyzing my images over the past few years, wondering if higher pixel density could improve the quality of my images. The result was very unexpected: there were very few pictures whose quality could be improved due to pixel density. In addition to my crooked hands, many natural factors were to blame for this - noise, movement, quality of optics, “air”, inaccurate AF, etc. Moreover, 90% of the pictures that could have been improved with an increased pixel density did not need improvement - they all already had sufficient quality.
It is significant that most of low-quality photographs suffered from a lack of sensitivity. As a wildlife photographer, movement and noise bother me much more now. 16-25 megapixels in full format is my ideal today.
Also, do not forget about dynamic range - dynamic range, which is very closely related to noise, because they limit it to the shadows. Smaller pixel means smaller DD. Everyone will draw their own conclusions here. And for those for whom pixel density is more important, I want to warn about another insidious enemy that will always lie in wait for you, and from which you cannot hide. At least in this universe. This is diffraction...
Part three. Diffraction in photography. Theory
For this part of my article, all figures are taken from
wonderful teaching aid about diffraction:
Tutorials: diffraction & photography. Highly recommend
it to everyone who wants to deeply understand this topic.
The matrix has nothing to do with this part, but you still have to take the rap. For physics. What does diffraction have to do with the matrix of a digital camera? None. But let's look at what we mean by the word diffraction when we talk about headaches for photographers?
Without going into details, diffraction is a physical phenomenon that prevents us from closing the aperture too much, reducing the quality of the resulting image.
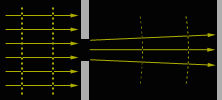
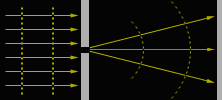
If we consider the causes of diffraction, we will see that it appears when light passes through a diaphragm. After passing through the diaphragm, the rays no longer go as straight as we would like, but “stratify” a little, diverging to the sides. As a result, each ray forms on the surface of the matrix not just a point, but a “circle and circles in the water” - diffraction rings, or, as it is also called the Airy disk (after the name of the scientist, English astronomer - George Biddell Airy):

Of course, unlike a well-focused point, such disks can climb onto neighboring pixels if they are located sufficiently tight. And when they creep onto neighboring pixels, we say goodbye to good sharpness.
Let's look at this phenomenon with an example. Knowing the size of the pixels, we can easily build a grid indicating the boundaries of the pixels (dotted lines). Further on formula we calculate the diameter of the Airy disk and, for simplicity, represent it as a spot of light. And let's try to apply Airy disks, characteristic of the most common diaphragms, onto our grid. As an example, I took the pixel size of the 5D MarkII camera, and the aperture values are indicated below each figure:

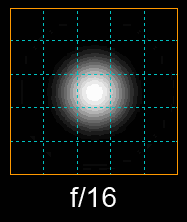
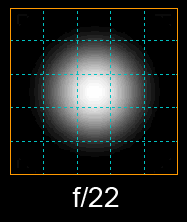
As you can see, with a constant pixel grid, the Airy circle grows. At f/16, it already significantly creeps into neighboring pixels, which in real life will blur the picture, not giving us pixel-by-pixel sharpness. And at f/22 this disk occupies almost the entire area of 9 pixels!
Knowing the size of this circle, I can calculate the maximum closed aperture, after which further closing will worsen the photo. This option is my colleague with the-digital-picture.com calls DLA (diffraction limited aperture), which corresponds to the Russian term DOP (diffraction-limited aperture). However, my calculations of the numerical value of this parameter are somewhat different from the calculations of the author of the above site. For example, in his formula, he apparently somehow takes into account the size of the entire matrix (in particular, with equal pixel density, the values of DLA 40D (f/9.3) and 1D MarkIV (f/9.1) are different). This, of course, cannot be true when we are talking about diffraction at the pixel level. However, our results do not differ much, so the difference can be neglected. In addition, due to the combination of many factors (the blurred boundaries of the disk, the complex structure of the matrix cells, etc.), it is impossible to name with absolute accuracy the DLA value after which image degradation begins to be observed.
So let's see how it works. For the 5D MarkII (as well as the 20D), the DLA is f/10.8, which is very close to the picture above labeled f/11. At the same time, for the Canon 1D (only 4 mp, the largest matrix cells among all Canon cameras), this parameter is f/19.1. Let's stop down to f/16 and see what the Airy disk will look like projected onto a 1D pixel grid and onto a 5D MarkII (or 1Ds MarkIII or 20D) grid:

As can be seen from this example, what is allowed to Jupiter is not allowed to the bull. When shooting on 1D, we can easily close the aperture to f/16, but on the 5D Mark II this will lead to a decrease in possible detail.
Part four. Diffraction in photography. Practice
The above was just a dry theory. It is absolutely correct, but does not take into account the fact that optics very often are not capable of producing sufficient detail, and the apertures have DLA. So how does this work in practice? 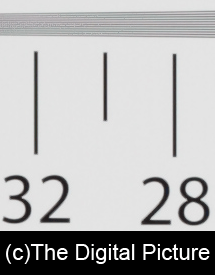 Indeed, optics do not always provide quality that would allow us to see pixel-by-pixel sharpness. Moreover, as we know, image quality increases as the aperture is closed. Because of this, with high-quality optics we may notice a deterioration in quality due to diffraction at apertures close to DLA, but with poor ones this can happen much later. However, if the degradation occurs by one or even two aperture values on the same DLA, this means that the camera sensor with that lens is never getting enough detail. Those. there will never be pixel-by-pixel sharpness, otherwise we would be able to notice diffraction at the level of the DLA numerical value.
What can we observe on cameras with high pixel density? For example, let's take the new (at the time of writing these lines) Canon EOS 7D camera. The DLA there is f/7.2. What does it mean? This means that the 7D will only be able to produce pixel-by-pixel detail at apertures smaller than 7.2. Let's take good optics and look at the result. To do this, let's turn to The Digital Picture resource for help. There we can find a snapshot of a special test chart on a 7D camera using good optics (Canon EF 200mm f/2.0L IS USM). Let's compare a shot taken at aperture 5,6 and 8
. As we can see, the sharpness deteriorates slightly - the theory works! Now let's compare 5,6 and 11
- here there is already a noticeable drop in sharpness, not only in the center, but even in the corners!
The whole paradox of cameras with high pixel density is that it is already difficult for the optics to convey a significant amount of detail, but to convey a significant amount of detail at apertures wider than f/8... I'm afraid this is a task only for really great lenses. Such as Canon EF 200mm f/2.0L IS USM ~ for $6000...
In conclusion, for inattentive readers, I want to emphasize once again that diffraction is not a matrix parameter , distorts the image to matrix and does not depend on the camera brand (and if it does, the difference is minimal and I don’t take it into account).
I thank Dmitry (Doctor Cthulhu) for his assistance in editing the text of the article.Table of characteristics of digital camera matrices
| Model | Produced | Type | MP* | Crop factor | Pixel size (micron) | Area (mm 2) | Die size (mm) | Matrix size (pixels) |
DPI | DLA** | FF*** (mp) |
| C a n o n | |||||||||||
| 1D | Kodak | CCD | 4,1 | 1.3 x | 11.6 µm | 548,2 | 28.7 x 19.1 | 2464 x 1648 | 2181 | f/19.1 | 6,4 |
| D30 | Canon | CMOS | 3,1 | 1.6 x | 10.5 µm | 342,8 | 22.7 x 15.1 | 2160 x 1440 | 2417 | f/17.6 | 7,8 |
| 1Ds | Canon | CMOS | 11,0 | 1.0 x | 8.8 µm | 852 | 35.8 x 23.8 | 4064 x 2704 | 2883 | f/14.8 | 11,1 |
| 1D Mark II | Canon | CMOS | 8,2 | 1.3 x | 8.2 µm | 548,2 | 28.7 x 19.1 | 3504 x 2336 | 3101 | f/13.8 | 12,9 |
| 5D | Canon | CMOS | 12,7 | 1.0 x | 8.2 µm | 852 | 35.8 x 23.9 | 4368 x 2912 | 3101 | f/13.8 | 12,9 |
| 300D/D60/10D | Canon | CMOS | 6,3 | 1.6 x | 7.4 µm | 342,8 | 22.7 x 15.1 | 3072 x 2048 | 3400 | f/12.4 | 15,5 |
| 1DS Mark II | Canon | CMOS | 16,6 | 1.0 x | 7.2 µm | 864 | ~36 x 24 | 4992 x 3328 | 3514 | f/12.1 | 16,5 |
| 1D Mark III | Canon | CMOS | 10,1 | 1.3 x | 7.2 µm | 525,5 | 28.1 x 18.7 | 3888 x 2592 | 3514 | f/12.1 | 16,5 |
| 1D x | Canon | CMOS | 17,9 | 1.0 x | 6.9 µm | 864 | 36 x 24 | 5184 x 3456 | 3657 | f/11.7 | 17,9 |
| 350D/20D/30D | Canon | CMOS | 8,2 | 1.6 x | 6.4 µm | 337,5 | 22.5 x 15.0 | 3504 x 2336 | 3955 | f/10.8 | 20,9 |
| 5D II / 1Ds III | Canon | CMOS | 21,0 | 1.0 x | 6.4 µm | 864 | ~36 x 24 | 5616 x 3744 | 3955 | f/10.8 | 20,9 |
| 5D III | Canon | CMOS | 22,1 | 1.0 x | 6.25 µm | 864 | 36 x 24 | 5760 x 3840 | 4064 | f/10.6 | 22,1 |
| 1000D/400D/40D | Canon | CMOS | 10,1 | 1.6 x | 5.7 µm | 328,6 | 22.2 x 14.8 | 3888 x 2592 | 4455 | f/9.6 | 26,6 |
| Canon EOS 1D Mark IV | Canon | CMOS | 16,1 | 1.3 x | 5.7 µm | 518,9 | 27.9 x 18.6 | 4896 x 3264 | 4455 | f/9.6 | 26,6 |
| Canon EOS 450D | Canon | CMOS | 12,2 | 1.6 x | 5.2 µm | 328,6 | 22.2 x 14.8 | 4272 x 2848 | 4888 | f/8.7 | 32,0 |
| 500D, 50D | Canon | CMOS | 15,1 | 1.6 x | 4.7 µm | 332,3 | 22.3 x 14.9 | 4752 x 3168 | 5413 | f/7.9 | 39,2 |
| 7D/60D/600D | Canon | CMOS | 17,9 | 1.6 x | 4.3 µm | 332,3 | 22.3 x 14.9 | 5184 x 3456 | 5905 | f/7.2 | 46,7 |
| 7D Mark II | Canon | CMOS | 19.96 | 1.6 x | 4.1 µm | 336 | ~22.4 x 15.0 (?) | 5472 x 3648 | ~ 6177 | f/6.9 | 50,3 |
| 5Ds(r) | Canon | CMOS | 50,3 | 1.0 x | 4.1 µm | 864 | 36 x 24 | 8688 x 5792 | 6130 | f/6.9 | 50,3 |
| N i k o n | |||||||||||
| D1/D1H | Sony | CCD | 2,6 | 1.5 x | 11.9 µm | 367,4 | 23.7 x 15.5 | 2000 x 1312 | 2143 | f/20 | 6,2 |
| D2H | Nikon | JFET | 4,0 | 1.5 x | 9.6 µm | 367,4 | 23.7 x 15.5 | 2464 x 1632 | 2641 | f/16.1 | 9,3 |
| D1X**** | Sony | CCD | 5,3 | 1.5 x | 5,9/11,9 | 369,7 | 23.7 x 15.6 | 4028 x 1324 | - | - | - |
| D700/D3/D3s | ? | CMOS | 12.1 | 1.0 x | 8.4 µm | 860,4 | 36.0 x 23.9 | 4256 x 2832 | 3003 | f/14.1 | 12,2 |
| D4 | ? | CMOS | 16,2 | 1.0 x | 7.3 µm | 860,4 | 36.0 x 23.9 | 4928 x 3280 | 3476 | f/12.4 | 16,2 |
| D40/D50/D70/D100 | Sony | CCD | 6,0 | 1.5 x | 7.8 µm | 367,4 | 23.7 x 15.5 | 3008 x 2000 | 3237 | f/13.1 | 14,0 |
| D3000/D40x/D60/D80/D200 | Sony | CCD | 10,0 | 1.5 x | 6.1 µm | 372,9 | 23.6 x 15.8 | 3872 x 2592 | 4167 | f/10.3 | 23,4 |
| D3X | ? | CMOS | 24,4 | 1.0 x | 5.9 µm | 861,6 | 35.9 x 24 | 6048 x 4032 | 4279 | f/9.9 | 24,4 |
| D5000/D90 | Sony | CMOS | 12.2 | 1.5 x | 5.4 µm | 369,7 | 23.7 x 15.6 | 4288 x 2848 | 4637 | f/9 | 28,8 |
| D300(s)/D2X(s) | Sony | CMOS | 12.2 | 1.5 x | 5.4 µm | 369,7 | 23.7 x 15.6 | 4288 x 2848 | 4637 | f/9 | 28,8 |
| D800(e) | ? | CMOS | 36,2 | 1.0 x | 4.9 µm | 861,6 | 35.9 x 24 | 7360 x 4912 | 5207 | f/8.2 | 36,3 |
| D7000/5100 | Sony | CMOS | 16.1 | 1.5 x | 4.8 µm | 370,5 | 23.6 x 15.7 | 4928 x 3264 | 5303 | f/8.1 | 37,4 |
| S o n y | |||||||||||
| A 100/200/230/300/330 | Sony | CCD | 10.0 | 1.5 x | 6.1 µm | 372,9 | 23.6 x 15.8 | 3872 x 2592 | 4167 | f/10.2 | 23,3 |
| A900/A850 | Sony | CMOS | 24,4 | 1.0 x | 5.9 µm | 861,6 | 35.9 x 24 | 6048 x 4032 | 4279 | f/9.9 | 24,4 |
| A500 | Sony | CMOS | 12.2 | 1.5 x | 5.7 µm | 366,6 | 23.5 x 15.6 | 4272 x 2848 | 4617 | f/9.6 | 28,6 |
| A700 | Sony | CMOS | 12.2 | 1.5 x | 5.5 µm | 368,2 | 23.5 x 15.6 | 4288 x 2856 | 4635 | f/9.2 | 28,8 |
| A350/A380 | Sony | CCD | 14.0 | 1.5 x | 5.1 µm | 369 | 23.5 x 15.7 | 4592 x 3056 | 4963 | f/8.6 | 33,0 |
| Sony A550 | Sony | CMOS | 14.0 | 1.5 x | 5.1 µm | 365 | 23.4 x 15.6 | 4592 x 3056 | 4984 | f/8.6 | 33,3 |
| SLT-A57/35/55/A580 | Sony | CMOS | 16,0 | 1.5 x | 4.8 µm | 366,6 | 23.5 x 15.6 | 4912 x 3264 | 5309 | f/8.1 | 37,7 |
| SLT-A77/A65/NEX-7 | Sony | CMOS | 24,0 | 1.5 x | 3.9 µm | 366,6 | 23.5 x 15.6 | 6000 x 4000 | 6485 | f/6.5 | 54 |
| F u j i f i l m***** | |||||||||||
| S2 Pro | Fujifilm | CCD | 6,1 | 1.6 x | 7.6 µm | 356,5 | 23 x 15.5 | 3024 x 2016 | 3340 | f/12.8 | 14,9 |
| S3/S5 Pro | Fujifilm | CCD | 6,1 | 1.6 x | 7.6 µm | 356,5 | 23 x 15.5 | 3024 x 2016 | 3340 | f/12.8 | 14,9 |
| P e n t a x | |||||||||||
| K100D (Super) /K110D | Sony | CCD | 6,0 | 1.5 x | 7.8 µm | 368,95 | 23.5 x 15.7 | 3008 x 2008 | 3251 | f/13.1 | 14,2 |
| K10D/K200D/K2000 | Sony | CCD | 10,0 | 1.5 x | 6.1 µm | 369 | 23.5 x 15.7 | 3872 x 2592 | 4185 | f/10.3 | 23,6 |
| 645D | Kodak | CCD | 39,5 | 0.7 x | 6.1 µm | 1452 | 44 x 33 | 7264 x 5440 | 4193 | f/10.2 | 24,5 |
| K-r | ? | CMOS | 12.2 | 1.5 x | 5.5 µm | 372,9 | 23.6 x 15.8 | 4288 x 2848 | 4615 | f/9.3 | 28,3 |
| K20D/K-7 | Samsung | CMOS | 14.5 | 1.5 x | 5.0 µm | 365 | 23.4 x 15.6 | 4672 x 3104 | 5071 | f/8.4 | 34,5 |
| K-5 | Sony | CMOS | 16.1 | 1.5 x | 4.8 µm | 370,5 | 23.6 x 15.7 | 4928 x 3264 | 5303 | f/8.1 | 37,4 |
| S i g m a****** | |||||||||||
| SD14/SD15/DP1/DP2 | Foveon | CMOS | 4,7 | 1.7 x | 7.8 µm | 285,7 | 20.7 x 13.8 | 2640 x 1760 | 3239 | f/13.1 | 14,1 |
| SD1(m) | Foveon | CMOS | 15,4 | 1.5 x | 5 µm | 384 | 24 x 16 | 4800 x 3200 | 5080 | f/8.5 | 34,6 |
| S a m s u n g | |||||||||||
| GX-20 | Samsung | CMOS | 14.6 | 1.5 x | 5.0 µm | 365 | 23.4 x 15.6 | 4688 x 3120 | 5089 | f/8.4 | 34,6 |
| NV40 | ? | CCD | 10,1 | 6.0 x | 1.7 µm | 28,2 | 6.13 x 4.60 | 3648 x 2736 | 15116 | f/2.9 | 306 |
| O l y m p u s | |||||||||||
| E400/410/420/450 | Matsushita | NMOS | 9.98 | 2.0 x | 4.7 µm | 225 | 17.3 x 13.0 | 3648 x 2736 | 5356 | f/7.9 | 38,4 |
| E510/520/E3 | Matsushita | NMOS | 9.98 | 2.0 x | 4.7 µm | 225 | 17.3 x 13.0 | 3648 x 2736 | 5356 | f/7.9 | 38,4 |
| E620/E30/E5 | Matsushita | NMOS | 12.2 | 2.0 x | 4.3 µm | 225 | 17.3 x 13.0 | 4032 x 3024 | 5919 | f/7.3 | 48,7 |
| E-M5 | Matsushita | NMOS | 15.9 | 2.0 x | 3.7 µm | 225 | 17.3 x 13.0 | 4608 x 3456 | 6765 | f/6.3 | 63,7 |
| L e i c a | |||||||||||
| M8 | Kodak | CCD | 10 | 1.3 x | 6.8 µm | 479,7 | 26.8 x 17.9 | 3936 x 2630 | 3731 | f/11.4 | 18,1 |
| M9 | Kodak | CCD | 18,1 | 1.0 x | 6.8 µm | 864 | 36 x 24 | 5212 x 3472 | 3731 | f/11.4 | 18,1 |
| S2 | Kodak | CCD | 37.5 | 0.8x | 6.0 µm | 1350 | 45 x 30 | 7500 x 5000 | 4230 | f/10 | 22,4 |
| H a s s e l b l a d | |||||||||||
| H3DII-31 | Kodak | CCD | 31,6 | 0.8x | 6.8 µm | 1463 | 44.2 x 33.1 | 6496 x 4872 | 3731 | f/11.4 | 18,1 |
| H3DII-39 | Kodak | CCD | 39,0 | 0.7 x | 6.8 µm | 1807 | 49.1 x 36.8 | 7212 x 5412 | 3731 | f/11.4 | 18,1 |
| H3DII-50 | Kodak | CCD | 50,1 | 0.7 x | 6.0 µm | 1807 | 49.1 x 36.8 | 8176 x 6132 | 4230 | f/10 | 22,4 |
| P h o n e s | |||||||||||
| iPhone 3Gs | 2 DLA (diffraction limited aperture) - DOD (diffraction limited aperture). The narrowest aperture at which pixel-by-pixel sharpness is possible (for more details, see the Diffraction section, before the table). 3 36x24 mp - shows the estimated number of pixels on a full-format matrix made using the technology of the camera in question. That is, for example, if you make a full-format sensor based on a Canon 50D, it will be 39.2 mp. 4 Nikon D1x pixels are rectangular. The real 5 mp received from the matrix were stretched into a 10 mp photograph. There is no point in calculating dpi and dla for such a technique. 5 Fujifilm - When calculating the dpi of the sensor for Fujifilm cameras with a non-standard matrix (with two types of cells), only the main pixels were taken into account. Due to the matrix structure, it would be incorrect to count both the primary and secondary pixels. The main pixels occupy almost the entire useful volume, and the small, additional ones occupy only small cells between them (for more detailed information see official Fujifilm website). 6 Sigma - Foveon matrices, which are used in Sigma cameras, consist of three layers (RGB) and, unlike other cameras, each pixel in the photograph is formed from three pixels of the matrix. This happens because the pixels are located one above the other and do not carry additional information about brightness (only about color). That is why, with a matrix of ~ 14 mp, photographs are only 4 mp. Pixel density is calculated for one layer. PS I can’t help but note that in fact, photodetector does not occupy the entire area pixel , some space must also be given to the so-called harness. In order to increase the usable area, manufacturers create special collecting micro-lenses on the matrix:
The larger the area the microlens collects light from, the more efficient, in theory, the operation of the matrix should be, and the less noise should be. But this is only in theory for now... | ||||||||||

The first to be included in the “collection” of photosensitive matrices were the frontal and rear camera smartphone from one well-known Korean manufacturer, which was kindly provided by Vasily Stolyarov. Then a habrauser living near Moscow sent me his old, non-working Pentax camera (hereinafter I will deliberately not indicate the exact model of the device). The device was dead and this was a good reason to hand it over into my caring hands, and not throw it away, as many do.
And just as I was about to cut, I received another offer from my practically classmate, Ilya. I couldn't refuse this offer. I was presented with a relatively modern Canon that had problems taking images.
Thus, there are three candidates on the red-revolutionary-May Day table: an OEM camera from a phone and cameras from Pentax (the oldest among all participants) and Canon (perhaps the youngest).
If anyone else doesn’t know why we are gathered here, then in the footer of this article there are links to previous “autopsy”. If someone has forgotten how a digital camera works or why a matrix is needed, then you are welcome to Wiki or just watch this video from the Discovery Channel:
The theoretical part. CCD and CMOS
Today, matrices made using CMOS (Complementary Metal-Oxide Semiconductor) technology have conquered more than 90% of the world market, and not so long ago, the insanely popular CCD (Charge-Coupled Device) is already predicting a quick decline.There are a lot of reasons for this, but not full list advantages of CMOS technology: firstly, low power consumption in a static state compared to CCD, and secondly, CMOS immediately “produces” a digital signal that does not require additional conversion (more precisely, conversion occurs on each individual subpixel), unlike CCD , which is actually an analog device, thirdly, low cost of production, especially with large matrix sizes.
You can briefly get acquainted with the principles of operation of CMOS matrices using two videos from Canon:
But all our patients (maybe with the exception of the camera matrix mobile phone) belong to the era when CCD reigned supreme in the world, and CMOS was just gaining strength and light sensitivity to subsequently take a leading position. Therefore, I will still say a few words about how the CCD matrix works. More detailed description can always be found on the Wiki pages.
So, a photon from the subject, passing through a Bayer filter, that is, an RGBG color filter, or an RGBW filter and a collecting microlens, hits the photosensitive semiconductor material. Being absorbed, the photon generates an electric-hole pair, which is “separated” in the cell under the influence of an external electric field, and the electron is “sent” to the piggy bank - a potential well, where it will wait for “reading”.

CCD matrix device diagram ()
Reading the CCD matrix occurs “cell by cell”, so to speak. Let's say we have a 5 by 5 pixel array. First we read the number of electrons, and in simple terms the value electric current, from the first pixel. Then a special controller “shifts” all the cells by one, that is, the charge from the second cell flows into the first. The value is read again and so on until all 5 cells have been read. Next, another controller shifts the remaining “image” down one line and the process is repeated until the currents are measured in all 25 cells. This may seem like a long process, but for 5 million pixels it takes just a fraction of a second.

The process of reading an image from a CCD matrix ()
To make it completely clear, I suggest you watch the following videos:
Practical part
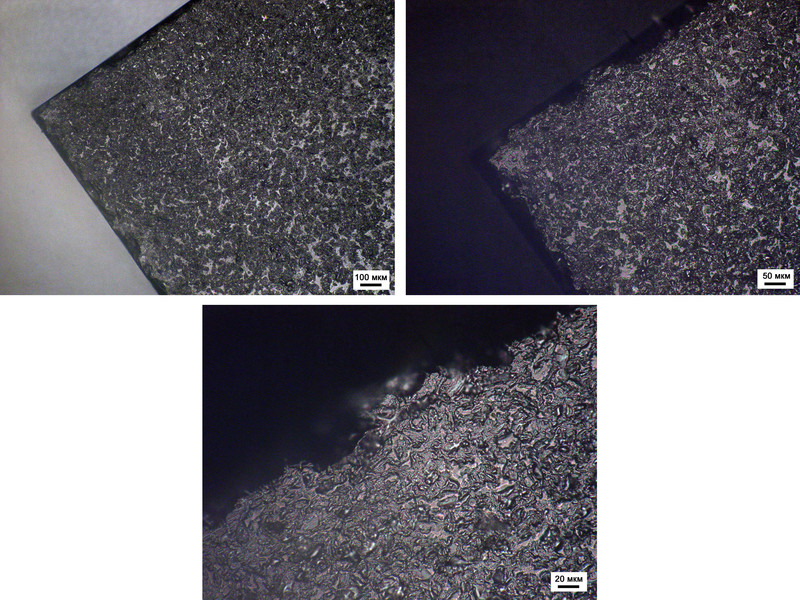
Usually, beautiful disassemblies are carried out by people in snow-white gloves, recently they got to cameras, but they say that for video assembly instructions you need to pay extra by sending an SMS to a short number. Next, we will use slightly more clumsy methods, so I don’t recommend repeating this at home...How did you figure it out? cellular telephone You can always look at it on the pages of the previous article, so I won’t present these heartbreaking shots here again.
The above-mentioned Pentax camera was provided by Monsieur, whose heart, it seems to me, should now be bleeding, and a stingy male tear rolling down his cheek:
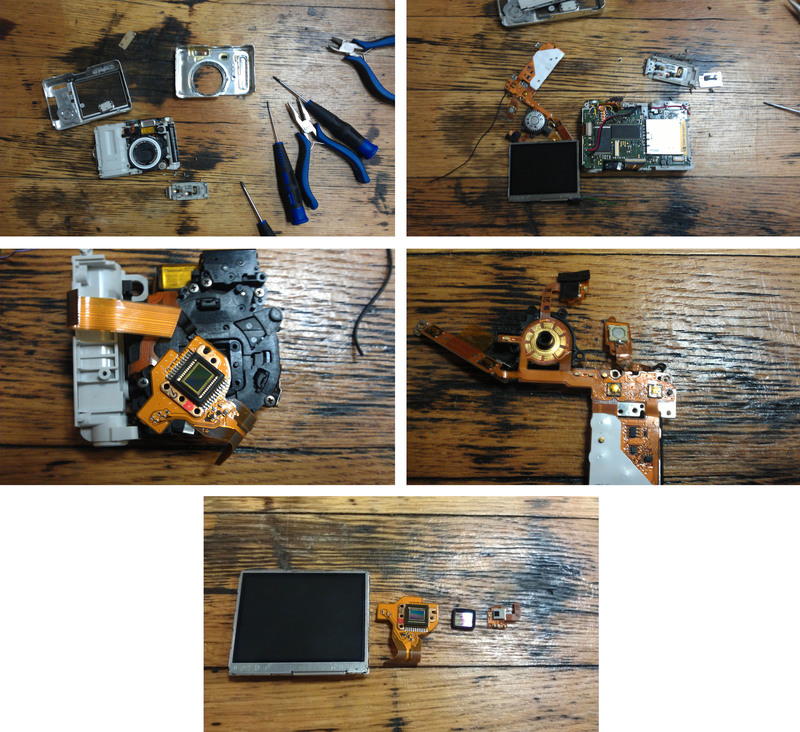
Pentax disassembly in photographs
Of all the variety of details, we are currently only interested in the LCD display, which will be shown to schoolchildren who come to us, on FNM, on excursions, the CCD matrix itself, glass with something suspiciously reminiscent of a polarizer or filter, and IR illumination (red light) for night shooting. It is worth noting that the matrix is rigidly fixed to the camera body. Consequently, all the vibrations of your hands will be easily transmitted directly to the matrix itself, which, you see, does not in any way contribute to high-quality photography. Apparently, he has reinforced concrete nerves.
However, that didn’t stop him from “drowning” his favorite camera. Remember, when you go to warm countries at sea in the summer and try to photograph the next rolling wave, that a camera is a device in which currents can lead to corrosion.

Traces of corrosion right on the cable leading to the shutter button (unfortunately, not the only place like this)
It is immediately clear that Canon is a slightly more advanced, more modern model than Pentax. For example, the matrix is spring-loaded (small springs are clearly visible in the lower left image). Such a passive image stabilization system helps to obtain higher quality and clearer pictures, unless, of course, you are a neurasthenic in an advanced stage!

"Insides" Canon
By the way, in the photo at the bottom right you can clearly see a huge capacitor responsible for the flash, because of problems with which I once had to write off my Canon digital point-and-shoot camera.
Mobile phone camera
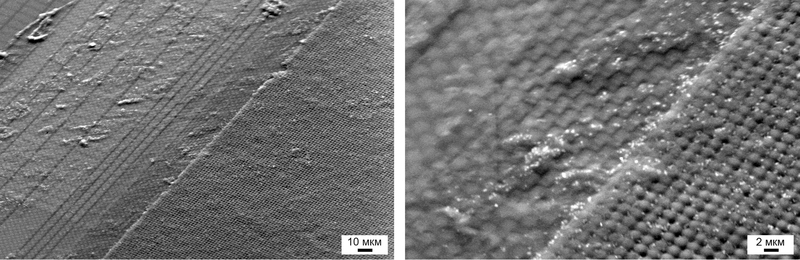
Let's start our research with a mobile phone camera, which will not be devoted much time and words in this article due to the fact that the matrix itself has completely microscopic dimensions and is difficult to work with (sawing, grinding).It is not difficult to notice that in the optical micrographs below the matrix at the edge has two zones: a lighter one and a darker one. I hope that everyone has already guessed: there are no diodes under the light side, it is applied just like that, with a margin in order to maximally cover the subtle mental organization of the matrix...
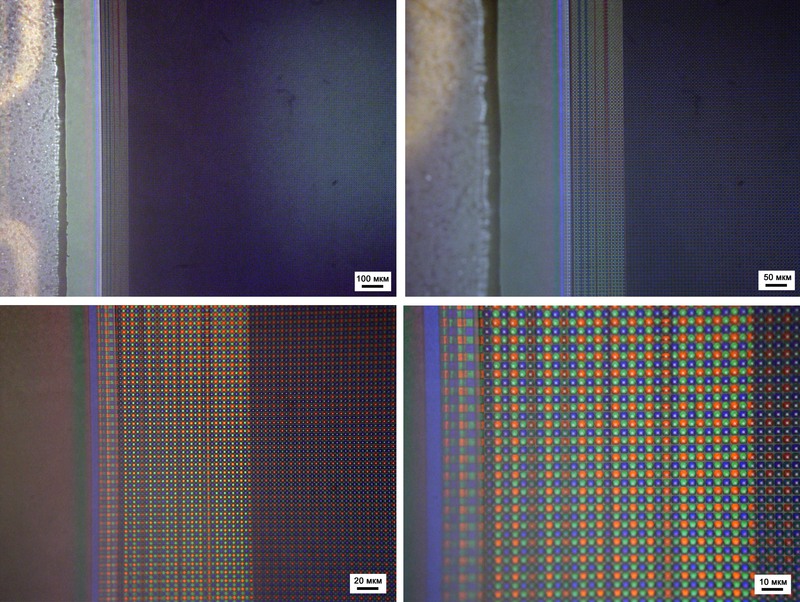
We'll cover everything with reserve - we don't mind
Microphotographs obtained using an optical microscope differ significantly from those produced by an electron microscope. For example, what about “sphere quadrature”?
The fact is that in optics we do not see any transparent layers (even if they are simply less noticeable), while electron microscopy is primarily a method of surface analysis, that is, it may well be that round color filters are covered on top square "caps". Moreover, the dimensions of such a cubic spherical subpixel are about 2.5 micrometers.

This is how it is, the squaring of the sphere...by the way, in a vacuum...
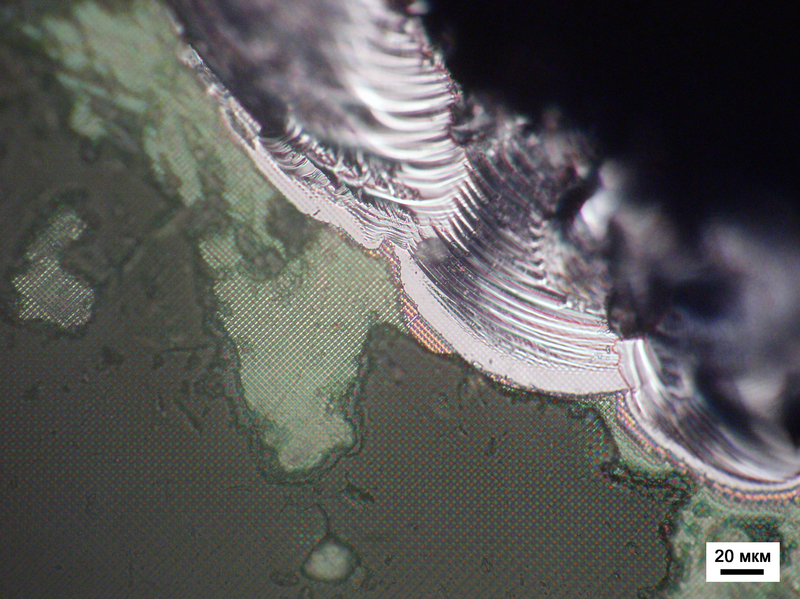
Pentax camera matrix
Let's start our study of the CCD matrix of a Pentax camera with optical microphotographs. To my deep regret, due to steric hindrances, as chemists say, in the sample-microscope system, it was not possible to take pictures at high magnifications and examine individual subpixels.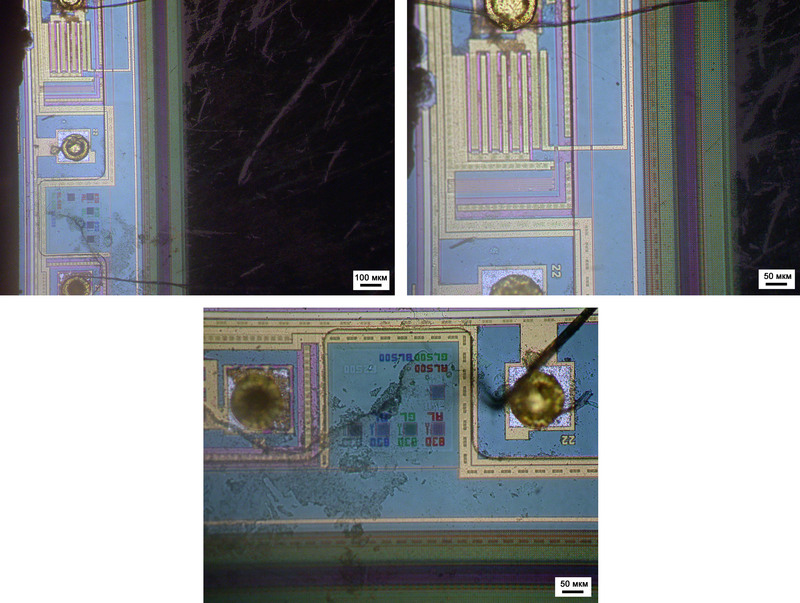
Something is written, I wonder, is it possible to see the names of little Chinese children here somewhere?
Each landing pad for contacts is numbered, but not each one has the same contact wire.

And this is how we will soon learn to count – with the help of nanotechnology, of course...
A clear boundary between the matrix itself and the “piping”
And the following micrograph is worthy of a textbook on electron microscopy. Do you know why an electron microscope is not a measuring tool? Yes, yes, that’s why: due to the local accumulation of charge, seemingly spherical objects suddenly became ellipsoids:
But we know that these are spheres...
Next, let's take a look at what is around the photosensitive matrix. Since I am not an expert in the field of creating electronic circuits, I’m afraid to even imagine why all these complex designs and “intricacies” of conductors are needed, maybe there is someone ready to explain the purpose of the parts and components below (in the comments, of course same)?

Unshakable posts that have survived sawing and polishing...
You can get entangled in these layers and break a leg or two.
This issue “A View from the Inside” is significant; after several years of “ordeals” we have finally established new system microanalysis, so in some cases, I can not only provide beautiful pictures, but also explain which ones chemical elements what is seen is.
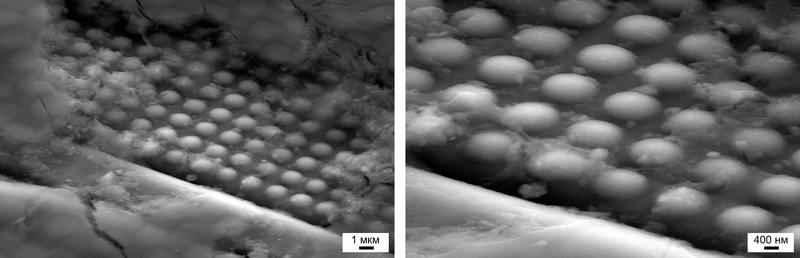
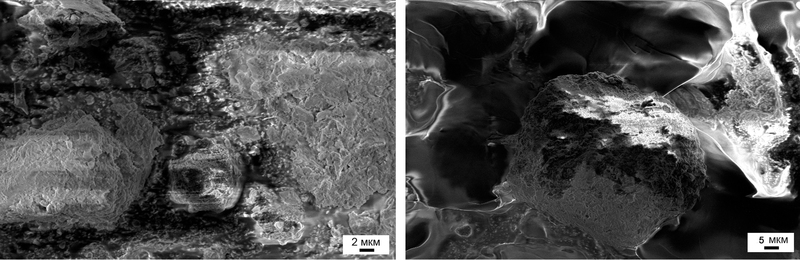
And here is the most interesting thing - the matrix in all its glory. Under the mesh, in the cells of which microspheres-lenses are located, you can see individual photosensitive elements (or their remains, to be more precise, it’s difficult to say). Below, when discussing the Canon matrix, I will explain in detail the “cross-section” design of the matrix. For now, let us turn to the data of local chemical analysis. It turns out that the mesh consists of tungsten, and the microspheres, apparently, are silicon dioxide, which is “covered” on top with some kind of polymer material. A more detailed analysis can be found.

The Matrix in all its intricate beauty
Returning to the first SEM image in this chapter, the contact pads are made of pure gold (oh yeah!), but the conductors inside the sensor appear to consist of aluminum, on which a thin layer of copper is sputtered, the content of which is on the verge of device sensitivity. Detailed information is provided.
Matrix Canon camera
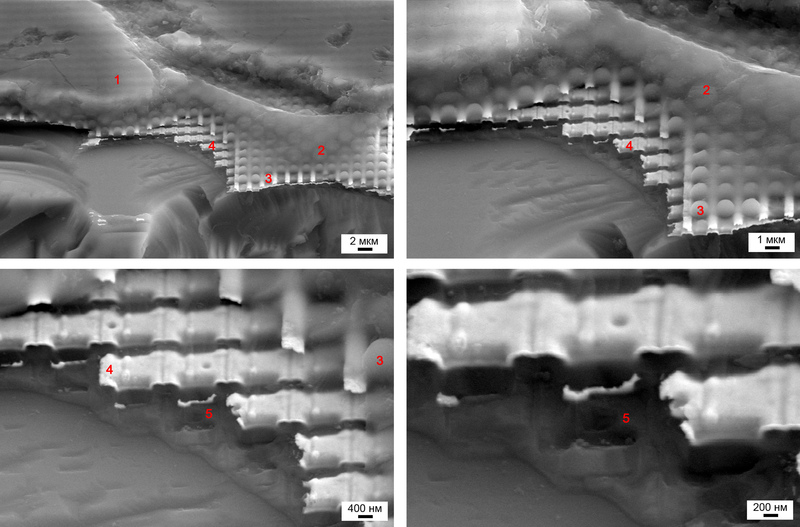
We will continue our immersion into the micro- and nanoworlds, as usual, with optical microscopy. As in the case of Pentax, the matrix from the Canon camera could not be photographed at high magnification due to geometric inconsistencies. However, from the obtained microphotographs, it is possible to estimate the size of an individual subpixel - about 1.5 microns, which is much smaller than that of a mobile phone matrix.
Optical micrographs of a Canon sensor
By the way, one of the culprits for the inability to take pictures on an optical microscope at high magnifications is the “cover” glass, which covers the matrix and its “filling”:

Good shot: transmission behind glass
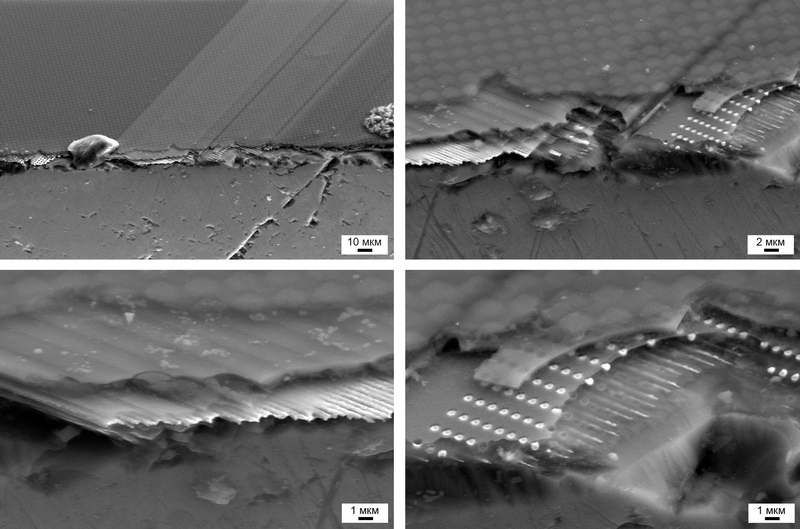
Of course, the most interesting things are always hidden on the chips, where the falling apart strictly ordered world gives a crack, allowing you to look into the most sacramental corners of the device:
We'll come back to the yellowish-orange areas of this photo a little later...
Already familiar to us columns of completely unclear purpose:

Like steadfast tin soldiers
Now let's take a closer look at the structure of the CCD matrix. On top, the CCD matrix is covered with something resembling a polymer layer (1), which protects the photosensitive elements from the aggressive external environment. Below it are microlenses with dye (2 and 3). But since electron microscopy does not allow obtaining color images, it is not possible to say for sure whether a large or small sphere is colored. Microlenses made of silicon dioxide (the most likely material for their manufacture) are fixed in the cells of a tungsten mesh (4), under which photosensitive elements (5) are hidden. And, of course, this entire structure rests on a substrate made of the purest silicon!
Taking into account the fact that the matrix is additionally protected by a “covering” glass, the photocells are protected better than the President of the Russian Federation in his limousine (if, of course, we correct for the scale factor).
Microanalysis data can be downloaded.
Arrangement of the matrix point by point. Description in the text
But that's not all. We still have a piece of glass remaining covering the matrix, which, it seems, is a polarizer. It is somewhat rough around the edges, but almost perfectly smooth throughout the rest of the surface area. It seems that optical microscopy does not give any results: glass is like glass.
Glass with a suspected polarizer: nothing unusual
And only with the help of electron microscopy is it possible to see the chemical contrast in the image and the striped structure. The thickness of such a “film” is only 2.5 micrometers, while the dimensions of the individual layers are 180 and 100 nm, respectively, for darker and lighter ones. Based on microanalysis data (), I would venture to suggest that the darker areas are enriched in titanium, and the light areas are enriched in aluminum. I think this is amazing!

It turns out that the camera has its own striped life inside!
Afterword
Such a world of the passing century of CCD matrices appears before us today.Thanks to everyone (Vasily for the phone, Ilya and for the cameras) who made their contribution to the creation of this article. Well done to you for supporting us in this difficult endeavor!
And the apotheosis of this article, or rather its apotheosis:

Rest in peace until we come up with a new use for you.
Bonus 1. What does a green dust storm look like in Moscow?
At first I wanted to post it as a separate post, but decided not to clutter up the space. Just a few days ago, Moscow was covered by a yellow-green cloud, many had already begun to prepare for the arrival of the apocalypse, but nothing happened... What in reality was the reason for such a strange color?The climate has been acting up on this planet lately: New Year will leave without snow, then it will be covered with snow to the very top, then spring will look like winter, then suddenly summer will come. Flowers, trees and vegetation are less adapted to this kind of disturbance, so 1.5 months of spring compressed into 1 week forced plants to reconsider their plans for reproduction...
In the morning, sitting down at my desk, I discovered a layer of dust on it, and after wiping it with a napkin, I realized that I needed to study this dust properly. No sooner said than done!
But I have two news for everyone: good and bad.
The good news is that the color of the yellow-green cloud was indeed due to a large amount of pollen (I counted at least three types):
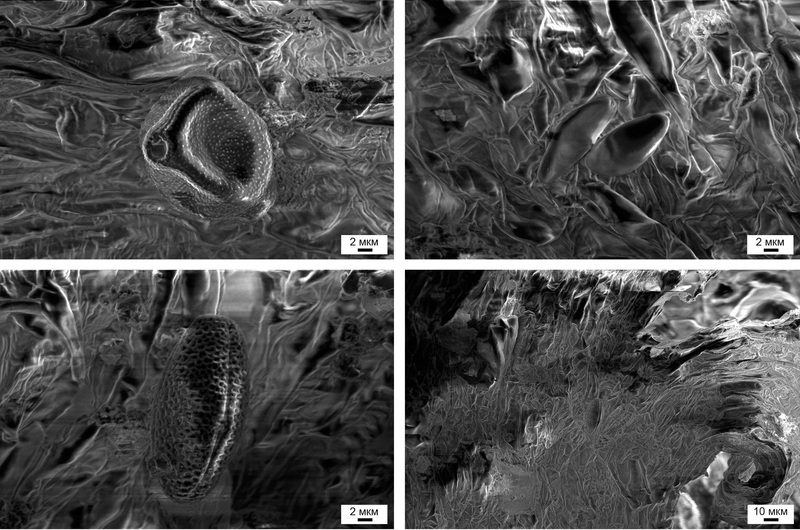
Composition of the Moscow storm: pollen... Below right, pollen on the surface of a part of the plant
The bad news is that we also breathe this, and every day, and not during plant reproduction periods (micro- and nanoparticles that not every filter will catch):
The composition of the Moscow storm: not very pleasant dust and dirt
Bonus 2. Guess what it is?
The matrix of a digital camera consists of many individual light-sensitive elements - pixels, each such element forms one point in the image. The higher the resolution of the matrix, the higher the detail of the resulting image.
The number of pixels on the matrix is called the resolution of the matrix and is measured in megapixels (millions of pixels). Each such pixel perceives light and converts it into an electrical charge (the brighter the light, the stronger the charge). Since only information about the brightness of the light is used, the picture turns out to be black and white. To make it colorful, the cells are covered with colored filters.
In most matrices, each pixel is covered with a red, blue or green filter, the so-called RGB filters ( R ed - red, G reen - green, B lue - blue). The filter passes only rays of its own color into the cell, so each pixel, for the camera processor, is either red, green, or Blue colour and the brightness of that color.
These three colors are the primary colors, and all other colors are obtained by mixing the primary colors. The processor calculates the color of each pixel by analyzing information from its neighboring pixels.
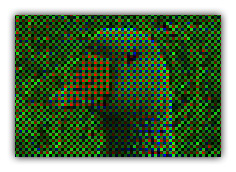
The arrangement of filters varies, but the most common is the so-called Baer filter, when filters of three primary colors are used in the following order:
As you can see, there are twice as many green cells as cells of other colors. This is due to the peculiarities of human vision, which is most sensitive to the green region of the spectrum. Data loss in this area would be most noticeable. In the modified Bayer filter, R G B E, one of the green cells is replaced by light blue (E-emerald, English. emerald), which gives better color rendition. (technology developed by SONY).
How pixel colors are calculated
Let's say there is a matrix consisting of red, green and blue pixels:
Now let's photograph the image:

In this case, the signal from the matrix to the processor will look like a signal from red, green and blue pixels with different brightness:
After processing, the processor calculates the color of each individual pixel using information about other colors from neighboring cells and generates a digital image:

As you can see in the picture, this image turned out more blurry than the original one. This effect is associated with the loss of some information as a result of light passing through color filters and image processing by the processor. To correct blur, the camera's processor automatically sharpens the image. Additionally, at this moment the processor can apply other operations: change contrast, brightness, suppress digital noise, etc. depending on the device model. Many of these functions are performed automatically by the camera; more expensive models have the possibility of additional, manual adjustments.
There are also RGBW matrices ( addedWhite - white), they have added pixels that do not have a color filter, light enters the pixel unhindered and it gives a stronger signal (such matrices are produced by KODAK).
Using such a pixel allows you to get a brighter image in low-light conditions, but there may be a loss of fine color details, because There are 2x2 pixel areas where there are only two colors, for example white and blue or white and green, etc., which makes it difficult to calculate the color correctly.
Matrix resolution and photo printing
When you print an image, the pixels have a physical size, and this is what is described by the print resolution. The more pixels per inch (ppi) there are on a printout, the less noticeable individual pixels will be, and the more realistic the print will look.
How high should the print resolution be so that the eye does not distinguish individual pixels and perceives the image as high-quality?
72 ppi- standard resolution for computer monitors or prints viewed from afar (such as posters). At close range the pixels are noticeable.
150 ppi- enough a high resolution so that the eye does not notice individual pixels and perceives the picture as a whole.
300 ppi- photographic print quality. A further increase in resolution is only necessary if the print is viewed through a magnifying glass.
To print a 10x15 photo without losing quality, you will need a camera with a resolution of approximately 2.16 megapixels = 1800*1200, more precisely 2.09 megapixels = 1770*1181 (photo height = 10 cm, 10 cm divided by 2.54 - that’s how many centimeters in one inch, we get 3.937 - this is the height of the paper in inches, one inch should fit 300 dots, respectively 3.937*300 = 1181), width = 15/2.54*300 = 1770).
In printers, the abbreviation dpi (dots per inch) is used for image resolution when printing.
Laser and inkjet printers are not able to display all color variations of one pixel with one dot on paper. Instead of accurately transmitting the color of each pixel, the printer applies a combination of multi-colored dots to the paper, which from a certain distance are perceived by us as a single whole. It is precisely because printing one pixel requires many printer dots that printer resolution and image resolution are completely different things.
There is a simple rule of thumb: To figure out what image resolution you'll need to produce a high-quality print, divide your printer's resolution by four. For example, if the printer states that its resolution is 1200 dpi, you can achieve maximum quality if you send an image for printing with a resolution of 300 ppi.
In digital photo labs, when printing, each dot on photo paper is exposed in an arbitrary color and the resolution in dots per inch (dpi) corresponds to the resolution in (ppi). Therefore, if a laboratory prints with a resolution of 300 dpi, the quality of the prints will be no worse than on a printer with a resolution of 1200 dpi.
Progress does not stand still, and modern printers provide resolutions of up to 5760x1440 dpi. What camera resolution is needed to use the resolution of such a printer to its full potential. In order to calculate what camera resolution is needed to print a photograph with dimensions 10x15, you need to divide the printer resolution by 4 (since one point does not display all the shades, see above). We get 1440x360, so to print a 10x15 photo you will need a resolution of 5.9*1440=8496, 3.937*360=1417, 8496*1417 = approximately 12 megapixels, for printing A4 approximately 42 megapixels!
Benefits of Matrix Resolution
The higher the resolution of the matrix, the clearer and more detailed photo you can get. Also, the higher the resolution of the matrix, the larger the photo you can print without losing quality. For high-quality printing of a 10x15 cm photograph, a camera with a resolution of 2 megapixels is sufficient, for printing an A4 photo - 10 megapixels.
If you want to use the full capabilities of modern photo printers, then to print a 10x15 cm photo you will already need a camera with a matrix resolution of 12 megapixels, and A4 - 42 megapixels!
Also, just because you don't plan to print large photos today doesn't mean you won't want to print them tomorrow, so good resolution is never a bad thing, but it must always be taken into account with another parameter - the physical size of the digital camera sensor .


