Why doesn't the camera work? What to do if your Canon camera does not turn on
Why doesn't my Canon EOS 500D camera turn on?
Question:
Good afternoon.
The vivid impressions of my vacation were overshadowed by the unfortunate breakdown of my favorite camera, Canon EOS 500D. Which has served me faithfully for the second year now. I don’t know where or how I broke it. I can only assume that I got caught in the rain with it. After that, it began to malfunction somehow, sometimes it turned off unexpectedly, sometimes it took a long time to press the power button for the camera to turn on. And now here The camera doesn't turn on at all. I changed the batteries and installed batteries, it’s not their fault. I'm wondering if it's possible and how much it could cost me to repair it. If the repair will be expensive, then tell me what model of camera to take so that the optics purchased for it will fit. Because I’m not ready to spend money on lenses again.
Answer:
Hello, Artem.
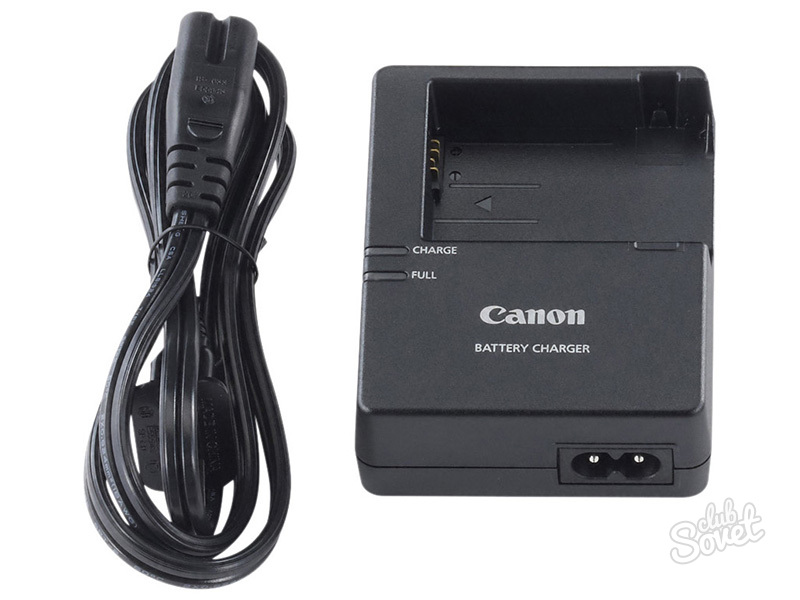
Your Canon EOS 500D camera is good and there are probably no objective problems with parting with it, unless of course it got caught in the rain and didn’t swim in the salty sea. Although we also raise recessed cameras. With the malfunction symptoms that you describe, when The camera does not turn on or does not always turn on, I can assume that the problem is in the power board; by the way, it is the same on the 500D and also fits on the Canon 450D and 1000D.
We need to look at what happened to the board, if it can be done, then repair it online service centers“Opora-Service” will cost you from 2000 to 3000 rubles. If it is specifically burnt out or very seriously oxidized, then in the worst case scenario, we will replace the board with a new one. New power boards are available and the cost of replacing the board along with labor will be 5,500 rubles. This is definitely cheaper than buying a new camera of a similar class, and especially since you don’t lose mounted optics, in which you probably invested quite a lot of money.
Canon IXUS 950IS camera stopped turning on
Question:
Canon IXUS 950IS stopped turning on, the lens does not extend and even the screen does not light up. I thought the batteries were dead, so I bought new ones. I installed it, everything is the same. The camera did not fall and I did not drop it into the water. Can I bring it to you for diagnostics at your service center on Petrogradskaya and how much does it cost to diagnose a camera?
Answer:
You can bring the camera for diagnostics to any service center of the Opora-Service network; our service centers are located not only in the Petrogradsky district, but also in Kalininsky, Vyborgsky, Moskovsky, Vasileostrovsky and other districts of St. Petersburg.
Our camera diagnostics are free, but repairs are of course paid for. If Canon camera IXUS 950 won't turn on and the problem is not in the batteries, then you need to look at the power board or motherboard. In practice, the cost of such repairs for this class of cameras in the Opora-Service network of service centers ranges from 1,500 to 3,000 rubles. When submitting your camera for repair, be guided by this repair cost range.
Have you bought a digital camera? It's time to learn how to use it! Using digital photographic equipment is as easy as using a disposable point-and-shoot camera with film. Turned it on, aimed it, pressed the shutter button... True, the quality of the pictures obtained using this algorithm may not be any better, and perhaps even worse. Did you overpay 10, or even 20 thousand rubles for this? Your new camera has a lot of features, and most of them may go unused! Get to know them a little better and surprise your friends with your photography skills. But before we do that, let's take a look inside the camera box.
Battery or batteries. Cameras powered by lithium batteries always come with 1 element. If your camera uses AA batteries, in most cases you will find a set of AA alkaline batteries inside the box. In rare cases, such cameras are equipped with Ni-MH AA batteries and a charger for them.
Memory card. Digital cameras that do not have built-in non-volatile memory are always equipped with a small capacity memory card of 8-32 MB.
USB cable. This cord allows you to connect the camera to a computer to copy pictures from the camera to HDD PC. On one side of the cord, similarly as in the case of an audio/video cable, there may be some non-standard plug. But on the other hand, there is always a standard USB connector for connecting to a PC.
Lens cap. Cameras that do not have built-in shutters that cover the front lens of the lens in the off position are always equipped with a plastic lens cover. This cap is manually attached to the lens after the camera is turned off.
Instructions. The instruction book is a very useful thing! Thanks to it, you can master all the functions of the camera. Unfortunately, the camera can only come with instructions for English language. In this case, the Russian-language instructions in in electronic format, most likely recorded on one of the included CDs. Cameras unofficially imported into Russia may not have instructions in Russian at all.
 |
Case. A case is a very useful accessory, but it is rarely included in the camera kit.
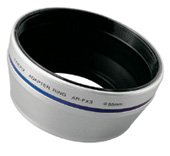
In addition to the listed accessories, some digital cameras are equipped with more “exotic” accessories: stereo glasses, a lens hood, a ring for attaching filters, etc.
ADVICE!
- Always check the contents of your camera when purchasing!
The reason for the lower price of the camera may be its incompleteness or a change in the configuration by the trading company.
The included memory card has a small capacity and is intended mainly for testing the functionality of the camera upon purchase. This memory card will not hold enough pictures. Therefore, when buying a camera, you can immediately look for a memory card with a larger capacity - 64, 128, 256 or 512 MB.
If your camera is powered by AA batteries and batteries and a charger are not included, consider purchasing them. Choose Ni-MH batteries with a capacity of 1800-2100 mAh and special Charger for them.
If the camera is powered by a Li-ion battery, then a spare battery will not be superfluous. Maybe you should buy it right away? It will allow you to take photos longer while in the forest or on the beach.
Another very useful accessory is a napkin or “pencil” for cleaning optics. No matter how careful you are, the lens will get dirty one day, and to clean it you will need a napkin, which is best purchased at a photo store.
Without further delay, attach the strap to the camera. Quite often it saves the camera from falling.
If the plastic camera cover has a strap, be sure to attach it to the camera. Otherwise, you will most likely lose the lid in the very near future.
WHAT'S INSIDE THE CAMERA?
Don't try to look inside your digital camera. The consequences of such curiosity can be fatal. However, I couldn’t contain my curiosity and now I’m happy to share what I saw with you!
 |
A zoom lens is very similar to a similar lens on a film camera, but if you look closely at it, you will notice that it has digital camera it is slightly smaller, and its focal length has decreased significantly - 8-16 mm instead of 35-70 mm. The reason for this is the small size of the light-sensitive matrix compared to the frame on film. The diagonal of the photosensitive surface of the matrix of many amateur digital cameras is slightly less than 10 mm, and the diagonal of the frame on ordinary photographic film is 43 mm. Now imagine what will happen if instead of photographic film we install such a small matrix in the camera. Only a small central part of the frame will fit into its field; it will seem that the frame was taken with a lens with a large zoom (focal length). It will be inconvenient to shoot with such a camera indoors, because you will need to move a long distance away from the person being portrayed so that not only the face, but also part of the figure fits into the frame. Therefore, the focal length of digital camera lenses is much shorter than that of film cameras. However, the angle at which the camera “sees” objects will remain the same.
The camera's aperture and shutter are typically located inside the lens. The diaphragm, consisting of several blades, when closing, reduces the diameter of the hole through which light passes onto the matrix. Thanks to this, the amount of transmitted light is reduced, excessive illumination of the matrix is prevented, and the pictures turn out good regardless of how brightly the subject is illuminated. We’ll talk a little later about how and why you can change the aperture value.
The shutter is located nearby. By opening and closing, it, like the diaphragm, is capable of changing the amount of light falling on the matrix. But it works somewhat differently than the shutter of a film camera. The shutter of a film camera is always in the closed position and opens only for a short moment at the moment of shooting. But the shutter of a digital camera is usually open. Light passing through the lens continuously hits the matrix. What is this for, you ask? The answer is obvious! A digital camera continuously receives images from the sensor and displays them on the camera monitor. If the shutter is closed, we will not see an image on the monitor (many cameras automatically close the shutter when the monitor is turned off). But after shooting a frame with a high resolution, the shutter closes for a fraction of a second - the time required to completely copy the information from the matrix into the camera’s memory.
 |
An infrared filter may be located immediately behind the objective lenses, preventing the passage of infrared rays to the photosensitive matrix that is sensitive to such rays. Our vision does not allow us to see infrared rays, which means that a digital camera should not see them either. Otherwise, the image obtained using such a camera will differ from what we see, and we will perceive such a discrepancy as a flaw in the camera.
Further along the path of the light rays there is a photosensitive matrix of the camera - a chip, top part which is made of glass. Under the protective glass there is a photosensitive surface of the matrix. It is the characteristics of the matrix that largely determine the quality of the pictures, and they also affect the price of the camera. We have already written about the types of photosensitive matrices, their differences and characteristics on the pages of our magazine. Therefore, without delving into the description of the matrix, I will only say that its surface is dotted with many tiny photosensitive cells. Light falling on the surface of the cells creates an electric charge in the depths of each of them. If there is a lot of light, the charge is large, there is little light, and the charge is correspondingly not large.
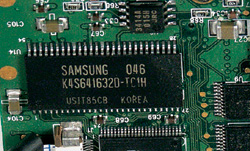 Camera RAM chip Camera RAM chip
|
After shooting, the resulting charges are transferred to an analog-to-digital converter (ADC). Here they are digitized and converted into digital form. Larger charges are assigned big numbers, and small - small. If there is no charge in the cell, it is assigned the value 0, but maximum value depends on the bit depth of the ADC. For most cameras this value corresponds to 255 (8 bits per channel).
The digitized information goes into the camera's random access memory (RAM). This is a microcircuit that can store information only when electrical power is present. If the camera suddenly turns off, all information (future photo) will be lost. But there is no need to be afraid of this! The photo is in RAM for only a fraction of a second. Here it is digitally processed - tone and color rendition is improved, the sharpness, brightness and contrast of the image are adjusted. The processing algorithms used at this stage are the property of photographic equipment manufacturers. It is no secret that digital cameras from different companies may use the same light-sensitive matrices, but the quality of the resulting image will differ significantly. The reason for this lies precisely in the different digital processing of the received signal.
The image, converted in accordance with the proprietary developments of the manufacturers and camera settings, is transferred to the non-volatile memory of the camera or to a memory card. Here, a digital photograph can be stored indefinitely, regardless of whether the camera has batteries or not.
All movements and transformations of the image in the camera are controlled by the central processor or, as they say, the chipset. After all, this is not only the processor, there are also other hardware that controls the camera.
An optical zoom viewfinder is located above the lens. During zooming, the distance between the lens lenses, its focal length, and, accordingly, the scale of the image changes. Similar lens movements must occur in the camera's optical viewfinder, which is why it is made in the same unit as the camera lens.
 Raptor II chipset Raptor II chipset
|
A separate place in the camera device is occupied by the flash unit. On a separate board there is a high-capacity capacitor and a step-up transformer.
Thanks to them, a high voltage (thousands of volts) is supplied to the contacts of the flash lamp, which is required for the passage of charge in the lamp and the short-term glow of the plasma.
On the back panel of the camera there is a liquid crystal monitor, on which during shooting you can visualize the image, make certain settings, and view the pictures taken. At high magnification, you can see that the surface of the monitor is covered with tiny rectangles of blue, green and red. In front of each color cell is a liquid crystal shutter. In its normal position, the gate is transparent, but when voltage is applied to its contacts, it loses transparency and turns black. On the inside of the monitor there is one or more white light sources. The brightness and uniformity of monitor illumination depends on their characteristics.
 Camera connectors and flash capacitor behind them Camera connectors and flash capacitor behind them  |
Thus, if voltage is applied to all the green and red cells, the monitor will glow blue, because the backlight light will pass only through the blue cells of the monitor. The synthesis of all other colors will be carried out according to the additive principle.
Once you get acquainted with the monitor structure, you can guess why it consumes a lot of electricity and why it should be turned off sometimes. When the monitor is off, the photographer must be aware of the most important camera settings, the number of frames remaining, etc. For these purposes, many cameras are equipped with liquid crystal displays. The operating principle of the display is similar to the operating principle of an LCD monitor. The main differences will be the absence of color filters (the image on the display is monochrome, black and white) and the absence of backlighting.
During the day, the image on the display is visible due to the reflection of light from the back wall, but in the evening you will need backlighting from some kind of light source - a light bulb or LED.
Of course, the camera design considered is not the only possible one. In addition to these components, there may be additional focusing sensors, exposure metering, focus illumination and red-eye reduction devices. Now that we know what's inside the camera, let's take a closer look at the outside of the camera.
ADVICE!
- Do not try to repair the camera yourself!
By disassembling the camera, you lose the possibility of warranty repair.
Be extremely careful with the lens popping out of the body. One hit to it can damage the camera.
Some cameras get quite hot during shooting; this is normal and does not indicate a camera malfunction.
Most cameras are not waterproof. They must be protected in every possible way from splashes of water and high humidity. These cameras cannot be used in the rain.
WHAT'S OUTSIDE?
At a quick glance at the camera you can see: the lens lens, the viewfinder eye, the built-in flash, controls (many buttons and switches), the connector compartment, the battery compartment. And now about each element in more detail.
LENS
The lenses of many cameras, when the power is turned off, are completely immersed in the camera body and move out of it when turned on. Be especially careful with such a lens; a slight blow to it while it is on can damage the camera. Another element of the lens that you need to be extremely careful with, regardless of camera design, is the front element. It must be extremely carefully protected from contact with any objects that could stain or scratch the surface. The quality of the image in the pictures and its sharpness directly depend on the cleanliness of the lens.
Dust can be removed from the surface of the lens using a stream of air from a special bulb or a can of compressed air. Fingerprints can be wiped off with a clean, soft cloth, but more severe stains may require a special lens cleaning fluid.
BATTERY COMPARTMENT
Under this cover there is one or more batteries. Before opening this cover, you must make sure that the camera is not recording information to the memory card and that the camera's power is turned off. As you already know, pictures first go into RAM and only after that are written to the memory card. The speed of copying information to a memory card is much lower than to RAM and can take several tens of seconds. Therefore, if you open the battery compartment while pictures are being written to the memory card, you will lose the most recently taken pictures, and incorrect completion of access to the memory card may damage all information on the memory card. A special indicator LED, as a rule, informs the photographer that the memory card is being accessed. Therefore, the moment the battery compartment is opened, all camera LEDs should go out.
All types of batteries used in digital cameras can be divided into 2 groups. The first group includes those cameras that use AA batteries (pen-AA batteries in popular parlance). The second group includes all cameras powered by batteries of a proprietary form factor.
If the camera uses a proprietary form factor battery (different in shape from disposable batteries), then most likely it is a lithium battery. You can charge such a battery without waiting for it to be completely discharged. 1.5-2 hours before you go shooting, feel free to charge it, not paying attention to the charge level.
Some manufacturers suggest the ability to charge the battery directly inside the camera when it is connected to the network. Others include a special charger for the camera. Regardless of how your camera battery is charged, the charger will be automatic and will prevent overcharging and damage to the battery. The state of battery charge can be judged by the state of the indicator LED, which goes out or changes color at the moment the battery is fully charged.
If you charged the battery using an external charger and the camera does not work after installing the battery in the camera, check that the battery is installed correctly. Some cameras have a lock that prevents the battery from being installed incorrectly, while others do not. Therefore, if you managed to install the battery into the camera without much effort, this does not mean that it is installed correctly and the camera will work.
Also, do not forget that with each charging and discharging cycle of the battery, its capacity will gradually decrease. For the first 50-200 (the numbers depend on many factors, the main one of which, as a rule, is the production technology of the battery and charger) cycles, the decrease will be insignificant, you will not even notice it. But then a significant reduction in capacity is possible.
If the camera is powered by AA batteries, most likely you should take care of purchasing a charger and batteries of this format (some manufacturers include a charger and batteries in the kit). No, of course, your camera will also work from primary batteries (batteries), but using them is not very reasonable from an economic point of view. Two or four of the most modern AA alkaline batteries will last you 1-2 hours of shooting, and such a kit costs about 50-100 rubles. Nickel-metal hydrite batteries are more expensive, about 100 rubles for one element with a capacity of 1800-2100 milliampere/hour. You will have to pay 500-1500 rubles for the charger. Now you can calculate for yourself how many hours of photography this kit will pay for itself.
MEMORY CARD COMPARTMENT
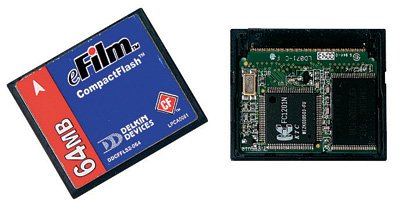 CompactFlash memory card assembled and disassembled CompactFlash memory card assembled and disassembled
|
This compartment houses the memory card. At its core, a memory card is one or more chips located in a small plastic case.
When a card is inserted into the camera, from 50 to 9 electrical contacts are connected to it, along which the electrical contacts stored in the memory cells move. Dirty contacts or slight discrepancies in their sizes can lead to temporary inoperability of the card. You can correct the situation by wiping the card contacts with a thick cloth.
Before replacing the memory card, it is advisable to wait for the information recording process to complete and turn off the camera's power. To remove Secure Digital, Memory Stick, xD-Picture Card memory cards, just press lightly on the card itself, after which the spring will push it out halfway. When replacing a CompactFlash card, you need to press the special button once or twice to do this.
Be extremely careful with the removed card. Being an electronic device, a memory card is resistant to moisture, mechanical damage and static voltage charges.
Most manufacturers guarantee the safety of information recorded on a memory card for more than 10 years. But storing pictures on a card is quite stupid; they are too expensive today.
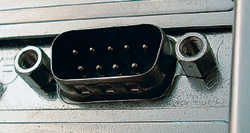
CONNECTORS
On the camera body you can find from one to 4-5 connectors. These can be sockets for connecting: a network adapter (external power source), audio/video output for connecting to a TV or VCR, a USB connector for connecting to a PC, a sync contact for connecting external flashes, a universal connector for connecting to a docking station and a remote control connector remote control(electronic cable release). To prevent the connector contacts from becoming dirty, they are covered with special covers.
There is no single standard for connectors, so be careful with the cords supplied. If they are lost, it may not be easy to find a replacement.
CONTROLS
To control various functions of the camera, there are many different buttons, switches, selectors, etc. located on its body. Their number, design and purpose vary for different camera models. But there are some that are available in almost all cameras. These are the power button, shutter button, multi selector, MENU button, zoom button and playback mode button.
A digital camera is an electrical device, which means it must have a power button. Try to remember to turn off the camera after shooting, this will save some battery power.
The shutter button is the most important button on the camera. This is the one you will click on most often! You can press this button halfway (half-press) or all the way. When pressed halfway, the camera focuses on the subject, measures the exposure and displays the shutter speed and aperture on the camera monitor (some amateur cameras do not display shooting parameters). By pressing the button all the way, you will take a photo of the scene.
Pressing the MENU button displays the camera setup menu on the camera monitor. And the multi selector allows you to select the desired items in the menu.
At a time when the menu is not displayed on the camera monitor, the multi selector buttons can perform a variety of functions - from zoom control to introducing exposure compensation.
The zoom key has two pressing positions. Pressing one of them will increase the focal length of the lens or activate digital zoom. The scale of the subject will become larger, as if it will come closer. Pressing the second one has the opposite effect. The focal length of the lens and the image scale decrease, and objects seem to move away.
In order to view the pictures you have taken, you must turn on the picture viewing mode. This can be done by pressing a special button.
 |
LCD DISPLAY
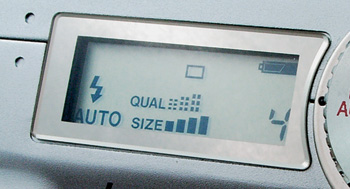
Displays the most important camera settings. Do not confuse it with a camera monitor. On the display you will not be able to see the image of the objects being photographed; it is intended solely to display numbers and symbols. Many amateur cameras do not have it, but it is a mandatory design element for professional and semi-professional cameras.
The display shows the most necessary settings and camera status: operating mode, number of remaining frames, compression ratio, resolution and much more. The backlight of the display allows you to see the information on it in the evening, but, unfortunately, it does not exist on all cameras equipped with a display.
INDICATOR LEDS
 |
Indicator LEDs are small colored “lights” located on the camera body. As a rule, they are located next to the optical viewfinder or next to the memory card compartment.
The different colors, blinking and lighting of the LEDs inform the photographer about the state of the camera. LEDs provide information about processes such as recording information to a memory card, whether the flash is ready to take pictures, and focusing accuracy.
BUILT-IN PHOTO FLASH
Almost all digital cameras are equipped with a built-in flash. For some it is located on the front panel, for others it is hidden in the top panel. Opening and turning on the flash in this case can be done either automatically or manually.
It is worth paying attention to the distance between the flash reflector and the lens. According to the laws of physics, the smaller this distance, the higher the likelihood of red eyes appearing in photographs. In addition, the flashes of different cameras may differ slightly in the brightness of the pulse.
VIEWFINDER
Four types of viewfinders have become common in digital cameras: LCD, electronic (EVF), optical parallax and DSLR.
It is very convenient to view the image on the LCD monitor. In addition to the image, it can display shooting parameters, auxiliary framing lines, a histogram and other helpful information. Additional conveniences are provided to the user by digital cameras with the ability to rotate the monitor in different directions. This design makes it more convenient to shoot from high and low points and simplifies self-portrait shooting.
But LCD monitors also have their drawbacks. The image on it is quite small, it is difficult to judge the focusing accuracy from it. When bright sunlight falls on the monitor, it is very difficult to distinguish the image on it. The image is poorly visible, but for a different reason when shooting in the evening or at night. High power consumption also makes it necessary in some cases to abandon the use of the monitor as a viewfinder.
An electronic viewfinder is essentially the same LCD monitor, only it is located inside the camera, behind the positive lens (almost all video cameras have a similar viewfinder). No light rays fall on the monitor located inside the camera, which means the image on it is always bright. Other disadvantages of LCD monitors remain inherent in electronic viewfinders. Semi-professional cameras and cameras with lenses with a very wide zoom range are equipped with such viewfinders.
The optical parallax viewfinder is a multi-lens structure located next to the lens. This viewfinder does not consume electricity, and the image in it is always clearly visible. After all, in essence, you are looking at the subject through a small hole in the camera. Only you won’t see any shooting parameters through this viewfinder, and the frame boundaries visible through the viewfinder will differ from those obtained in the photographs. More than 80 percent of digital amateur cameras are equipped with such a viewfinder.
The mirror viewfinder combines the advantages of all designs! Sighting is carried out through the camera lens, which means that the image is as close as possible to the one you get in the photograph. The LCD panel displays important shooting parameters in the viewfinder and consumes very little power. Only in this case the design of the viewfinder becomes more complicated and turns out to be a little cumbersome. Therefore, such viewfinders are an advantage of professional cameras with interchangeable lenses.
Well, now let's try to take some pictures.
SHOOTING
Before you take a picture with a film camera, you need to choose the type and sensitivity of the film. The quality of future photographs will depend on this. When photographing with a digital camera, you first need to make sure that some settings are correct. First of all, you need to check the quality with which the pictures taken will be saved. It's possible that your five-megapixel (5 million pixels) camera will save images with such low quality that even 10x15-centimeter photos won't look very good. A perfectly taken picture can be “ruined” at the stage of recording it on a memory card, and the reason for this will be incorrect camera settings.
As we said at the beginning of the article, after shooting, the process of digital image processing in the camera begins. Many digital cameras allow you to:
Set the required level of light sensitivity of the matrix;
Automatically reduce image resolution;
Save pictures in a specified graphic format;
Reduce the amount of memory occupied by a photo on a memory card using compression algorithms (only when using the JPEG format);
Change the color saturation of the photo;
Change image contrast;
Change image sharpness.
The presence of such functions in a camera is not mandatory and depends on the class of the camera. Some cameras do not have such settings at all, while others have much more.
Now let's take a closer look at the purpose of each function.
SET THE SENSITIVITY OF THE MATRIX
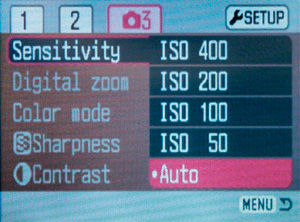 |
The amount of light required to obtain a high-quality photographic image depends on the sensitivity of the matrix. In most cases, the sensitivity of the camera matrix changes automatically. If the illumination of the subject is low, the camera automatically increases the sensitivity of the matrix, and vice versa.
More experienced amateur photographers can set the sensitivity of the matrix manually. By selecting the appropriate menu item, you will see possible options installations. For example: 100 ISO, 200 ISO, 400 ISO, Auto. As is the case with photographic film, increasing the sensitivity of the matrix leads to a deterioration in image quality. The noise level increases. But in low light conditions, sacrifices have to be made. It's better to get a low-quality photo than not to get one at all!
In reality, changing this setting does not change the sensitivity of the matrix. Only the algorithm for processing the signal received from the matrix is changed and it is artificially amplified. Simultaneously with the useful signal, image noise also increases.
ADVICE!
- If possible, try to shoot with the minimum sensitivity value of the matrix. It is with this setting that the image quality will be maximum.
If the subject is stationary, it is better to use a tripod and longer shutter speeds than to increase the light sensitivity of the sensor.
Use higher ISO settings only when fast shutter speeds are required in low light levels. For example, when photographing people indoors.
SELECTING IMAGE RESOLUTION
Let's say you purchased a five-megapixel camera. A photo taken with such a camera will have a resolution of 2560x1920 pixels. Multiplying these values, we approximately get 5 million dots (pixels) - the number of effective pixels of the photosensitive matrix of the camera. An image of this size takes up quite a lot of space on the memory card. For the same reason, such large pictures are not very convenient for sending. by email(E-mail). This means that if you are shooting solely to send pictures to a friend via E-mail, such a high resolution is not required! Camera manufacturers have foreseen this situation and “taught” their cameras to shoot at a lower resolution. Using the menu you can reduce the resolution of pictures.
Is it always worth shooting at maximum resolution? On the one hand, yes, by shooting at maximum resolution, we get pictures of the highest quality that this camera is capable of.
Subsequently, you can always painlessly reduce their resolution on your computer. But processing pictures on a PC will take some time. It’s good if there are few pictures, but if there are a hundred or two of them. How much time and effort will this require?
Knowing that the pictures will not be printed on paper and a high resolution will not be required, you can choose a lower resolution, for example 1280x960 pixels. The image size has been reduced, which means you can take significantly more photos on the same memory card! This is another argument in favor of shooting at a lower resolution.
If you decide to change the resolution, turn the camera into shooting mode and press the MENU button. One of the top menu items will probably be: “Image size”, “Size/quality”, “Recorded Pixels” or something similar. Select the required resolution and click “OK” to confirm your selection.
Unfortunately, not all cameras allow you to change the resolution of pictures. For some models, the image resolution changes when you select the “high-quality”, “standard” or similar option in the “image quality” menu section. You can find out what is hidden behind these abstract inscriptions in the instructions for your camera. Sometimes these options change the image recording format, sometimes the degree of compression, and sometimes both parameters.
ADVICE!
- If you plan to print pictures on paper with a format of 10x15 cm or larger, take photographs with the maximum resolution, such that the product of the number of dots on the sides of the frame approximately corresponds to the number of pixels of the camera matrix.
A resolution of 640x480 or 800x600 pixels is suitable for email, but the quality of pictures printed on paper will be very low.
By lowering the resolution, you can take more pictures on one memory card.
As a rule, the resolution of pictures is displayed on the LCD monitor and display of the camera in shooting mode.
When using the digital zoom function, the resolution of pictures may be automatically reduced.
If, by multiplying the number of points on the sides of the image, you get a value that greatly exceeds the number of pixels of the matrix, then this is an option to increase the image resolution using interpolation (adding new pixels using a digital image processing algorithm). It is better not to use this resolution when shooting; the pictures will take up more space on the memory card and their quality will not improve.
SELECTING A GRAPHIC FORMAT
What is a digital image recorded on a memory card? This is a sequence of numbers indicating the brightness and color of each point in the image. And what does it represent Text Document, written to disk? This is also a similar sequence of numbers, only now they denote not brightness, but different letters of the alphabet, punctuation marks, etc. But how can the computer, and with it you, tell what this or that file is - perhaps it is text, perhaps a photograph, and perhaps a video! In order to facilitate this task, the extension is written after the file name - 3 or 4 letters, conventionally indicating the file type. Thanks to them, the computer knows what kind of file it is and what program can be used to open it.
Improvements in methods for recording graphic information have led to the emergence of many different standards or formats. Each graphic format has its own image recording features and its own extension. There are dozens of graphics formats today, but only 4 are used in digital cameras! These are: TIFF, JPEG, RAW and in extremely rare cases GIF.
 |
The “RAW” setting corresponds to recording in this format, the “Super fine” setting corresponds to the TIFF format. The remaining options control the degree of compression of the JPEG image.
The TIFF (Tag Image File Format) format was proposed in 1986. It was intended for storing black and white scanned images. Since then, the format has been improved several times, and today there are about 6 modifications. The file of this format has the extension - TIF.
A special feature of the TIFF format used in digital cameras is that pictures saved in this format are not processed by any compression algorithms to reduce the file size. A photo saved in this format will have high image quality and a large file size.
Approximately, the file size will be equal to the number of pixels multiplied by 3. For example, a TIFF file made at maximum resolution with a five-megapixel camera will take about 3x5,000,000 = 15,000,000 bytes or about 15 megabytes on a memory card. But this file will not only take up a lot of space on the memory card, the duration of recording such a large amount of information on the card can take several tens of seconds. This means that serial shooting in this mode will not be available.
The second widely used JPEG format. In 1987, through the efforts of ISO and CCITT, the Joint Photographic Experts Group (abbreviated JPEG) committee was created. The Joint Group of Photography Experts (this is how the name of the organization is translated) began developing a standard for compressing graphic data.
The format for recording graphic images, created on the basis of the developed compression standard, became known as JPEG. As you may have guessed, this format differs from TIFF in that it uses information compression methods. Thanks to them, the image takes up a significant less space on the memory card than the same photo in TIFF format. A photo from a five-megapixel camera will only take about 2 megabytes. That is, almost 8 times smaller than a similar image in TIFF format.
The JPEG format has two features. Firstly, it allows you to adjust the degree of compression (which can be done with a camera, but more on that later). Secondly, when an image is compressed using this method, the original graphic information is lost and distorted. Visually, the image quality deteriorates slightly.
Quite conventionally, the third recording format can be considered RAW. Why conditionally, you ask. The fact is that such a recording format really exists; it was developed by Adobe. But digital cameras do not use this format at all.
RAW is not an abbreviation, as is the case with the two previous formats, but a word with a specific translation. In Russian RAW means raw. By saving images in this format, the camera performs minimal image processing. The information received from the matrix is digitized and almost immediately recorded on a memory card. As you might guess, the size of the image file in this case will approximately correspond to the resolution of the camera matrix. However, this does not always happen; some cameras, when saving images in RAW format, use a higher bit rate. This improves image quality and increases file size.
A RAW file is a kind of raw material. Before this image can be used for printing or any other purposes, it must be processed on a PC (using a special converter program) and then saved in some other graphic format, such as JPEG or TIFF.
As a rule, programs that convert images allow you to edit the image: set the white balance, the required level of sharpness, contrast, color saturation, etc. The result of such processing will be consistent with the use of similar camera functions.
Each digital camera manufacturer uses its own RAW format. Photos taken in RAW format with different cameras will have different extensions and will not be compatible with each other. RAW files made with a Canon camera have the extension CRW, Nikon - NEF, Minolta - MRW, Fujifilm - RAF, Olympus - ORF, Kodak - DCR. More recently, Sony has also developed its own RAW format.
The fourth graphic format used in digital cameras is GIF (Graphics Interchange Format). The scope of its application is very specific - the creation of animated images. The camera takes several pictures, which are then saved in one GIF file. The result is something like a video film made up of several frames. This format is used mainly in Sony digital cameras.
Reading the instructions from the camera or advertising brochure, you can see that the camera uses EXIF graphics format with some version number. The EXIF format is not really a graphics format, it is just a standard for recording information about shooting conditions in an image file. The list of information embedded in a graphic file can be different; as a rule, by reading EXIF information, you can find: the name and model of the camera with which the picture was taken, the date and time of shooting, the shutter speed and aperture value, the method of determining exposure, the focal length of the lens, the type color space used.
ADVICE!
- All amateur cameras can save pictures in JPEG format. But other formats are available only in the most advanced of them.
When taking photographs for family photo albums, the Internet, and entertainment, use the JPEG format (most of the illustrations in this article were made in this format).
If you plan to display your photos in a photo exhibition or magazine, it is better to use TIFF or RAW format. The image will be of the highest quality, since it will not be “distorted” by the compression algorithm.
Using the RAW format in practice is not very convenient, since it takes time to convert images on a PC.
Editing pictures in graphic editors leads to loss of EXIF information. The only exceptions are latest versions graphic editors.
You can read EXIF information using the software included with the camera, image viewing programs (for example, ACD See), some graphic editors, and also using special EXIF reader programs.
Download free program To read EXIF information in English, please visit http://www.takenet.or.jp/~ryuuji/minisoft/exifread/english/
COMPRESSION RATE OF IMAGES
Some cameras allow you to adjust the compression level when saving images in JPEG format. This option is located in the camera menu, next to the options for selecting image format and resolution. And sometimes, as mentioned above, it is combined with them. Typically, the “Quality” menu option allows you to set one of three compression levels: “Fine” (excellent image quality), “Normal” or “Standard” (normal or standard quality), “Economy” (economical).
 |
It’s easy to guess that the “Fine” setting corresponds to the maximum image quality, which means the degree of compression is minimal. The file size will be approximately equal to 1/2 the resolution of the camera matrix. For example, a five-megapixel camera has 5,000,000 million pixels, which means the image size will be 1/2 of this value - 2,500,000 bytes or about 2.5 MB (megabytes).
When shooting at a medium image quality setting, the file size will be approximately 1/4 the number of pixels.
The Economy setting corresponds to the maximum compression ratio. The image will have a small file size (about 1/8 of the matrix resolution) and relatively low image quality.
ADVICE!
- If you are interested in taking as many pictures as possible on one memory card, and subsequently plan to print the pictures in the 10x15 centimeter format, then save the pictures in JPEG format with the maximum resolution and maximum degree of compression - “Economy”.
With a print format of 10x15 centimeters, the difference between photographs taken with different degrees of compression is almost invisible to the eye.
The size of the image file after compression depends not only on its degree, but also on the subject of the image.
In an effort to capture as many high-quality frames as possible on one memory card, use a high resolution and strong compression, and not vice versa. The quality of photos taken from files of lower resolution and with minimal compression will be worse!
Even with the maximum image quality in JPEG format, some information about the subject is lost and some distortion occurs.
ADJUSTING COLOR SATURATION
 |
Some digital cameras allow you to adjust the saturation of your photos. Typically, you can choose one of three saturation options: maximum, medium, or minimum.
Sometimes in the same section of the menu there is a “black and white” image item. Which setting to choose is a matter of your taste. But no matter what saturation you shoot with, you can enhance or, conversely, eliminate the impact of the settings using a PC.
ADJUSTING THE IMAGE CONTRAST
Similarly, as with color saturation, some cameras allow you to set one of three options for image contrast: maximum, minimum and normal. Images taken at a medium contrast setting tend to look less impressive. Such photographs have less contrast than photographs taken from film. Therefore, increasing the contrast in most cases makes the image more attractive.
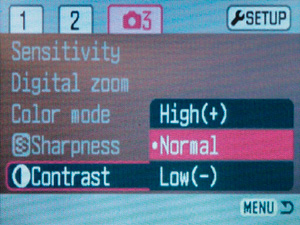 |
In many ways, the need to change this option can be determined by the shooting scene and its contrast. When shooting particularly high-contrast scenes, you may need to reduce it using the appropriate setting, and vice versa. Low-contrast objects will appear more attractive when the image contrast is increased.
If you are an experienced photographer and know how the photographic latitude and contrast of the image are adjusted when using black and white photographic materials, then pay attention to the fact that changing the contrast when shooting with a digital camera has virtually no effect on the photographic latitude of the image.
ADJUSTING IMAGE SHARPNESS
It turns out that the sharpness of an image obtained with a digital camera depends not only on focusing accuracy, but is also adjusted using a special option.
Setting the image sharpness higher or lower activates a special digital image processing algorithm. Locally increasing the contrast of pixels at the boundaries of dark and light areas makes the image visually sharper.
 |
ADVICE!
- Changing the sharpness of the image may result in unattractive white outlines appearing around dark parts of the image. Therefore, in most cases it is worth shooting with a medium setting.
By shooting with higher or lower saturation and contrast, you can always completely eliminate the impact of these filters by editing them on a PC. It is impossible to completely eliminate the effect of the “Sharpness” filter!
If you will be printing photos without adjusting them on a PC, it is worth setting the image contrast to a higher value. The photos will look more like those printed from film.
Perhaps each person has his own requirements for image sharpness, contrast and saturation. So shoot with different settings to find the ones that work best for you.
If you forgot to install desired value saturation or contrast, increase or decrease sharpness - no big deal! You can achieve a completely similar result using a PC.
WHITE BALANCE
The next important setting to pay attention to before shooting is white balance. The quality of color rendering in photographs depends on how correctly this option is installed.
If you have taken a lot of photographs with film, you have probably noticed that photographs taken at home in the evening without using a flash turned out orange-red. The reason for this lies in the spectral composition of the radiation (color temperature) of incandescent lamps (ordinary light bulbs that are screwed into your chandelier). It is the orange-red rays that dominate the emission spectrum of these lamps. The human eye easily adapts to lighting conditions and stops noticing them. But photographic films and the camera’s light-sensitive matrix are not able to adapt, so significant color distortions appear in photographs. The “white balance” function allows you to avoid this kind of distortion associated with deviations in the spectral composition of lighting.
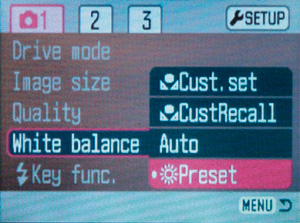 |
There are several white balance operating modes: automatic, manual and various presets - sun, shade, incandescent lamps, fluorescent lamps various types and so on.
Auto White Balance continually attempts to track the color of dominant rays and adjust their impact. However, the automatic system may make mistakes. Let's say you are photographing a portrait close-up, the face occupies the entire field of the frame. Analyzing the image, the system notices that the entire field is dominated by pink color(complexion), the camera thinks that this is caused by the spectral characteristics of the lighting and tries to eliminate the pink cast. As a result, the complexion becomes colder. A system designed to improve color reproduction worsens it. But this is most likely the exception rather than the rule. The auto white balance function is effective in most cases and does its job well.
By selecting one of the presets, you tell the camera what kind of light source is lighting your subject. Using the information stored in memory about which rays dominate the light of such a source, the camera corrects the color rendition. Unfortunately, artificial light sources have quite different spectral characteristics, and there are many more of them than the number of camera presets. Therefore, presets can only correct very gross color distortions. One or another color shade may still be present in the photo.
The most accurate color reproduction is ensured by manually setting white balance. To set white balance manually, take a piece of white paper and place it in place of the subject you are photographing. Then point the camera at the sheet so that it fills the entire frame. Now activate manual white balance and press the shutter button to confirm your selection. The camera analyzes the resulting image and determines how the color rendition needs to be adjusted in order for the sheet to turn out white. If white turns out white, then all other colors will be rendered correctly.
ADVICE!
- Automatic white balance provides fairly good color reproduction for amateur photography. So if you are a beginner, you can confidently shoot with this setup.
If color accuracy is extremely important to you, set the white balance manually.
When photographing under artificial lighting and wanting to achieve more correct color reproduction, set the appropriate white balance preset.
By default, white balance is performed automatically by the camera.
By using a colored object instead of white when manually setting white balance, you can achieve interesting color distortions. This trick can be used to take unusual, artistic shots.
Many cameras forget to manually set white balance when turned off. Therefore, after turning on the camera again, you will need to repeat the installation procedure.
If you often use manual white balance, put a sheet of clean white paper in your camera case! You already know why you need it.
LET'S START SHOOTING!
Once you've made sure your camera settings are correct, you can start taking pictures! If you are suddenly confused by the number of installations required, and you think that digital technology is too complicated for you, don’t worry! All necessary settings are made by the camera manufacturer and are activated when the camera is turned on. Most likely, they will be the following: maximum shooting resolution, saving images in JPEG format with maximum quality, normal contrast, image saturation and sharpness, automatic white balance and automatic change in light sensitivity. So immediately after turning on the camera you can start shooting!
CROPPING THE IMAGE
Having decided to take a particular frame, the first thing you need to do is think through the composition of the picture and determine the boundaries of the frame. All modern amateur cameras allow you to use the LCD monitor as a viewfinder. The monitor displays about 100% of the frame area, and it is most convenient to use it to determine the boundaries of the frame.
The zoom feature greatly expands the photographer's creative capabilities. You can change the image scale in the frame without changing the shooting point, and photograph distant objects. In addition to optical zoom, many digital cameras have a digital zoom feature. Typically, this function is automatically activated when the lens reaches its maximum focal length. The algorithm for this function is simple. To increase the scale, the camera begins to enlarge the central part of the image received from the matrix to the size of the full frame, using an interpolation algorithm. It is quite obvious that the quality of the image obtained using digital zoom will decrease in proportion to the magnification factor.
Having achieved the desired arrangement of the composition elements in the frame, you can press the shutter button, but not all the way, but only halfway!
ADVICE!
- If you are afraid that the camera's batteries will run out before you take all the necessary shots, turn off the camera monitor and use the optical viewfinder to determine the boundaries of the frame. This will reduce the camera's power consumption and slightly extend the battery life.
The optical viewfinder will also be more convenient when shooting in sunny weather. In bright light, the image on the camera monitor is very dim, and it is very difficult to make out anything on it. The only exceptions are the monitors of some cameras, which are made using special technology and use the light falling on them to increase the brightness of the image.
Cropping and zooming on a PC will give the same result as digital zooming.
If image quality is important to you, don't take photos using digital zoom.
Remember that the image seen through the optical parallax viewfinder is different from the image that appears in the photograph. To see this difference and take it into account in the future, hold the camera still and compare the image visible on the monitor with the image in the viewfinder.
Many cameras adjust the brightness of the image on the monitor in proportion to the brightness of the image. Therefore, if the image on the monitor seems too light or dark to you, pay attention to the correct exposure parameters (shutter speed and aperture values).
In case of mechanical damage to the camera monitor and LCD leakage, immediately wash your hands with plenty of water. Do not allow liquid to get into your eyes or mouth. The substance used in LCD monitors is quite poisonous!
The Electronic Viewfinder (EVF), like the LCD monitor, consumes power, so using it will not result in significant energy savings.
Focusing, determining exposure parameters and shooting
When you press the shutter button halfway, the camera focuses and measures the exposure. All these procedures are practically no different from similar actions when shooting with a film camera. Therefore we will not dwell on them detailed description. You can find it in the summer issue of Consumer magazine in an article entitled “Learn to Photograph.” But digital cameras have one function that greatly facilitates the process of determining exposure - a histogram.
bar chart
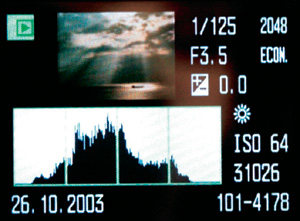 |
When looking at a photo you just took on the monitor of a digital camera, it is difficult to determine how correct the exposure was, which parts of the image have good detail, and which parts turned out to be too dark or light. The brightness and contrast of the image on the monitor depend on many factors: technical characteristics the monitor itself, the settings installed, the angle at which the monitor is viewed, the brightness of the light falling on it. The impression that exposure is correct can be very misleading.
The histogram gives an accurate idea of how correctly the frame was exposed.
A histogram is a bar chart that displays the ratio of pixels of different brightness in a digital image. The horizontal axis of the histogram is the brightness axis. The left edge of the axis corresponds to the minimum brightness (black), and the right edge corresponds to the maximum brightness (white). The vertical axis shows the relative number of pixels of a given brightness. The higher the vertical line, the more pixels of a given brightness are in the image.
By looking at the image and its histogram, you can tell for sure whether the frame in question is overexposed or underexposed, and which parts of the image are well-developed and which are not.
The frame is dominated by dark tones and no light ones. To correct it, you need to increase the shutter speed, decrease the aperture number, increase the sensitivity of the matrix, or set exposure compensation with a “plus” sign.
Light colors dominate the frame and there are no dark ones. To correct it, you need to reduce the shutter speed, increase the aperture number, reduce the sensitivity of the matrix, or set exposure compensation with a minus sign.
The frame contains pixels of all brightnesses. A decrease in the number of pixels to the right and left edges of the histogram indicates good detail development, both in highlights and shadows.
Some digital cameras allow you to see the histogram only after you have taken the photo and saved it to the memory card. Other, more advanced models are capable of displaying a histogram before taking photographs, during sighting. This makes it possible to judge the correctness of exposure parameters even before taking photographs, which allows you to completely avoid exposure errors.
LET'S SEE WHAT HAPPENED!
One of the greatest advantages of a digital camera is the ability to view the photo you take immediately after taking it. Switch the camera to playback mode and see what happens.
Looking at the image of the photograph on the camera monitor, almost nothing can be said with certainty! It is almost impossible to objectively judge the sharpness and brightness of an image. But many cameras have two special modes that make this task easier. The first is a histogram. Thanks to it, you can evaluate the accuracy of the exposure with 100% confidence.
The second useful mode is to zoom in while viewing. Press the zoom button on your camera and the image on the monitor will be enlarged. By zooming in as much as possible, you can view different parts of the photo by pressing the multi selector. Now we can draw a conclusion about how sharp the photo turned out.
If the photo is not very good, you can delete it and photograph the scene again.
ADVICE!
- Of course, looking at the image on the monitor, you can guess how correctly the shutter speed and aperture were set when shooting. But this opinion may be extremely erroneous. When assessing brightness, you can only trust the histogram!
If the photo turns out dark (the peak of the histogram is located in its left part), then switch to shooting mode, enter positive exposure compensation and photograph the scene again.
If the photo turns out to be light (the peak of the histogram is located in its right part), then switch to shooting mode, enter negative exposure compensation and photograph the scene again.
Blurry pictures can be deleted immediately; it will not be possible to significantly increase their sharpness on a computer.
If you want to take a few more pictures, but the frame counter shows “0”, try increasing the compression level or reducing the shooting resolution. You may have 2-5 more frames left. Or free up some space on your memory card by deleting uninteresting pictures.
For greater convenience when viewing pictures, you can connect the camera to a TV and view the pictures on the big screen.
When taking photographs, do not get carried away by viewing the pictures taken. After all, while watching, batteries are depleted.
ADDITIONAL FUNCTIONS IN VIEWING MODE
Don’t think that a digital camera only allows you to view the pictures you have taken. The number of additional functions depends largely on the characteristics of the camera. By switching to viewing mode, in addition to the functions mentioned, as a rule, you can:
Specify DPOF printing options. Digital Print Order Format - a standard for ordering digital printing using digital cameras. While viewing, you can specify which pictures and in what quantity need to be printed, order the printing of thumbnails of all pictures on one or several sheets (index print). After marking the photos you want, remove the memory card from the camera and install it in a photo printer that supports DPOF, it will automatically print the specified photos in the required quantity.
Flip the photo 90, 180 or 270 degrees. To avoid having to turn your head when viewing portrait photos, flip them to the desired position using this function.
Set protection against deleting pictures. This feature allows you to protect your most valuable pictures from accidental deletion. If you later try to delete this picture, the camera will display a message - the picture is blocked.
View photos in slide show mode. In this mode, all taken pictures are displayed one by one on the camera monitor (or TV screen if the camera is connected to it) at a specified time interval.
Make a copy of the photo at a lower resolution. If you want to not only print the photo, but also send it to friends by email, make low-resolution copies of the photos.
Format the memory card. If you have used floppy disks for PCs, then you probably know what formatting is. In a similar way, you can format a memory card using a camera. Formatting may be required if you have used the memory card in some other device and the camera refuses to read such a memory card.
ADVICE!
- Unfortunately, many digital photo laboratories have stopped accepting orders for printing in DPOF format (this was done to avoid errors when ordering prints).
Snapshot deletion protection writes the file attribute "Read only". To delete such a picture using a camera, you must first remove the protection.
Formatting a memory card will delete all information recorded on it, including protected images.
If you try to delete a protected photo using a PC by connecting a camera to it, the computer will ask you if you really want to delete this file. If you agree, the photo will be deleted.
You can use the formatting function of a memory card to quickly delete all information from it.
Your PC may not use the same file system like in a camera. Therefore, the camera may not “understand” memory cards formatted using a computer.
If you inserted a memory card and the camera refuses to work with it, try formatting it in the camera.
SHOOTING IS COMPLETED, WHAT'S NEXT?
When taking photos, you will sooner or later fill up all the memory on the card. Well, if you have one or more cards, you can continue shooting on them. But quickly enough they will be filled. What to do next with digital photos? It all depends on your needs. Most likely, you will want to save the photos digitally, such as on a CD, and print them. You can copy pictures onto a CD-R disk and print them without using a PC.
Recently, many digital devices have appeared that can read information from memory cards. But the participation of the computer at this stage significantly expands your capabilities. On your computer, you can improve the quality of your photos, sort them, create a digital photo album, and much, much more. In a word, a computer is an indispensable assistant for a photographer who shoots with a digital camera. Therefore, the first thing you need to do in most cases is to copy the pictures to your computer's hard drive.
CONNECTING THE CAMERA TO THE PC
 |
This is perhaps the easiest way to transfer pictures to a computer. Everything you need for this is included with the camera.
The first digital cameras were connected to a computer's COM (serial or communications) port. But using this port had two big drawbacks. Firstly, to connect, it was necessary to turn off the power to the camera and computer.
Secondly, the COM port did not provide high speed information transfer. Copying 8 MB of information (4 pictures in JPEG format) took about 15 minutes.
 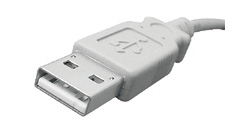 Standard USB plug Standard USB plug
|
Today, a mouse and a modem are sometimes connected to this port, but it is no longer used to connect digital cameras.
The second port to which the camera can be connected is USB (Universal Serial Bus). The USB standard was officially approved in 1996, and in 2001 a new, faster specification, USB 2.0, appeared. Today, almost all personal computers have a USB port.
If you have an old PC and no USB connectors, no problem. It is enough to purchase a USB controller for 200-500 rubles and install it in the PCI slot of the computer motherboard. Just before purchasing, you should make sure that there is a free PCI slot in your computer.
Even faster FireWire (IEEE 1394) data port. Only now it is implemented mainly in professional devices. Therefore, we will leave it outside the scope of this article.
To connect the camera to the USB port, use the included cable. The camera and computer can remain turned on while connected. If necessary, turn on the PC connection mode on the camera.
     |
After this, a message should appear on the monitor of a computer running Windows XP.
The Found New Hardware Wizard window will then appear.
When you see it, install the disc that came with the camera into your computer's CD-ROM drive. If your camera comes with multiple drives, select the one that says “USB Driver” and click the “next” button. The computer will begin searching the CD for the required driver.
If the search is successful, a driver installation window will appear on the screen.
Once the installation is complete, click the “Finish” button in the window that appears.
An information window will appear on the monitor to confirm successful installation.
A couple of seconds after this, a window will appear with a choice of actions for the new “removable disk”. Here you can select the action you want, but the best place to start is to copy the pictures to your computer's hard drive. This can be done either automatically or manually.
If you only want to print the pictures, select the top option and click the “OK” button. The photos you select next will be printed, but the images themselves will remain on the memory card. If you want to copy photos to your PC automatically, select “Copy images to this computer” and follow the computer’s prompts. More experienced users can select the "Open folder to view files using Explorer" option. After confirming the selection, a window with the contents of the disk will appear on the screen.
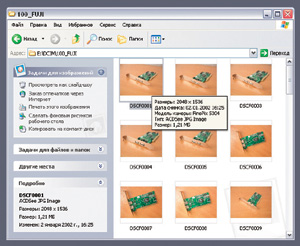
According to the DCIF standard, all digital cameras create a “DCIM” directory on the memory card. If you see other directories, ignore them, the photos are stored deep in the “DCIM” directory. When you open this folder, you will see another subdirectory, the name of which contains a three-digit number, an abbreviation for the name of the digital camera manufacturer, and, possibly, another number. This folder contains your photos!
We open it and see the thumbnails of all the pictures. By hovering the cursor over a file, you can see its size in pixels, the date and time it was taken, the name of the camera model, the file type and the default program used to open it, as well as the size of the image on disk.
Now you can select the files you need and drag them to the desired directory on your hard drive “C”. You can also directly burn images to a CD by selecting the “Copy to CD” option on the left side of the window.
ADVICE!
- When connecting the camera to a computer with a different operating system, you will have to perform approximately the same steps, but their order and path may be different. For more information about this, read the instructions for the camera.
Some cameras may require you to install software and restart your computer first. Only after this the camera will be recognized by the computer.
Some older models may not be recognized by the computer as a removable drive. The TWAIN interface of such a camera only works in conjunction with any graphics editor. To save images, you need to launch the graphic editor, select the “import” option, and then the required TWAIN device (this interface is mainly used when working with scanners). After which a window with thumbnails of the pictures will appear on the screen. The selected images will be opened in the graphic editor, and only after that they can be saved to your hard drive using this option of the graphic editor.
When connecting a modern camera to a computer with an outdated operating system, and vice versa, when connecting an outdated camera to a new OS, you may encounter an insurmountable problem of missing or inoperable driver. In this case, it will be easier to use a card reader to copy pictures than to connect the camera to a PC.
Some digital camera drivers come standard with Microsoft Windows XP. When you connect such a camera, it will be almost instantly recognized as a removable disk, without the need to install a driver from a CD.
If the driver is not automatically found by the computer on the CD, try installing another disc that came with the camera. Or try starting the driver installation using the menus that automatically appear on the screen when installing the CD.
Before transferring pictures to a PC, make sure that the camera's batteries are not exhausted, or connect the camera to network adapter. Turning off the power during transfer may result in lost pictures.
CARD READERS AND ADAPTERS
You don't need to connect your camera to copy pictures to your PC. You can use a card reader - a special device for reading and writing information onto memory cards of various formats.
Card readers in most cases are connected to a USB port. They are a small device with slots for one or more types of memory cards.
In addition to external card readers, there are also internal ones, installed in the computer system unit next to or in place of the disk drive.
To copy pictures, you need to remove the memory card from the camera and insert it into the card reader. The card is recognized by the computer as a removable disk, you already know in which directory on the memory card to look for pictures, you can start copying.
Another type of device for copying information from memory cards to a computer is various adapters. The adapter allows you to install a memory card in place of any other removable storage media. There are two types of adapters that are most common. The first allow you to read information from cards using a 3.5” floppy drive. Almost all computers have a disk drive for reading them. Another type is PC Card adapters. They make it easier to copy pictures to your laptop.
Almost all laptops are equipped with a PC-Card reader slot. In addition, many modern laptops have slots for connecting certain types of memory cards directly, without the use of any additional devices.
There are also adapters that allow you to use one type of memory card in devices designed for another type. For example, adapters that allow you to use xD-Picture Card memory cards in CompactFlash slots.
ADVICE!
- Perhaps the most convenient way to copy pictures to a PC is to use card readers and adapters. They are always connected to the PC and ready to go.
In some cases, when installing a card reader, you will need to install the supplied drivers. Without them, the device may not work.
If you decide to purchase a card reader, give preference to universal devices that allow you to copy information from different types kart. Who knows what camera you will buy tomorrow.
DOCK STATION
Another possible intermediary in the way of copying pictures to a PC is a docking station. This device sometimes comes bundled with a digital camera, other times it must be purchased separately. The docking station is connected to the computer's USB port and network adapter. The device is always on the desk and ready for use. When you insert the camera into the docking station, it automatically connects to your PC and network adapter. The camera batteries begin to recharge, and pressing one button on the docking station starts the process of copying pictures to the PC.
Docking stations are produced exclusively by digital camera manufacturers for use with specific models. On the one hand, the docking station is a convenient device that simplifies charging batteries and copying pictures. On the other hand, using a docking station ties you to your workplace, because only here you can charge the battery and connect the camera to your PC.
 |
The most convenient cameras are those that have not only a connector for connecting to a docking station, but also an independent USB connector and a network adapter connector. This camera can be connected to a PC and a network adapter without using a docking station.
INSTEAD OF CONCLUSION
Well, we figured out the basic functions of a digital camera, took a few pictures and copied them to the PC. Then you can edit the pictures, prepare them for printing, create an electronic photo album, print the photos or post them on the Internet. But this is the topic of the next publications! Happy shooting!
Master's answer:
In life modern man The camera becomes an indispensable thing with which he can capture the beautiful moments of life. True, the latest models of equipment can be so complex that the user sometimes cannot even immediately turn on the purchased camera.
Before turning on the purchased camera, you need to leave it in the room for an hour so that the equipment warms up. At this time, you can unpack all the cables and check the disks that come with the kit.
The instructions included with the camera will help you quickly understand the operating features of the equipment. If the camera is foreign-made, the instruction manual may be written in a foreign language. Its Russian translation for a specific model can be found on the Internet. Often, the absence of instructions in Russian can be an alarming signal of low-quality equipment, because manufacturers with a good reputation always provide their products with instructions in the language of the country of sale.
Battery turn. Initially, it can be wrapped in special packaging, or inserted into the camera if the camera is checked in a store. The battery is placed in the charger and the equipment is connected to the network. Pay attention to the first charging time - the battery should be charged according to the time specified in the instructions. When using the camera for the first time, it is recommended to fully charge the battery.
To charge the battery, connect the camera to the computer using a USB cable in the absence of a special charger. A charged battery is inserted into the device, then a memory card purchased separately from the device. To do everything correctly, you should use the section on using additional removable media.
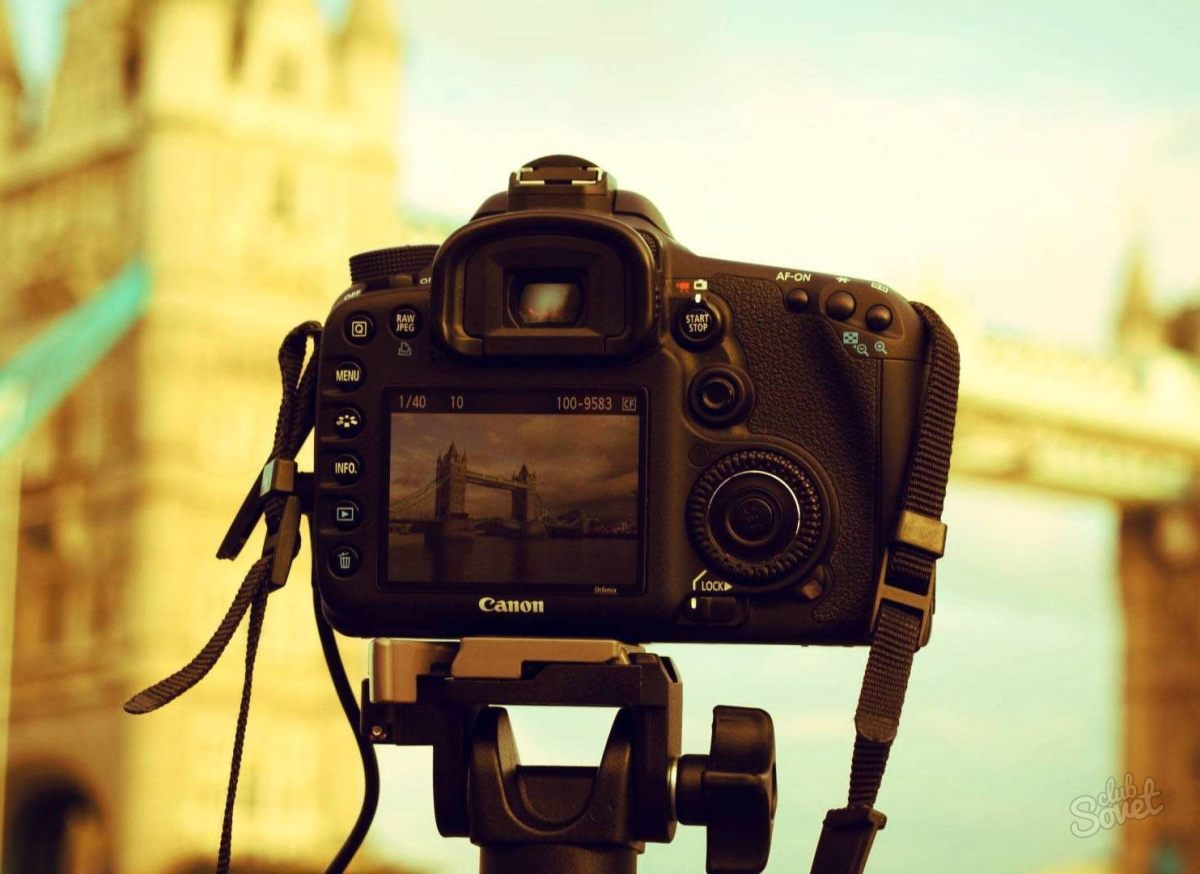
The device is turned on by pressing the button located on the device body. In most cases, the button is located directly under the index finger of the hand, on it is marked international designation. You need to make sure that when shooting, your hand does not fall into the area of effect of the device’s lens, since in most models this part extends.
After turning on, in digital models an image should appear on the screen. In the settings menu, select the “date and time setting” mode. After checking with the local time zone, set right time and date in the required format. If you check this box, the date and time will appear on photos.
The “sound” item allows you to set the sound of the shutter, shutter, turn on, etc. in the camera. This feature can be completely disabled.
With the mode set to “auto”, take test shots. Make sure the images are high quality and preserved. Adjust brightness, contrast and other settings based on the pictures you took.
A camera today is not just a household appliance, it has become an indispensable thing that helps capture the most vivid and unforgettable events of our lives. Modern models of devices can be so complex that it is not easy for a novice photography enthusiast to learn how to use and even initially turn on the purchased device.
Take your time to turn on your brand new camera. Bring your purchase home and leave it for a while so that the device warms up at room temperature for at least an hour. Check the contents of its packaging. Check the list of components for the list. Such a list along with instructions is usually found in the box. There will also be an installation disk with software, cables. It is important that the contents of the box and the list of accessories fully correspond. Sample set:- power supply (battery);
- Charger;
- memory card (if there is no built-in one);
- audio/video cable;
- USB cable;
- strap for comfortable carrying of the camera;
- lens cap;
- CD with software;
- instructions.
Sometimes the camera is equipped with rare accessories: a lens hood, stereo glasses, a ring for attaching a filter, etc.
First of all, read the instructions. The foreign model is accompanied by a description in several languages. The absence of an instruction manual in Russian is an unpleasant signal of dubious quality. Manufacturers of branded equipment care about consumers and always accompany their products with instructions in the language of the country to which they are supplied. Look for a translation on the Internet. There it is easy to find instructions for many models, even outdated ones.


Be sure to check the camera accessories in the store. The built-in memory card or the one included in the kit has a very small capacity, so immediately look for a card with sufficient capacity. If the charger and battery are not included, don't hesitate to purchase them. In very rare cases, a cover is included in the set. An irreplaceable item, it is worth purchasing additionally.


