Car alarm connectors. Installing a car security system yourself - where the connection is made. Connecting an alarm to a car with central locking.
A car protected by a security system is a guarantee of peace of mind. Purchasing the device does not cause any problems; it is much more difficult to connect a car alarm. Installing security on your car yourself has at least a couple of advantages: cost savings and the possibility of your own, atypical implementation, which can scare away potential crooks. Let's consider the sequence of actions during installation.
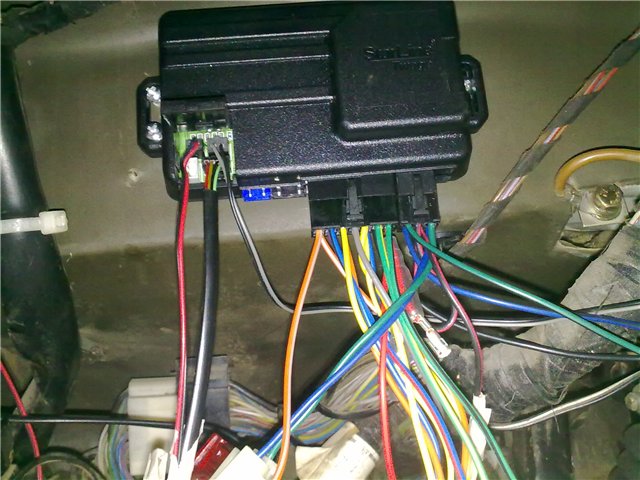
We decide on the location of the block, which can be anywhere. You should not install it behind the instrument panel or above the control pedals: this is where they look for it in the first place. It would be better to think a little, stretch the wires longer and find a non-standard solution. Next, we supply power, “minus” from any contact on the body, and “plus” from the battery or from the ignition switch. All connections are made according to the diagram supplied with the device.


Each car alarm always comes with detailed installation and electrical connection diagrams, making it easy to install yourself. It's even better to see the whole process on video.
Today’s article will be useful to all those who have decided to independently install an alarm system on their car; by the way, we read about how to choose one. For the most part, this procedure does not require special skills. However, if words such as “battery”, “soldering iron”, “polarity” don’t mean anything to you, then you probably shouldn’t read this article further, but it’s better to save your time and your car and entrust the installation of an alarm system to your car professionals. For everyone else who feels empowered and is ready to lie in incredible positions in their car, connecting the next alarm contact to the trouser wiring, it will be very useful to read how to install an alarm with your own hands, which is described below.
Advantages of installing a car alarm with your own hands.
I would like to immediately note the main advantage of installing a car alarm yourself: by installing it yourself, without outside advice, you will avoid installation templates that plague specialists who install it everywhere. After all, an attacker only needs to find out once on what principle, where and in what way the alarm unit and its auxiliary elements are installed, and the entire clientele of this master is at risk. And if we also take into account the fact that some modern car alarms involve disabling standard protective devices, then such an alarm, on the contrary, will not protect your car, but will help you get rid of it as quickly as possible.
Car alarm kit.
 So, let's see what we have at the initial stage: car - 1 pc., a box of a recently purchased alarm system - 1 pc. First, you need to study from cover to cover all the instructions and directions that the alarm manufacturer included in the box. For the most part, if this is, of course, not the nameless brainchild of a certain Chinese master, but a device from popular and well-known manufacturers, then you will find all the necessary information for installing an alarm with your own hands in the text and good illustrations.
Today, for example, the basic version of a car alarm with two-way communication usually has the following equipment:
- The alarm unit itself is a small box, slightly larger in size than a pack of cigarettes. This box contains all the hardware logic and power switches necessary to use the alarm. The small size of modern blocks makes it possible to hide the installation location of a given block in the most profound and difficult-to-reach way for an attacker. The most popular location for this device is under the dashboard. This location is, first of all, due to its inaccessibility, as well as the fact that most of the wires of standard automotive electrical wiring pass through this place, to which it will be necessary to connect.
- Antenna. There is nothing supernatural here, a small plastic box, most often with a built-in car alarm status indicator. The main requirements for its installation are to place it as high as possible and avoid contact with the metal of the body. In most cases, it is mounted under the interior rearview mirror on the glass. The cable supplying it hides perfectly under the headliner and under the decorative element of the right or left pillar of the body, and then goes directly to the block. On my own behalf, I will also add that before hanging the antenna and running the cable, estimate the length of the latter. Very often it is enough almost end to end, and an extra bypass of some obstacle can end, you know, not in the best way for you.
- Shock sensor. This is a block practically the same size as an antenna. On it you will see one or two LEDs, depending on the trigger levels, and one or two adjusting screws to adjust the optimal sensitivity of the sensor. It must be attached firmly to the car body and preferably closer to its center. The optimal location would be the gap between the two front seats, if, of course, it is possible to hide it there, and you have enough wire length for this.
- The control and programming button for the alarm unit is a small button with lead wires, somewhat reminiscent of the good old doorbell button, only reduced in size several times. It must be positioned optimally, conveniently for yourself, and most secretly for a potential attacker. Because thanks to it, knowing the brand of the alarm, you can quickly turn off the entire alarm without having to completely destroy the entire panel in search of the block. A word of advice: think outside the box. For example, as an option, it can be connected to an unused button, or installed in a regular place, of course, if your car is not fully equipped and all these regular places are occupied. Remember the best place to hide something - this is a place located in plain sight, but not giving itself away.
- Siren. You should recognize it immediately, it looks like a small loudspeaker. It is installed, for the most part, in the engine compartment. But its installation has its own small nuances. Firstly, it and the wire suitable for it should be inaccessible from below the car, and, secondly, it is advisable to place it with the horn tilted down so that the condensation that will form flows down and not into the horn bowl.
Basically, I listed the entire standard set of such car alarms. Of course, depending on the manufacturer and model, the box will also contain connecting elements, hood and trunk limit switches, relays for additional functions and interlocks, and much more.
After studying the car alarm itself, it is worth identifying where it is implanted in your car, or rather, studying the car’s electrical wiring diagram and finding the optimal connection points. Of course, there are many brands of cars and all manufacturers have their own characteristics, but the basic connection algorithm, in general, remains the same.
Alarm installation instructions.
So, first of all, you need to find places where the alarm unit is constantly powered. If everything is clear with the “minus”, this is the body of the car, then with the constant “plus” problems may arise. Look for it either among the ignition switch wires or, alternatively, you can run the wire directly from the battery.
Connecting a light alarm.
As for light signaling - this is blinking turn signals or low beam headlights, it is organized, as you probably already understood, in two ways.
- In the first case - connecting to turn direction signals, it is worth paying attention to the hazard warning switch; the wires of both sides of the turn signal converge directly in it.
- And in the second, when connecting to the main headlights, it is worth finding and understanding the contacts of the low beam relay. Moreover, it is necessary to connect not directly to the wire going to the headlight lamp, but to the relay control wire.
Connection to central locking.
 The greatest difficulties are usually caused by connecting to the central locking. The reason for this is the variety of designs of this device, its control polarity and other features. Modern car alarm devices take into account most of these features and offer various connection schemes. Carefully study the car alarm manufacturer's instructions and the electrical diagram of your car. The connection point will most likely be the central locking control unit, read. Its location is quite unexpected and not very convenient. So, in some cars you can connect the system to an existing interior central locking control button, which is located either on the center console or on the driver's door. And in some cars there may be no central locking or electric door locks at all, in in this case you will have to take care of purchasing such devices. Today, almost any car can be equipped with such a device, regardless of whether the car manufacturer provided such a possibility or not. Connecting it to your security system may also require purchasing additional relays, since the power switches installed in the security system unit itself may not be able to cope with the required load. Therefore, here you will have to remember the school physics course and understand the total current strength of electric locks and the permissible load in the alarm unit.
Connecting the trunk and hood limit switches.
Well, connecting the hood and trunk switches shouldn't be a big problem. Here you will either have to find the wires of standard devices and connect directly to them, or install the devices included in the kit and run wires to them.
Connecting door opening contacts.
But connecting to the door opening contacts can cause a problem, since such contacts can be combined directly in the interior lighting control unit. In this case, you should look for the connection point in the electrical diagram of this element, having studied it thoroughly, or, as a simpler and faster option, you can simply ask about its location on the forums of car clubs of your car brand. Most likely, this problem has already been solved long ago before you.
Connecting the siren, sensors and other wires according to the diagram should also not pose any special problems.
By the way, I would like to strongly recommend that you reliably isolate the connection points, and even hide the car alarm wires, disguising them as standard wiring. This, firstly, will protect you from a short circuit, and, secondly, it will not reveal where the car alarm unit itself is located.
Adjusting the shock sensor.
After connecting, you will still need to adjust the shock sensor. Its adjustment comes down to increasing or decreasing its sensitivity directly with the screws located on it. Try turning the screw and tapping the car with the palm of your hand, thereby determining the optimal sensitivity. After setting up the shock sensor, you may have to make changes in the programming of the car alarm unit itself. This is not difficult to do, following the manufacturer's instructions and your car parameters.
That's all. Now all you have to do is reinstall all the removed trim panels and enjoy the convenience and peace of mind that a car alarm will give you.
Each of us, car enthusiasts, has probably wondered more than once - how to make sure that my car is certainly not stolen! Well, the question is correct, but, unfortunately, a direct answer to it has not yet been found. Although there are many recommendations on the topic of how to protect your car from completely unwanted attacks, it seems that no one has yet been able to bring all these tips to a common denominator - this is too complex a task with many unknowns.
Meanwhile, in this already seemingly endless confrontation - the hijacker, on the one hand, and the owner and the authorities, as well as the security equipment installed on the car, the active links seem to be only the hijacker and the authorities (with a big stretch), and the owner, when disaster will befall him personally. The authorities rightly get punished for their inaction, however, we, car owners and potential victims, also prefer for some reason to passively remain inactive - until a certain bird pecks us in a certain place.
Many will object - why, at the first opportunity we equip our swallows with all kinds of security equipment, pay money for it, in general, we do what is required in our time. So it is so, just think about it - how does this happen in practice? And so - you come to an installation company, it doesn’t matter - a specialized one or at a car dealership, private or something else, and completely entrust the car to the specialists in the hope that the professionals know their business! Stop! They know, but do they use their knowledge for your car? This is where the same reserve, unused in 95 cases out of a hundred, hides, which will be discussed in this article.
Namely, by placing an order for the installation of security equipment, you thereby enter into an agreement according to which the company undertakes to install a security system on your car, and you undertake to pay for it. Of course, in most cases the configuration of this system is discussed in terms of what you want from it and how much it will cost. However, as a rule, this concerns service amenities - electric drives in the doors (or docking with a standard central locking system), closing windows when arming, automatic engine start in cold weather, etc. So what do you get? And everything is in accordance with this agreement - the doors close/open on command from the alarm remote control, the engine can also be started from the remote control, the windows obediently close when the car is armed, and the car, however, is practically not protected from theft. Why? Yes, because, out of ignorance, we don’t bother to discuss things that are really important for properly protecting a car from theft! Important in terms of counteracting theft, in terms of increasing the time required by professionals, only on the other side of the law, to steal your car. Because the theftability of a car depends less on the type and cost of the security system, and more on the work of installing it. From a creative approach, undoubtedly, but the professionalism of the installer plays the main role in this, for which we agree to pay our hard-earned money. So why not require installers to show this same professionalism?
Well, now we come directly to the most important thing - how professional installation differs from standard installation. Again, many naively believe that the problem is the quality of the electrical installation and professionally made connections to the car’s wiring. So to speak - so that it is reliable, sound and neat. However, this is not all - qualified and high-quality installation is important, but, I repeat, in the matter of protection against theft, this is not the main thing.
The main thing is the installation of modules and the implementation of locks. Installation should be as secretive as possible, and blocking should be as cunning as possible.
Let us illustrate these two simple points for this Installation using the example of a 2001 Seat Cordoba with an injection engine. This is a complete analogue of the well-known Volkswagen Polo. The simplest task is to install a security alarm - “so that it beeps/screams and opens/closes the doors” :-) Well, so that the windows close on their own when arming.
Let's start with something simple, with the fact that, as a rule, it does not depend on the type of alarm - with the installation of a siren. About the alarm itself we'll talk further. A siren is a simple device for notifying the owner and others (as potential witnesses) that the security system on a particular car has been activated.
Photo 1. It’s nice that you don’t have to think too much about where to put the siren - the place for it seems to have been specially prepared by the manufacturer - with right side, next to the expansion tank, behind the battery.
Look at the photo of the engine compartment - it is approximately clear where the siren will be mounted in the case of a standard installation. There it is, on the right side, next to the expansion tank, right on the standard screws.
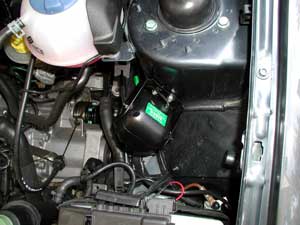
Photo 2. A siren mounted in a standard way (a cube made of impact-resistant plastic with a green sticker).
From the point of view of the quality of work - everything is in order - the engine is to the side, the siren does not interfere with anything, it is difficult to get to it from below, in a word, it will live happily ever after and will not be disturbed by warranty issues. But the owner of the car with such an installation can change, unexpectedly for himself. Because such a siren is too open and accessible. If this siren does not have its own battery (not autonomous), then it is neutralized by simply tearing off the wires, and if it is autonomous, then you also need to cut the wires, just not all, but the one that goes to control the siren, anyone who has ever held such a siren in knows in his hands which wire this is. It will take a little longer, but the siren will not disappear. Or you can simply drill it using a cordless drill with a long drill bit, but “of course, you feel sorry for the bird.” But car thieves do not stand on ceremony, as evidenced by the sad appearance of cars with traces of failed thefts.
Installers solve the problem of additional protection for such a siren, as a rule, head-on - at the expense of the owner. You will be offered a hood lock to make access to the engine compartment difficult. To be fair, for many cars such a measure is justified - after all, such a lock protects not only the siren, but also prevents the neutralization of locks made in the engine compartment. The trouble, however, is that opening such electric and electromechanical locks is not difficult, since manufacturers provide for their emergency opening using a special cable. The installers, of course, will try to hide this cable, but finding its location is not at all difficult, just by looking inside the engine compartment using a flashlight and a mirror with an extension cord.
Meanwhile, for any car there is a simpler, cheaper, and most importantly, effective solution - an additional siren installed in a hard-to-reach place, as shown in photographs 3 and 4. As they say, feel the difference! Do not forget to put a fuse in the connection circuit of the large siren - the alarm output will not burn out in the event of a short circuit along this wire.

Photo 3. Additional small-sized siren installed in a hard-to-reach place (circled in red). The siren body covers the wires that go to it, which go into the cabin through a rubber plug - getting to them from the engine compartment is a very difficult task.

Photo 4. Enlarged view of the additional siren.
Do not forget to require installers to install an additional siren in a hard-to-reach place.
Next - blocking. They are needed so that only the owner and no one else can start the engine. In the vast majority of cases, the fuel pump will be blocked in a car with an injection engine. The only thing weaker than such a blocking could be a starter blocking or a prehistoric toggle switch that turns off the ground. In many cars, it is not difficult to hear that the fuel pump is not working, as well as directly connecting it to the power supply using a pre-prepared piece of wire, from the cigarette lighter connector, for example.
Much worse for the “bad guys” would be controller blocking. In the simplest case, it is carried out via the “Ignition” circuit of the controller, but it is even better to block the engine via the circuit of one of the control signals or via the chain of vital sensors. The photo shows the place where the blocking was done, and the next photo shows the same place after the work was completed. Such a blockage does not give any indication of itself - when you try to start the engine, the starter turns, the fuel pump hums, but the engine does not start!
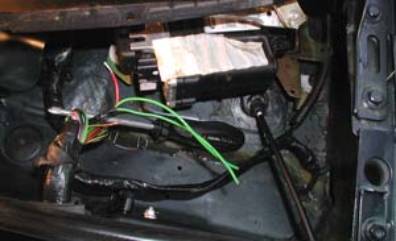
Photo 5. To get to the controller, you need to remove the wiper compartment grille. The wiring harness from the controller connector contains wires from sensors that are vital for engine operation. These wires need to be found and broken.

Photo 6. After all breaks are made, the wiring harness is wrapped with the same insulating tape that is used at the factory. The installer's intervention in the wiring should not be noticeable externally. In the red circle is the hood contact sensor (limit switch). The arrows indicate the screws that secure the siren, which is screwed from below to the shelf.
Require professional controller locking from your installers!
In order not to return to the topic of blocking, I will add that in extreme cases it is implanted into the controller itself! And some important wires on the connector and inside are soldered in places in such a way that replacing the controller with the same one prepared by the hijackers in advance will lead to its failure. The photo shows the board of such a radio-controlled “bug” (with a dynamic code) - again, at the limit (we are talking about aerobatics in an installation environment) without a radio command from its owner, this “bug” will not allow the controller to work for its intended purpose.
 Photo 7. Three-channel board for controlling external devices. Its small dimensions make it easy to integrate such a “beetle” into most modern car controllers.

Photo 8.
Next to the control board is a two-button control panel for it. The radio command coding algorithm is dynamic, KeeLog. The same remote controls are used to control alarm systems, which allows for so-called “double access” to the car. By pressing one button, the doors are unlocked and the system is disarmed. However, the engine can only be started by pressing the second button on the key fob. This access algorithm is better able to resist electronic hacking algorithms.
The radio channel allows you to do without additional wires altogether, but a simple low-power relay installed inside the controller case also ideally copes with this difficult task, only it is still easier to neutralize a regular relay due to the wired control circuit. To make life more difficult for car thieves, control of such a relay can be entrusted not to the alarm system, but to a combination of pressing the car’s standard buttons, for example, the radio button. After all, in a parking lot, one way or another, it is advisable to take the removable radio panel with you - and if you don’t even start the engine without it, then the benefit is double. This will be the so-called “secret” - undoubtedly, another effective means of combating theft as a phenomenon. If every car had something like this, how much would the bar for requirements for the level of “thieves’ qualifications” rise...
But all these interlocks will be worthless if the alarm unit itself is placed “open and accessible” in the car. The locks are controlled by the alarm. But in practice this is what happens - the alarm is mounted inappropriately somewhere under the steering column, or is simply tucked behind the sound insulation or dangling on a tie somewhere behind the safety box. The client won’t see it anyway in 99 cases out of 100!
But the hijacker will find it out of 100 cases in the same 99. And one single incident can prevent him from stealing a car. But it costs nothing to complicate his task by simply moving the alarm module from such a standard place to somewhere else. For example, in the luggage compartment, where you still need to get to! The photo shows part of the trunk with the trim removed. An autonomous power source is also visible, which is necessary to ensure full functioning of the alarm system in the event of the standard battery being disconnected. The additional battery is an alkaline maintenance-free battery, and the simplest decoupling of two diodes and a resistance is used as a switching and charging circuit.

Photo 9. Luggage compartment after installing the alarm (the arrow shows the place where it was hidden) and an additional battery (carefully wrapped with a special white noise, marked with a red dot).

Photo 10. It’s hard to believe in the previous photo that there is an alarm module hidden behind the vertical shelf, right? This photograph was taken especially for the distrustful - the alarm module is clearly visible from this angle.
Of course, installing an alarm module in the trunk compartment (or under the trim of one of the doors, for example) requires laying a new wiring harness, as well as additional camouflage measures - the wires coming from the LED, the toggle switch for activating the anti-burglary algorithm - must be laid in standard harnesses, which To do this, they are cut and, after laying, wrapped with the same insulating tape that is used in this machine at the factory. This does not allow you to simply track the location of the block using an LED, for example. The same is done for the remaining wires to the alarm - nothing should indicate their presence (see photo 15).

Photo 11: Most auxiliary alarm connection points are usually located in the wiring harness in the sill on the driver's side of the door.

Photo 12. The easiest way to find the wires from the standard door limit switches is by unscrewing the limit switch.

Photo 13. On the connector block, which is located behind the fuse strip, there is a wire (marked with a red arrow) that is responsible for controlling the standard central locking. When ground is applied to this wire, the locks close, but from a potential of 12 volts, on the contrary, they open.

Photo 14. The window control module, or the so-called “window closer,” in accordance with the general concept of installation work, is hidden directly in the driver’s door. This place is both difficult to access and also unexpectedly convenient - the wires are short, and only two conductors pass from the door to the salon - for 12 volts of power and for the control signal.

Photo 15. All wires leading to the alarm are carefully wrapped in a standard factory wiring harness - the task is to hide any traces of outside interference. Sometimes this requires disassembling half of the interior, but, fortunately, not always.
The concept of hidden installation implies the appropriate placement of all alarm modules without exception. This applies to the power window control module (photo 14), and especially to the sensors. Sensors are the eyes and ears of any alarm system. It is a common belief that car thieves first of all try to disable the siren so that it does not “distract” them with its sound and does not interfere with their concentration on the task of bypassing the locks, after solving which they can start the engine and drive away in an unarmed car under their own power. But in order to silence the siren, it is not at all necessary to open the hood - you can disable the alarm sensors. Without receiving alarm signals from sensors, the system will not be able to detect and record an intrusion. After all, the alarm notifies about the fact of an intrusion cyclically - interrupting the alarm trills of the siren over and over again to poll the sensors, and if they are located accessible, the siren will not work for more than one cycle, with this installation, and this is only 30-60 seconds of alarm. That's why installing sensors is as important an operation as anything else. At the same time, you still need to take care of the possibility of adjusting the sensitivity level in the future. Photo 16 shows one of the installation options for the most common sensor - the so-called shock sensor. Isn't it true - an original solution :-)

Photo 16. The shock sensor installed in the cavity of the rear parcel shelf is accessible for adjustment from the luggage compartment. The central location and rigid fastening of the sensor to the metal of the body ensures the most uniform sensitivity around the perimeter of the entire vehicle.
Require installers to install alarm units covertly and covertly!
I will add that the system unit itself has been slightly modernized, but a specialist can assess how important this modernization is in protecting against theft. And if unsoldering the light signaling relay from the board and connecting the system directly to the standard emergency flasher may seem like overkill (although this relay, with its clicking, gives away the location of the central module), then changing the blocking algorithm from active to passive - no one will argue here - this is simply mandatory installation rule. Why? Because the active algorithm means that to neutralize blockages it is enough to simply de-energize the alarm using in various ways: “...they can stun you, give you something to drink, put you to sleep... Finally, from the corpse. But we don’t think it will come to that...” Alas, it will come. And they can cut the wires, connect them all together, pull out the fuses, tear out the central module, etc. - the installer must provide all the options, but is not obligated to do this at all! You should demand your own implementation of the passive locking algorithm! In this case, the listed neutralization methods do not work - the engine will remain blocked even after the “death of the alarm.”
This, by the way, is one of the reasons why passive locking is prohibited in many countries - imagine what could happen on a high-speed autobahn if the alarm system suddenly fails - the engine is blocked, and an emergency situation occurs that can lead to an accident and loss of life to the victims. That is, of two evils - between theft and the possibility of suffering due to a faulty alarm system, in such countries they choose the lesser, in their opinion. In our country, passive interlocks (they are also called “normally open”) are not prohibited, and in those alarm systems where they are not provided, it is easy to organize them through simple modifications. For example, the photographs show one of these modified alarms with a built-in additional relay, which, in addition to implementing a passive algorithm, allows you to further increase the number of breaks in the vital circuits of the car. And this increases the time required to restore the wiring, and the chances of a failed theft increase even more.

Photo 17. An additional relay (black), built into the housing of a simple alarm, has two contact groups and a very small current consumption of 10 milliamps. Such a baby is capable of passing currents of up to 3 amperes through itself and breaking two vital electrical circuits of the car. Thus, the concept of “alarm + immobilizer” is quite simply implemented, as they say, “in one bottle”.
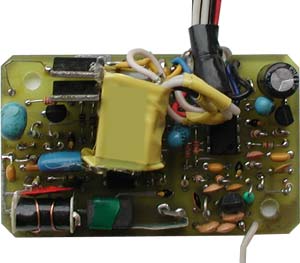
Photo 18. The same relay, only already insulated and glued to the board using hot melt adhesive. This modification is time-tested and has proven itself on the most positive side - not a single failure and, so to speak, “try to steal it” :-)
Insist on the implementation of all the locks available in the alarm when installing - additional engine lock increases your chances of staying with the car!
And finally, the warning system. Unfortunately, the sound of a siren today is no longer enough - people are already accustomed to their constant howling on the streets, due to poor quality or unconfigured sensors, and do not pay attention to these sounds. The solution is to install a pager, the transmitter of which, when attempting to penetrate, will emit a radio signal, and the receiver will notify the owner, and not all neighbors in the house. But the radio channel is vulnerable to radio signal jamming devices. A novice radio amateur can make such a jammer, but what should he do? The solution is either to use a pager with constant monitoring of the communication channel, or to install a security system with two-way communication, which also implements an algorithm for constantly checking the connection between the owner’s receiver and the transmitter in the car. However, there is also a third method - namely, secretly installing a pager transmitter in the cabin. In practice, transmitters are installed anywhere, and they can always be seen from the outside and, accordingly, be prepared technically for theft in the proper way.
But it is possible and necessary to mount the pager transmitter so that nothing would indicate its presence in the car! This installation technique is well illustrated by photographs 19 - 21 - isn’t it, a simple and effective solution. It is best to use the headrest of the front passenger seat for this purpose, because the rear seats sometimes need to be folded down to carry a lot of cargo, and the headrest, which has become non-removable, will interfere with this. The following photographs illustrate how this is done.

Photo 19. Headrest of one of the seats - perfect place for covert installation of a pager transmitter. In addition to the necessary secrecy, a decent warning range is provided due to the optimal location of the transmitter in relation to the metal of the body.

Photo 20. Despite the apparent complexity, the headrest can be disassembled quite easily. To prevent the wires from the transmitter from being visible, they must be passed through the mounting pipe, which is hollow inside.

Photo 21. Visual illustration The most important part of the installation is replacing the headrest with the pager transmitter hidden inside and pulling the wiring harness through the hole in the seat.

Photo 22. After completing the work, the “charged headrest” does not display anything. Just like a “car loaded with an alarm” :-)
In addition to this original solution, the transmitter can also be mounted between the front seats - there is often a suitable place for this.
In any case, a pager or its antenna visible outside the car is a demasking factor for the entire security system (it’s so obvious!), so demand correct installation pager transmitter! So that nothing reveals its presence in your car.
On these simple examples I tried to illustrate the most important principles of competent, intelligent installation - no additional investments in the subject are required - except that you have to spend money on an additional siren and a small relay to organize “correct, theft-resistant” interlocks. And the increased labor intensity of installation work - in fact, it does not increase. It should have been like this from the start. Moreover, who will now argue (and facts are stubborn things!) with the following statement - today's standard salon installation is hackwork and a waste of money. But this happens, I want to repeat once again, because of our clients’ technical illiteracy. I sincerely hope that this article will reduce the number of blind spots that so interfere with the optimal solution to this simple task - “signaling” your undoubtedly worthy car with dignity! So that its hijacking becomes a truly difficult task in practice.
P.S., or instead of an afterword. Technical progress does not stand still, and today security systems are already being produced that combine interlocks using relays controlled by the car’s standard wiring. Or there are those that are combined with a pager into one whole. For example, this system is in the photo below.

The manufacturer advertised this alarm as a two-way communication system. But in fact, this is still a hybrid of an alarm system with a pager, with a convenient informative key fob receiver. There is two-way communication, but its range is rather small - only 200 meters in open space. At this distance, you can check the condition of the car by pressing the button on the key fob pager - it will send a request and receive confirmation from the car - in urban areas the range is only 70-100 meters. Not enough. While the range of the machine’s transmitter is at least 800 meters. At such a distance, the security complex works like a regular autopager, in terms of notifying the owner.
The installation of such an alarm was described in the article. Considering the inexpensive price of this kit (in Taiwan - from 50 USD, in Moscow - 90-100 - the wholesale selling price for today), this solution can be considered optimal in many cases. Provided it is installed correctly, of course.
Best regards, Sergey aka Hungary
A car of any brand must be reliably protected from possible theft or unauthorized entry for the purpose of stealing the owner’s personal belongings from the interior. Installing an alarm system on a car will create an appropriate level of security for personal vehicle. Today there are many different security kits. Most often, security equipment from well-known brands is used, for example, StarLine, Mongoose, Tomahawk, Alligator Sheriff, Pantera, Scher-Khan.
Installing car alarms on your own has recently become a hot topic. Included with the alarm system are instructions for performing installation and configuration work.
Modern cars, including domestic ones, are equipped with a security line. Such a security line, as a rule, has a minimum functional set. However, standard functions are not always sufficient to provide effective vehicle protection. Therefore, car enthusiasts often wonder how to install an alarm system themselves.
What types of car alarm systems are there?
Installing car alarms always begins with choosing the most suitable equipment. Before purchasing a ready-made kit, you need to determine the type of system being installed. Today there are the following main types of alarms:
- With one-way communication;
- With feedback;
- With two-way communication.
Installation of car alarms with one-way communication is the simplest and at the same time reliable. Using this kit, you can block the engine, control the central locking, as well as the status of the hood and luggage compartment. Such complexes are usually mounted on expensive cars. Alarm systems with feedback allow you to control the main subsystems of the machine remotely (distance range up to 1 km). The functional set is generally similar to the set of options in one-way signaling.
The video shows an example of alarm installation:
Installing car alarms with two-way communication will allow you to start the engine remotely. The gearbox used (manual or automatic) does not affect the operation of the system. The cost of this type of security line is higher than that of the two previous complexes.
How to calculate the cost of installing a car alarm?
Installation of car alarms can be carried out independently or by qualified specialists. In the case of installation of an alarm system by specialized service companies, the cost of the work performed is established taking into account the following factors:
- The type of alarm device (for example, installing a one-way alarm system costs much less than installing a system with auto start);
- Availability of additional functions in the system;
- The need to install an additional package of options (for example, turbo timer mode, mirror control, etc.).
The price of installation work does not depend on the cost of the car or its make. Installing a car alarm includes the following steps:
- Connecting the system to the control unit;
- Configuring installed sensors;
- Connection and connection of door end elements to transmit an alert signal about the opening of any door, including the hood or luggage compartment;
- Setting up the engine blocking function;
- Connecting a siren.
As practice shows, installation and configuration work takes no more than 5 hours. It is almost impossible to determine the exact cost of installation work, since the price is influenced by a number of the above factors. Any specialized company offers to purchase a set of equipment and at the same time install an alarm system on the car. In this case, the price is generalized, i.e., it includes the cost of both components and installation and configuration work. Average cost of installing a car alarm Russian Federation is given in the table.
What set of tools is needed when performing installation work yourself?
In order to install a car alarm on your own, you first need to carefully study the operating instructions. The instructions that come with the car alarm describe the procedure for performing installation, configuration and startup work. To carry out installation operations you will need a certain set of tools:
- Electronic multimeter (used to measure the conductivity of connecting cable lines);
- Additional cable (since the cable line included in the kit may not be long enough);
- Foam pad (for packaging the central control unit);
- Insulating tape;
- Double sided tape;
- Socket wrench;
- Screwdrivers of various diameters;
The video shows how to make a car alarm with your own hands:
How to correctly determine the location of alarm components?
Installation of a car alarm begins with the design stage and determination of the location of the system components. The central unit is installed behind the dashboard. It is first wrapped with foam padding and secured. The unit must be located inside the car in a place hidden from unauthorized persons. It is not recommended to place the central block mechanism near moving parts.
When installing a car alarm, you need to pay attention to a number of aspects:
- To avoid kinks and subsequent short circuit (break) of the connecting wires in the door-body section, it is necessary to use rubber tubes or bushings;
- Electrical wiring must be located in a dry place;
- Fastening and direction of connecting cables is carried out using special plastic clamps;
- The sensors are located in accordance with the determining influencing factor;
- The LED indicator is best placed on the front panel in the cabin.
Stages of self-installation of a car alarm
Installing a car alarm yourself begins with determining the power supply to the central unit. The body of the car is a kind of “minus”. The “plus” can be the ignition switch or the battery itself.
Next, the light alarm is connected. It can be connected to turn signals or low beam headlights. It is important to remember that you cannot connect it directly to the wire going to the main headlights. The light element is connected to the lighting control relay.

After connecting the light alarm, the system is connected to the central locking system. The connection diagram can be varied depending on the type of alarm system and the make of the car. For proper installation, you need to study the instructions and electrical diagram of the machine. When connecting the central unit and the lock, it is necessary to calculate the total current strength of the locking devices and check its relationship with the permissible load in the control unit.
After connecting the central locking, the end elements of the trunk and hood are connected to the alarm system, and the door opening contacts are also connected.
Then the functionality of the entire complex is checked, and the system is configured and, if necessary, programmed. The classic car alarm connection diagram looks like this.

Installing an alarm system is becoming an increasingly urgent task every day. Standard systems that come with a new car have a minimum set of functions and meet minimum safety requirements. But they are not enough for a reliable one. A reasonable solution in such a situation may be to replace the standard installation with a specialized one. This will significantly reduce the likelihood of your vehicle being stolen.
Installing an alarm on a VAZ 2107:
The second possible case in which it may be required is its failure or outdated design. In the first case, a car without an alarm system, that is, without basic protection, cannot under any circumstances be left and therefore an urgent replacement is necessary. If an outdated design is used, the replacement procedure can be delayed and this process can be approached more thoroughly.
Alarm selection
At the initial stage of such a procedure as for a car, it is necessary to decide on the modification of the new device. To do this, it is recommended to write down on paper the requirements that will be put forward to the security system. This must include:
- Radius of action
- Possibility of automatic engine warm-up
- Auto-lock
- Protective options (autograbber, which provides a diagnostic function for installed alarms, for example)
- Anti-scanner (protection against digital hacking of the system by intercepting commands)
Once you have decided on your list of wishes, you need to look at the price offers and decide on the purchase budget. At the next stage, it is recommended to view reviews, study technical documentation, and review reviews. The ideal option is if you know a good specialist, it would be very good to consult with him on this issue and make the final decision. In any case, the selected device should fully suit you in all respects. Once a security system has been selected, it must be purchased.
GSM - alarm
One of the know-how in this industry is GSM signaling. With its help, communication is ensured between the car and its owner. For example, if a car is stolen, then using such a system you can easily and simply track its location. To do this, the alarm system includes a GSM module, which, using mobile communications provides the transmission of information about the state of the machine and its location. Enough effective remedy combating car theft. But such know-how has one serious drawback - the high cost of installing such a system. This is what is holding back the widespread adoption of such devices. Today, it makes sense to install such GSM alarms only on luxury cars, trucks and buses. If the cost of the car is comparable, or, even worse, less than the cost of the security system, then this will not be entirely the right decision. But in any case, the final choice remains with the owner of the vehicle.

GSM alarm system - becoming more popular every day
Installation options
Conventionally, methods of installing security systems can be divided into those that are done with the help of specialists from a third-party organization and those that are done in-house.
If you engage a company that constantly carries out such work, you get the following advantages - high quality of work performed, short installation time, warranty on equipment. The only drawback that arises with this installation method is the high cost of the work. The services of such a specialist are not cheap, which is why you have to overpay.
The second option is to carry out installation and commissioning work. In principle, there is nothing complicated here and any person who has at least some experience in similar work can do it.
Why do you install an alarm system yourself?
Most often, installation is done on one’s own in cases where:
- Limited budget and not enough money for installation
- Some people like to do everything themselves and installing a security system on a vehicle is no exception.
- Non-standard alarm design
Quite often, domestic car enthusiasts have a situation when they want to buy a quality device, but they don’t have enough money. Ultimately, everyone starts trying to save money possible ways, and still buy what you want. In the process of purchasing a car alarm, such cases are not uncommon. alarm system, and does the installation work himself. Due to this, you save quite a significant amount on installing the system and you have the opportunity to purchase a device to protect your car of a higher class.

Installing an alarm system yourself will save you money
Also, installing an alarm on a car without involving outside help is carried out in cases where the owner of the vehicle likes to do everything on his own. And such cases are not uncommon. Many people enjoy spending hours rummaging through their car. You can even call it rest. A person relaxes and is distracted from pressing problems. On the other hand, it allows you to increase your self-esteem. Well, the last factor that contributes to this development of events is that it is doubly pleasant to use those things that are made on your own.
Separately, it is worth noting the non-standard design of this security system. The car owner wants a good, high-quality system for car security. But at the same time, he cannot find a device that would satisfy him and best meet his requirements. And if he finds it, then at such a price that any desire to buy such an expensive device disappears. As a result, everything comes to a situation where it is easier to make the system yourself, from scratch, than to buy it for a fairly large amount. At the same time, it will be no worse than the one lying on the store counter. But this raises another problem related to practical implementation. In this case, you can install the alarm yourself.
Do-it-yourself alarm installation
Before starting installation, it is necessary to study in detail the documentation for both the vehicle and the system itself. The next step is to study and understand the car's wiring system well. Next, you need to look at the alarm connection diagram and decide where it would be most optimal to perform this or that action related to installation and connection.

Most often, the car alarm housing is installed next to the fuses. This allows you to get two advantages at the same time - the availability of the security system and the reliability of the installation. At the same time, there are no problems with connecting the switching and it is possible to use existing wire routes, which greatly simplifies and speeds up the process of completing the work.
Next, we install the alarm ourselves step by step. To do this, we connect the sound signal system to the corresponding connector of the alarm unit. Then the central locking is switched. The wires are screwed to the terminals of the required connector in. At the next stage, similar actions are already performed with turns, which are also part of such a system.
Then the power supply wires are connected without supplying electrical energy. At this stage it is important to maintain polarity. If the wires are mixed up, a situation may arise in which the car alarm may fail. Therefore, it is necessary to devote Special attention. If there is even a shadow of doubt, it is better to perform an additional check using measuring equipment such as a multimeter, tester or voltmeter.
Then the ground is connected. It is carried out with a separate single wire, which is attached to the body of the machine. For these purposes, M6 or M8 bolts complete with a nut and washer are most often used. For higher reliability of such an electrical connection, it is recommended to open the bolt with paint. This will avoid possible unwinding of the fastening element and will significantly improve the quality of the connection.
The car alarm must be connected to the car ignition. For these purposes, a pair of wires are routed from the central unit of the security system, which connects these two important components of the car.

Next, the remote control transceiver is installed. remote control. It is usually installed on . The wires to it are laid separately from all the others. This is done in order to avoid possible interference that could lead to a false alarm. Itself in the upper part of the glass at a distance of 20 millimeters from the car body.
Then you need to install the gift sensor. It is attached behind the dashboard using special mounting clamps that are included in the kit.
The signal part is installed under the system. To do this, completely disassemble the wiper mount. Then the plastic base of this element is removed. Then the siren is installed. The wires to it are laid along existing routes (a pair of wires go to the wiper and together with them we lay 2 more wires). Then, in the reverse order, we bring everything back to its original form and return the element of the vehicle’s anti-rain system to its place.
Now we install the limit switch under the hood. It will monitor the state of this element of the car body at the moment when the security system is turned on. The limit switch is installed, most often, above the left headlight. In the normal state it is closed, but when an attacker opens the hood, the circuit will open and the alarm will turn on.
At the final stage of installation work, it is necessary to connect the engine and the alarm system. To do this, a relay contact group is connected to the fuel pump control system. When the security system is turned on, the relay is activated and the contact opens. As a result, the fuel pump cannot turn on and the engine does not start.

Some particularly expensive cars are equipped with a redundant alarm system. This is believed to further reduce the likelihood of car theft. In our country, this practice has not yet become widespread enough. Installing such an alarm system is not cheap and not everyone can afford it.
The traffic police fined a Russian who converted a Lada into a Mustang
The attention of the police was attracted by photographs of an unusual Mustang in in social networks. After the pictures became popular, traffic police inspectors identified the owner of the vehicle and invited him to the department for a conversation, reports the State Traffic Safety Inspectorate for the Omsk Region. During the inspection, it was found that the 24-year-old Omsk resident made the following changes to the design of the car: installed...
Volkswagen Polo Cup – the battle begins!
Despite the doubts of skeptics, the only rally monocup in Russia continues to live and develop. Yes, for obvious reasons, the organizers of the Volkswagen Polo Cup had to slightly increase the cost of participation - from 120 to 140 thousand rubles. But, firstly, you still cannot find a more profitable turnkey offer. And secondly, they prepared a small bonus for the athletes...
The old Land Rover Defender may be resurrected under a new name
To do this, the billionaire is going to modernize the original Defender, as well as come up with a new name for the SUV. Autocar reports this with reference to Ratcliffe himself. Ratcliffe previously announced plans to restart production of the original Land Rover Defender six months after the model was removed from the production line. However, at Jaguar Land itself...
The companies that sell the largest number of real foreign cars in the Russian Federation are named
According to data from the analytical agency Autostat, a total of 153.5 thousand were imported into the Russian Federation during this period. passenger cars. And it is all the more interesting to find out which brands sell in Russia the largest number of “real foreign cars” brought from abroad. As it turned out, most cars for reporting period imported by Toyota...
Moreover, two such models are in the lead: Lada-2114 and the old “nine”. In third place is the rear-wheel drive "seven", reports "Avtostat-Info". Well, among foreign cars, Ford Focus is in first place with a large gap from competitors based on the results of 9 months of this year - in total, more than 100 thousand cars of various types were sold...
What can you buy instead of a new Lada: experts gave the exact answer
As the authors of the study note, cars costing from 300 to 500 thousand rubles are in greatest demand among Russians. In this price range greatest number models are offered by the Lada brand (Granta, Kalina, Priora), but many motorists prefer a used foreign car to a new domestic car. According to expert findings, having...
Royal Mercedes S-Class sells for $30,000
In 1988, a 300-horsepower Mercedes-Benz 560 SEL cost more than 250 thousand dollars, but now the auction organizers plan to earn only 25-30 thousand pounds sterling (30-36 thousand US dollars) for the right-hand drive limousine. This specimen once belonged to King Hussein of Jordan, who ruled the country from 1952 to 1999. Armored...
IceContact 2 – tested by Yakutia!
Winter studded tires IceContact 2 To test the new winter studded tires IceContact 2, CONTINENTAL specialists decided to go... to Yakutia! The need for such testing was caused by the use of the latest development - ContiSeal technology. The main essence of this technology is that the inner surface of the tire is coated with a viscous adhesive...
Today we will look at six crossovers: Toyota RAV4, Honda CR-V, Mazda CX-5, Mitsubishi Outlander, Suzuki Grand Vitara and Ford Kuga. To two very fresh new products, we decided to add the debuts of 2015, so that the test drive of the 2017 crossovers would be more...
The most stolen car brands in St. Petersburg
Car theft is an age-old confrontation between car owners and thieves. However, as noted by law enforcement agencies, every year the demand for stolen cars changes noticeably. Just 20 years ago, the bulk of thefts were made from products of the domestic automobile industry, and in particular from VAZ. But...
Hits 2017: rating of crossovers by cost and qualityThey are the result of genetic modeling, they are synthetic, like a disposable cup, they are practically useless, like Pekingese, but they are loved and expected. Those who want a fighting dog get themselves a bull terrier; those who want an athletic and slender dog give preference to Afghan hounds; those who need...
HOW to choose a used car, which used car to choose.
How to choose a used car There are quite a lot of people who want to buy a car, but not everyone has the opportunity to purchase a brand new car at a dealership, which is why you should pay attention to used cars. Their choice is not an easy matter, and sometimes, out of all the diversity...
TOP 5 rating: the most expensive car in the worldYou can treat them as you like - admire, hate, admire, be disgusted, but they will not leave anyone indifferent. Some of them are simply a monument to human mediocrity, made of life-size gold and rubies, some are so exclusive that...
HOW to choose a car, Buying and selling.
How to choose a car Today the market offers buyers huge selection cars that just make your eyes run wild. Therefore, before buying a car, there are many important points to consider. As a result, having decided what exactly you want, you can choose a car that will...
The most stolen cars in Moscow in 2017
The ranking of the most stolen cars in Moscow has remained almost unchanged for several years. About 35 cars are stolen in the capital every day, 26 of which are foreign cars. The most stolen brands According to the Prime Insurance portal, the most stolen cars of 2017 in...
WHERE can you buy a new car in Moscow?, where to sell a car in Moscow quickly.
Where can you buy a new car in Moscow? The number of car dealerships in Moscow will soon reach one thousand. Now in the capital you can buy almost any car, even a Ferrari or Lamborghini. In the fight for clients, salons use all sorts of tricks. But your task...
- Discussion
- In contact with


