Easy craft from a plastic bottle. Crafts from plastic bottles
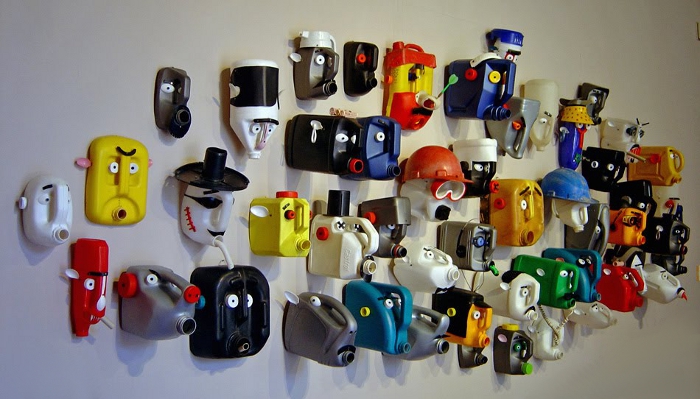
Family hearth for each of us it is a sacred repository of good hearts, warm and kind words, tender kisses and caring hands. This is the place where everyone relaxes their souls, is filled with positivity and positive energy, feels relaxed and cheerful, cheerful and at ease. And so that the reigning idyll does not exhaust itself over time, every day caring housewives and owners, including, strive to equip every corner of their “royal” possessions as best as possible. And this does not mean that you need to move dishes, furniture and household appliances, grow your favorite flowers, keep order and cleanliness. This, of course, is of great importance for the prosperity of harmony in your home, but it would also be nice to pay attention to the adjacent areas of your home - this is the garden and vegetable garden. Of course, growing vegetables, fruits and berries is useful and economically profitable, but besides this, we invite you to add some zest to well-kept land plantations - decorate your backyard with various crafts made with your own hands from plastic bottles. Many people have a cart and a full cart of such goods, and all this, as is commonly believed, will be useful in the household, but it is better to transform the old and unnecessary into something original and new that will bring benefit and joy to those around them. So, Dear friends, the topic of our article is directly related to needlework. If you are interested in this, then we provide 10 photos of ideas for do-it-yourself supports made from plastic bottles for the garden and vegetable garden, made at home. Our creative ideas are meaningfully revealed to you through prepared master classes with step by step instructions. Check them out and start creating your own creations. You and your children will definitely love this!
Ladybug beetle made from plastic bottles
To make your garden and vegetable garden look bright, we recommend using our step-by-step master class with detailed instructions for the course of action. We will make cool crafts with our own hands from plastic bottles in the shape of colorful ladybugs. If you have children or grandchildren, this is an idea with visual photo You should definitely like it, and especially the younger generation. Arm yourself with the necessary materials at hand and move on to exciting creativity.
To work you will need:
- plastic bottles - liter and two liter;
- stationery knife;
- scissors;
- dye;
- brush;
- small foam ball;
- toothpick;
- disposable fork;
- candle;
- nail clippers;
- ready-made eyes;
- glue gun
Manufacturing process:
- At the beginning of creative work, we will need to prepare construction material for the body of the bug. To do this, take all the bottles that you have - from small to large, and cut off the bottom of them with a stationery knife.
- The finished parts should be coated with the paint of your choice in bright colors on both sides - internal and external. If stains remain during the decorating process, it is advisable to repeat the steps. After which it is recommended to dry your workpieces.
- In the meantime, we begin to form the head of the beetle. For this purpose, you need to take a small foam ball and use a stationery knife to cut it into two parts, one of which will be slightly larger. This is what we will need for work. We need to slightly cut off the edge of this foam part so that the future head of the insect fits snugly to the body.
- After we have made the head of the craft with our own hands, we should paint it black on all sides. Take a toothpick and stick it into the beveled edge of the part. This will be our holder while the product is being processed. After the decorating process, we take some time to dry the elements of the body.
- Now we need to make antennae for our bug from a disposable fork. To do this, light a candle and slightly bend the ends of the cutlery teeth using the flame. And when you have succeeded, you need to use nail clippers to cut off all the teeth of the fork to the base.
- When all the parts are ready, you can start assembling the bug. We attach the foam head with a glue gun to the body made from a plastic bottle.
- We need to revive the insect's face with ready-made store-bought eyes and antennae we created earlier. We attach them with glue into holes made using ordinary nail scissors.
- The final step of our creative work will be decorating the back ladybug black dots. For this move you will need black paint. After this, you need to thoroughly dry the craft, then display it in the garden or garden, wherever you like. Believe me, your neighbors will be simply amazed by your resourcefulness and creativity.
Flowerpot “Jolly Pig”

To make wonderful crafts from plastic bottles with your own hands for the garden, you will need a little patience and skill. In order to somehow help you in this skillful task, we provide step by step wizard class with informative instructions, thanks to which you will create unique piglets in the form of a flowerpot or other vegetation. So let's get started.
To work you will need:
- five-liter plastic bottle (for the body);
- plastic two-liter bottle (for ears);
- water-repellent paint in pink and black;
- scissors;
- brush;
- glue gun;
- stationery knife.
Manufacturing process:
- We take a five-liter container and use a utility knife to cut out one of its sides, leaving room for the face and back of the pig.
- Separately, from this available material we make with our own hands the ears, tail of the animal, and, if desired, legs from the cut-off necks of plastic bottles.
- After preparing the body and all its constituent elements, we will need to paint all the parts in pink color water-repellent paint.
- Draw the eyes and nose of the animal in black, as in the photo idea.
- Using a glue gun, we attach the ears to the product and its protruding tail. If you want, you can add hooves, they also need to be glued. After drying, our craft is ready for use in the garden or vegetable garden as a decorative and unusual flowerpot for vegetation.
Flowers "Daisies"

To decorate and effectively complement your garden, you will need, of course, flowers. However, attention, the topic of our article today, as you remember, is related to crafts from plastic bottles, so the riot of plants will be made with your own hands from this material at hand. You will certainly like our idea, so go ahead, dear friends!
To work you will need:
- tree trunk;
- multi-colored paint;
- plastic liter bottles;
- stationery knife;
- scissors;
- glue gun
Manufacturing process:
- First, we need to prepare the “stem” for our future flower. We take a thick stick or a strong branch, remove and sharpen the excess knots, and then paint our trunk green.
- We will have to cut off the bottom from one liter container, since we will use it for the base of the flower. We paint it yellow.
- Then we prepare our “petals” of the plant. We take liter or half-liter plastic bottles and paint them in variegated colors.
- When our flower base and “petals” dry, we need to connect them together, as in the photo. For this purpose we need a glue gun.
- Don’t forget to attach leaves made of the same material as the flower itself to the stem of the plant. We also attach them with glue. So, in principle, our “Chamomile” craft for the garden is ready. You need to create more of such products with your own hands so that the look seems richer and more saturated.
Plastic bees in the garden

To make your garden or vegetable garden come alive, you definitely need to decorate it with bees. Such products, created with your own hands from plastic half-liter bottles suspended on low-growing trees, will cause a lot of admiration and smiles among your family, children, grandchildren and acquaintances. Our step-by-step master class with a photo idea will be useful and educational for you. Study it and get down to creative work immediately to quickly make a wonderful craft at home.
For production you will need:
- plastic half-liter bottles;
- black and yellow paints;
- stationery knife;
- scissors;
- brush;
- loop thread.
Work process:
- To get beautiful cartoon bees, we need to take half-liter plastic bottles with lids and decorate them with paints, giving them a natural striped color.
- When the craft is dry, attach wings to it, cut from the same material at hand as the insects. We make small cuts with a stationery knife, almost at the base of the expansion of the container, and insert our blanks into them. For reliability, fix the work with universal glue.
- The final stage will be the formation of a loop on the back of the bee and hanging it on a tree you like. It’s just so simple that you can create a cool decorative item with your own hands, even with your children, for the garden. They will be delighted with your ideas and fantasies.
Fly agarics

Fly agaric mushrooms will also look great in your garden. Make them with your own hands from plastic bottles and place them somewhere in the grass with a small family. Such a craft will not leave anyone indifferent, especially small children. View our photo idea and start the step-by-step master class.
To work you will need:
- plastic bottles;
- paints - red and white;
- brush;
- glue gun;
- scissors;
- stationery knife;
- your fantasy.
Process of creation:
- We cut off the bottom of a two-liter plastic bottle and immediately paint it red with white splashes, like a fly agaric in nature.
- We make the leg with our own hands from the same material at hand, only from leftovers. We twist the plastic into a kind of tube, fasten it with a glue gun, and then completely transform it with white paint.
- Don’t forget about the “skirt” of the fly agaric, located on the stem of the mushroom. We also form it from a small piece of flexible material and attach it with a glue gun, and then dress it in white.
- We connect the parts of the future product we have prepared using the same glue. So our original fun craft for the garden and vegetable garden is ready, which will gather many onlookers around it! You'll see!
Penguins made from plastic bottles

In order for your DIY craft from plastic bottles for the garden to turn out interesting and bright, you need to put all your effort into this creative activity, patience and creativity. Well, for example, look at our photo idea and try to translate it into reality using the provided step-by-step master class with detailed description course of action.
For creativity you will need:
- plastic liter, five-liter or six-liter bottles;
- paints - black, red, white;
- stationery knife;
- scissors;
- glue gun;
- paint brush.
Manufacturing process:
- In order for our future craft to be believable, it is necessary to comply with all the rules of the natural color of the bird. We take a six-liter bottle and, without cutting off the neck, decorate it with black and white paints, as in the photo provided.
- From a two-liter container we cut off the top, slightly beveled. It will become the head of our northern bird after we skillfully transform it with black paints, give it eyes and a red beak, made with our own hands from plastic waste, rolled into a sharp thin cone and glued together.
- We should carefully attach the finished penguin head to the body using a glue gun.
- We create the wings, as well as the beak, from waste containers painted in the black color characteristic of this bird.
- We form the legs from two flattened liter plastic bottles, repainted red and attached with the neck back with glue under the weight of the penguin’s body. Our product is ready to decorate your garden! Now choose a suitable place on your land plantation to accommodate guests from the snowy north.
Beautiful pink flamingo

A craft in the form of a flamingo will look quite beautiful and exotic on your plot of land in the garden or vegetable garden. It is also easy and simple to do with your own hands at home using plastic bottles and paints, and, of course, your spiritual and creative investment. Like any other work on creating decorative products, it will require maximum patience and diligence, since the external aesthetic appearance of your creation will depend on this. Let's get started.
For creativity you will need:
- six-liter plastic bottle or food canister;
- foam ball;
- silicone hose;
- thick flexible wire;
- stationery knife;
- glue gun;
- scissors;
- brush;
- two metal rods or sticks;
- water-repellent paints in pink, pale red, black and white.
Manufacturing process:
- At the beginning of creative work, we will need to make with our own hands all the necessary parts for our craft. First, we make the head of an exotic bird out of a foam ball. We masterfully, but extremely carefully wield the knife to achieve this intended goal. We look at the idea we provided in the photo and try to create something similar or even better.
- As for the body itself, to make it you will need a six-liter plastic bottle or a canister made of the same material. We cut off its neck, mask the resulting hole with a petal of this material at hand and a glue gun.
- Subsequent creative work will be related to the creation of the “plumage” of a flamingo. We cut it from the same material as the container itself. Their number should correspond to the size of the body in order to cover both the top and, if desired, the bottom of the bird. After the component elements are ready and painted with pink paint, we attach them to the back of the flamingo with a glue gun from the beginning of the plastic bottle to its very bottom.
- Now we connect the bird’s head to the body. For this we need a long narrow neck. We take a strong but flexible wire and a silicone hose, and insert a metal element inside. By the way, neck length is a purely personal matter. We embed the wire pin that has come out on one side into a foam head, which also needs to be painted pink in advance for convenience and the eyes and beak drawn in the corresponding colors. The connection of these two parts - the base of the neck and the head - must be tight and neat. We will need to insert the second end of the wire and silicone hose into the flamingo's body. Just below the disguised neck of the container we make a small hole where it is and insert our product in the form of a neck. We fasten everything with universal glue.
- All that remains is to install our product on the legs. We create them from wooden sticks or metal rods. We cut out the limbs from a plastic bottle, attach them to the legs with wire, and paint the entire structure with a pale red color.
- At the bottom of the body we make two small holes for attaching the legs. We push them through and fix them with glue. Our adorable DIY craft is complete! Give it the most prominent place in the garden or vegetable garden so that everyone, even passers-by, can admire such beauty.
Cheerful gnome and his girlfriend made from plastic bottles

To make your DIY craft from plastic bottles for the garden unusual and eye-catching, we recommend using our prepared photo idea. The gnome and his girlfriend will perfectly decorate your land plot, giving it a certain fabulousness and carefree childhood.
To work you will need:
- plastic liter bottles - 4 pcs.;
- five-liter plastic bottles - 2 pcs.;
- disposable flower pots - 2 pcs.;
- water-repellent paints in green, red, black, white and pink;
- scissors;
- brush;
- gray yarn;
- glue gun;
- stationery knife;
- plastic kinder egg - 1 pc.;
- decorative elements: basket with artificial fruit, any garden tools.
Manufacturing process:
- First of all, let's create a gnome. We take a five-liter bottle and cut two opposite holes on the sides, equal to the volume of the liter container. This will be the place for future hands.
- We will create the arms from the same material at hand as the body of our product. We cut off the top of the containers and insert them into pre-made holes on the body of the craft. We fix everything with a glue gun for reliability.
- Now let's formalize appearance products. We paint clothes with green paints, and additional accessories in the form of a belt and cuffs with black paints.
- We dress the gnome's fingers and face in soft pink or beige.
- Using a convenient brush, we depict the eyes, mouth, cheeks, and the nose with glue from half a kinder egg, the same color as the face.
- We make our own eyebrows and beard from gray yarn. Having cut to the required length, we attach the parts with strong glue.
- We put a flower pot on the head and transform it into red with a black hand-drawn strap for beauty.
- Since our gnome is a hard worker, we insert a mini-spatula and rake into his hands, and then we begin to create his girlfriend - an assistant.
- Using a similar procedure, we make a girl’s torso from a five-liter bottle, cutting off the neck of the container and making holes for the arms.
- We also make the arms from the same material and attach them to the body with glue.
- We put a flower pot on the head and paint it white. Use any artificial flower as decoration.
- We paint the face with a delicate pink color, glue a pink nose from a kinder egg, draw eyes and a mouth.
- We braid the braids from gray yarn and attach them under the hat of the craft with our own hands.
- The shirt on the gnome's girlfriend will be white with green cuffs and a bow at the neck.
- The skirt can be made of plastic, slightly heated over a fire and taking the shape of some tails. If this is a little difficult for you, then simply - just paint the skirt with black paints.
- We insert a basket with artificial fruit into one handle of the product we created, and some flowers into the other. Such cool helpers have appeared in your garden or vegetable garden. Make a lot of these creations and you will see how excellent it is!
Palm trees made from plastic bottles

A very simple and original craft made from plastic bottles is a palm tree. It will look great in your garden or vegetable garden, where there is a flower bed or a well-groomed lawn. It’s quite easy to make such a product with your own hands, especially since our step-by-step master class with a photo idea will explain everything to you in detail and clearly.
To work you will need:
- any plastic bottles;
- scissors;
- stationery knife;
- wire;
- glue gun
Manufacturing process:
- We pre-prepare our building material. We cut off the bottoms of plastic bottles. Their number should correspond to the height of the future palm tree.
- After this, we form our exotic tree with our own hands, placing the trimmed products on top of each other.
- You can use a glue gun as a fixer, or just as a base - make a metal rod, a wooden stick or something else as a rod and place it in the middle of the palm tree trunk.
- We make the crown from trimmed “sheets” of plastic. We finely cut the edges of each and collect the finished composition into a bundle, which must be secured with a piece of wire.
- We insert decorative vegetation into the top of the trunk and once again secure ourselves with a piece of wire.
- The finished tree can be coated with paint and some patterns can be drawn. In general, everything is at your discretion, dear friends! The craft will perfectly complement your garden or vegetable garden, rest assured!
Videoinstructions
Plastic bottles In everyone's life, they have firmly taken a place as disposable containers and their use is only in the form of containers, but we can get much more benefits without throwing them away. For most people, a bottle is a useless thing, but with some ingenuity you can find many ways to make your life easier and save money using bottles. You can make it from a plastic bottle almost everything, you just need the bottles themselves and a little imagination.
Sprinkler for the garden.
One of the simplest ways is useful apply the bottle in the garden or garden- make it out of garden sprinkler, it couldn’t be easier to make. We attach a plastic container to the garden hose and make several small holes, then seal the hose with the neck. This is how we made a waterer for the garden.
Advice.For convenience, use a square container or secure a round one with a weighty object.

Not uncommon, wire charger missing from the outlet to the place where can I put it mobile phone, everything can be fixed by making a clumsy holder for your mobile phone. It is necessary to cut the bottle diagonally, take the bottom and cut a round hole in the upper part for the socket. Now the phone will lie in the bottom using a socket.
Advice.It is better to cut the bottle as close to the top as possible, this will allow you to hold the phone more securely.

You lose every time stationery, you have to look for them, you need to make them easy to make stand. In addition to the bottle, you will need a bolt and nut. You need to cut off the top and bottom, then drill a hole in the plug and bottom and connect it with a bolt and nut. It will be convenient to use this since it turns out to be 2 sections. The upper compartment will accommodate pens and pencils, and the lower compartment will hold paper clips, buttons, graters, and you won’t have to take out your pens for small things.
Advice.Tighten the bolt and nut loosely, then the top will be able to rotate.

Empty canister with a manual one you don’t have to throw it away, it can be useful if you don’t need it or have become unusable, it will work scoop. It is necessary to mark the canister with a marker as in the photo and cut it.
Advice.For convenience, make the nose of the scoop square.

Laminating a glass jar.
We use glass jars for different purposes and you have to mark them in all ways, but the inscription on the glass does not stick well, and the glued pieces of paper quickly become unusable, and laminate no possibility. With an industrial hair dryer, this problem will be solved forever, and the strength of the cookware will increase. If you break it, you won't have to pick up the pieces and cut your hands. Using your imagination, you can decorate the jar well. It’s easy to do, you just need one bottle, suitable in size and color, and a piece of paper with an inscription or design that we want to attach. However, there is a way to do without an industrial hair dryer.
Method one.
Cut off the top of the bottle and place it on the bottom with the cork facing up, then place the jar with the inscription on the cork, put on gloves and start heating the industrial hair dryer. When the hairdryer is hot, you can begin to gently heat the jar in a circle, without stopping in one place. You need to take a reserve, the plastic will settle both in width and height. When the jar is tightly sealed with plastic, cut off the excess and heat the angular parts again, if all parts have become even, the jar is ready.
Advice.Start heating the plastic from the bottom, gradually rising.

Method two.
Cut off the top of the bottle and place a jar with an inscription glued to the bottom. To heat the plastic in this case, we need a tall pan of water and a stove. The pan should not be full, otherwise water will splash onto the stove. When everything is ready and the water is boiling, we lower the bottle into boiling water and begin to turn it slowly, holding the neck of the glass jar with tongs.
Advice.By holding the jar at an angle, the effect will be achieved faster.

Are you tired of balls of thread, getting tangled up with each other and getting stuck in knots, the way out is simple - we make a device from bottles of any size for holding threads in one place. At the same time, the balls will rub less, get tangled and get stuck. You can make a holder that can be attached to a chair or armchair. We cut the bottle closer to the neck, leaving a part that needs to be cut in the form of a rectangle to the bottom, after which we make a hole in the resulting tail according to the size of the lid and put it on.
Advice.The device can be hung by making holes on opposite edges and threading a thread through them.

With the onset of cold weather, all possible types of heaters are turned on in every house and at the same time indoor air becomes dry, and we begin to experience discomfort. Headaches, skin problems, irritation of the mucous membrane and other inconveniences can be avoided by making a silent, simple, convenient and reliable room humidifier. For this you will need:
- Adhesive tape
- Scissors or knife
- Strip of fabric or lace
- Two liter bottle
- gauze fabric
Advice.Pouring into a container essential oils, we will get an air freshener.

Instructions
- We make a 5×10 centimeter slot in the side of the bottle; errors are acceptable.
- Using strips or string, we hang the resulting bottle on the straight upper pipe entering the battery with the hole facing up and secure it tightly with tape so that the bottle does not jump out and spin.
- We fold the gauze several times to form a rectangle 10 centimeters wide and a meter long.
- We place the middle of the folded fabric in the hole, and wrap the ends around the battery pipe.
- Pour water into the resulting container and moisten the wound gauze, this is the maintenance of the device.
Mosquito trap
From a two liter bottle make a mosquito trap. The trap will attract small insects as a result of fermentation processes, namely carbon dioxide. To make it you will need:
- 1 gram baker's yeast
- two liter bottle
- dark fabric
- 50 grams of sugar
- 200 ml of water with a temperature of no more than 40 degrees
We begin production by cutting it so that the neck, upside down, fits tightly into the bottle and does not reach the water. Now that the container is ready, pour in sugar, yeast and fill it with forty-degree water, it should not be warmer or hotter. If the liquid is too hot, fermentation will not begin due to the death of the yeast bacteria. Pour the water slowly and stir the mixture. Now we insert the neck into the bottle like a funnel. To catch mosquitoes, the trap must be covered with thick fabric that does not allow light to pass through or with paper. Once caught in such a trap, mosquitoes will not escape. Insects will be caught in such a trap for up to a week, after which we will change the mixture.
Advice.After preparing the mixture, place it in a warm place.

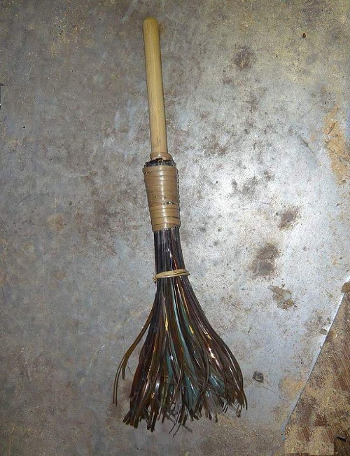
From several one and a half liter bottles we make a simple and extremely durable broom. This broom is convenient for sweeping floors and fleecy surfaces. The hardness of the broom depends on the number of pieces cut.
Manufacturing.
First, we make preparations. We cut off the neck and bottom, spread the middle into flaps to the middle, no wider than two centimeters. You will need 4 of these, and leave another one with the top and neck. Now we put everything together, and cut off the top from the next bottle, put it on what happened and squeeze it. We take a strong wire and thread it through all the bottles along the edges. We put everything on the handle through the cork and secure it with wire. For reliability, we drive a nail through the neck into the handle.
Advice.Use copper stranded wire.

If in nature we didn’t have mugs you can easily make it from a bottle. First, cut off the top, then use a knife or scissors to cut out a square, retreating 2-3 centimeters from the top cut. We cut it evenly and with the expectation that the width of the remaining jumper will be the handle. Turn the top ring inside out and push through the bottom. Now we have a mug that can help us out in nature.
Advice.Without cutting out a large square, you can fold the middle section and place the cork ring over it.

Create self-watering flower pot just cut off the top of the bottle first, then the middle part, so that the top part fits in without touching the bottom. Then we carefully make a hole in the cork and thread a thread through it. The thread should extend 5 centimeters from both sides of the cork. Now that everything is ready, pour water and insert top part like a funnel. Now we fill in the soil, not forgetting to wet it. The plant will absorb the required amount of liquid, this will simplify plant care.
Advice.Fertilizers can be added to the tank.

Arriving in nature you forgot the cutlery there is nothing to notice them with. To save the situation, a bottle, a knife, and a lighter are enough. Cut out one of the five parts of the bottom and a little of the top in one piece after burning the edges with a lighter. You can use this spoon to eat and prepare food.
Advice.After burning, rinse the device.

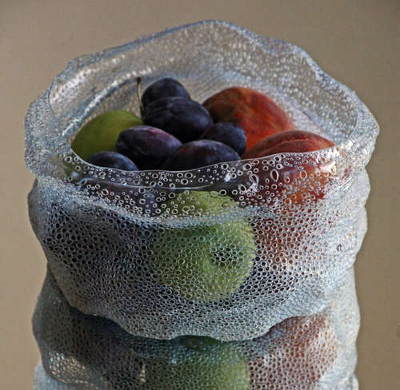
Not all refrigerators have vegetable cells and have to store vegetables in in a variety of ways, while food breaks, scratches and rolls all over the refrigerator. For convenience, use five-liter eggplants. Cut off the top part and fill with vegetables or fruits. In this form, the food will not wrinkle and there will be significantly more free space in the refrigerator.
Advice.Store vegetables and fruits in separate containers.

During the cooking process it is required separate egg white or yolk. But they are not easy to separate, the yolk is very fragile and if you puncture it, it will mix with the white. You can cheat with a bottle. Crack the egg onto a plate, squeeze the bottle and bring it to the yolk. By unclenching, we will draw the yolk into it without damaging it. The method is suitable for preparing dishes whose recipe includes a lot of eggs, for example, the common French meringue dessert “Meringue”.

Advice.Rinse the bottle before use.
Nowadays it has become quite popular to decorate the garden using plastic bottles. The answer to the question is what caused such a stir for garden crafts made from bottles; It can be quite related to the question: what is needed to make crafts from plastic containers. How to make crafts from plastic bottles - 100 photo examples for you, look at our selection and take the ideas into your arsenal.


Crafts from plastic bottles for the garden
To make these masterpieces you need:
- plastic bottles,
- improvised tools (knife, scissors, it is also possible to use a drill, jigsaw, soldering iron, welding machine, and so on);
- metal frames are possible (which are easy to make with your own hands from metal tubes or fittings);
- paint (which is used even less often, and to be honest, I don’t particularly like such crafts);
- screws;
- nails;
- cement;
- putty;
- primer.

It all depends entirely on your idea; in some cases you will only need scissors and the bottle itself. In others, absolutely everything listed above, and even something else.


Well, the most important element is your imagination and creativity (in my opinion, without these elements the work will always not turn out particularly well).


As we can see, the list of components spent in the manufacture of such products does not cause any concern for your budget; among other things, such crafts are very original.

Since everyone is trying to add something of their own to seemingly simple crafts, with a completely worked out manufacturing scheme. And most importantly, anyone can make crafts from plastic bottles with their own hands, if only they have the desire.


There are a great variety of such crafts, from simple ones, consisting of only one plastic bottle to... I would even say, ad infinitum, the main thing here is your imagination, patience, perseverance, and the amount of containers collected. In this article I will provide a description of making crafts from plastic bottles.

How to make crafts from plastic bottles
Who doesn’t like a variety of figures in the garden, from a gnome to a mushroom? Fairy tale characters You can create them for your garden with your own hands from all kinds of materials. Plastic containers are one of the most favorable materials. Crafts from plastic bottles for the garden - photo ideas for your piggy bank:


The plastic from which the bottle is made is soft, easy to cut and sew, figures made with it are able to retain their shape for a long time, are beautifully painted, and are absolutely not afraid of precipitation.

Crafts made from a plastic bottle for the garden - the only disadvantage is that they are light, and the wind easily scatters them, or even carries your figures somewhere to neighboring areas. This problem is easily solved by pouring sand, soil, stones, and so on inside the plastic craft.

I will not give examples of making these figures, since, in my opinion, this is a purely creative matter; just look at at least one of the figures and it will immediately come to your mind to make a completely different figure using the same technology.

Crafts from plastic bottles for the garden
Swan flowerpot. To create it you will need:
- large plastic bottle (five liters),
- thick wire (you can use fittings),
- metal mesh for making wings,
- gauze,
- paint and putty.

We cut the plastic container lengthwise (we cut off one of its sides so that we get a container for further planting flowers).

You need to pour wet sand into this container (to give it a more rounded shape, as you probably already guessed, this will be a kind of swan’s body).

We insert a rod into the lid (before this you need to bend it so that you get something like a swan’s neck).

Next, we take a metal mesh with a smaller mesh, cut it in the shape of the wings and tail, make sure that there are rods at the base of the wings, then we make holes in the swan’s body (base) and insert the wings and tail into them, bending the pins inside the base.

The next stage: take gauze, soak it in putty and cover the entire outer part of the base, wings and tail in one layer.


Let's wait a day until the putty dries. Next, we remove all the unevenness and cracks with another layer, but this time with a small layer and without gauze or putty.
We are waiting for it to dry.

Let's color the swan. It may be difficult to apply paint here, so it can be coated with a primer. The swan flowerpot is ready. All that remains is to pour out the sand, put it on Right place, pour soil and plant flowers. Crafts from plastic bottles, see photos of designs of other animals:


Craft from a liter plastic bottle
Ball made from plastic bottles. We select plastic eggplants of the same size and cut off their bottoms.
Next we will make the frame. Let's weld metal rods (tubes), or even take a thick wire as a basis, make a ball consisting of several links, then using the wire, make it lattice-like (the smaller the mesh, the better).

Then, using gauze and primer (we also soak the gauze in the primer), we wrap this ball in one layer. Let's wait until it dries.
Next, using glue (since the craft will be placed outside, it naturally must be waterproof and reliable), we glue the bottoms to the base.

That's all, you can use bottles different color, to create some image on the ball.


Summary: DIY crafts from plastic bottles for children. Crafts from plastic bottles for the garden. Crafts from plastic bottles for kindergarten, photo. Flowers from plastic bottles. Ideas for crafts made from plastic bottles.
What can be made from plastic bottles? In this article we will tell you what crafts from plastic bottles you can make with your own hands with your children. Plastic bottles are a universal material for making crafts. We will tell you how to do:
Vases made from plastic bottles
Crafts for the garden from plastic bottles
- garden crafts made from plastic bottles
1. Crafts from plastic bottles. Toys made from plastic bottles
Catamaran made from plastic bottles
By connecting two plastic bottles together using electrical tape, you can make a toy catamaran for dolls.


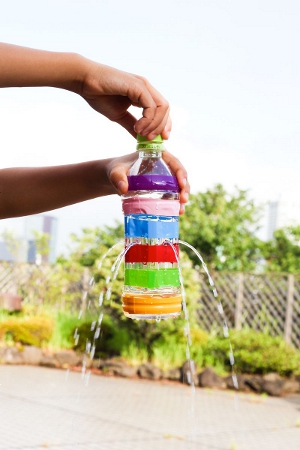
Craft from a plastic bottle for children - fountain
On a hot summer day, you can't think of a better entertainment for children than playing with water in the fresh air. From an ordinary plastic bottle you can make an educational toy for experimenting and playing with water in the country or on the beach.
Make several holes in the bottle using a sharp object. In the photo below, the holes are made in the center of the bottle, but in fact, it is better to place them at the bottom of the bottle. In this case, the maximum volume of water from the bottle will be used. Plug the holes with your palm and fill the bottle to the top with water. Screw on the lid. Remove your hand from the holes. Surprisingly, water does not pour out of the bottle through the holes.
Now unscrew the cap slightly and you will see water begin to pour out of the bottle through the holes. It is the air entering through the neck of the plastic bottle that displaces the water from the bottle.
This toy can be used as a washbasin in the country.
Crafts from plastic bottles for children using the papier mache technique.
You can make interesting crafts for children using papier mache technique from plastic bottles. Boys will probably be interested in a homemade airplane made from a plastic bottle, and girls will be able to make a whole home zoo.
The principle of making toys from plastic bottles using the papier mache technique is as follows. First, the frame of the future craft is made from cut and whole bottles. Everything is held together with tape. Additional parts are cut out of cardboard and also attached with tape or tape.
After this, you need to tear or cut the paper into small pieces. This can be either regular printer paper or special corrugated paper for children's crafts. Dilute PVA glue with water in a 1:1 ratio. Then, dip each piece in diluted glue, attach it to the frame of bottles. Thus, cover your craft with 4-6 layers of paper.
Once the glue is dry, paint and decorate your plastic bottle craft.

How to make an airplane from plastic bottles >>>>

From plastic bottles with your own hands. Cow >>>>
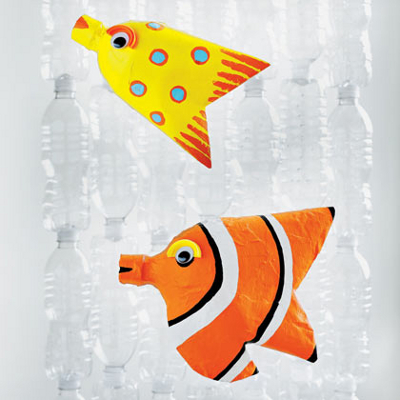
Children's crafts from plastic bottles. Tropical fish >>>>

Children's crafts from plastic bottles. Crocodile >>>>
And a few more links to master classes on making crafts from plastic bottles for children:
2. DIY plastic bottles. Vases made from plastic bottles
The easiest way to make a vase from a plastic bottle is to simply cut off the top of it and decorate it. In this case, it is advisable to use an iron to round the edges of the homemade vase. It will be more beautiful and safer this way.
To round the edges of a vase made from a plastic bottle, place a sheet of paper on top of it and bring a hot iron (the paper is needed to prevent the plastic from sticking to the sole of the iron). Sharp edges of the bottle high temperature wrap up. Be careful - do not hold the iron for long and constantly check what is happening under the paper. Link >>>>

We would like to invite you to make a creative vase craft. To make it you will need several plastic bottles. You can use one large bottle (1.5 liters) and 4 small bottles (0.5 liters). To make a vase from plastic bottles you will need plastic glue or a glue gun. For instructions on making a vase from bottles, see the link >>>>

You can make a cute felt case for a plastic bottle. Insert the bottle inside the case - the vase from the plastic bottle is ready!

You can make a beautiful, “airy” vase from a plastic bottle if you first hold the cut bottle over the fire to give it shape. Then make numerous holes in it with a soldering iron. But it’s still better not to store food products in it!


And one more idea on how to quickly and easily make a vase from a plastic bottle.
3. Crafts from plastic bottles photo. Flowers from plastic bottles
Making flowers from a variety of materials is one of the most popular types of crafts and needlework today. You can make original artificial flowers with your own hands from ordinary plastic bottles.


Detailed wizard for a class on making flowers from plastic bottles, see the link >>>> To make this craft from plastic bottles, you will need, in addition to plastic bottles different colors, you will also need a candle and a glue gun. However, instead of a glue gun, you can use just glue. Attention! Be very careful when working with fire!
Separate instructions on how to make flower stems from plastic bottles can be found at the link >>>> To do this, you need to cut the plastic bottle in a spiral to get a narrow strip of plastic. Then twist it over the fire.

4. From plastic bottles with your own hands. Boxes and boxes made of plastic bottles
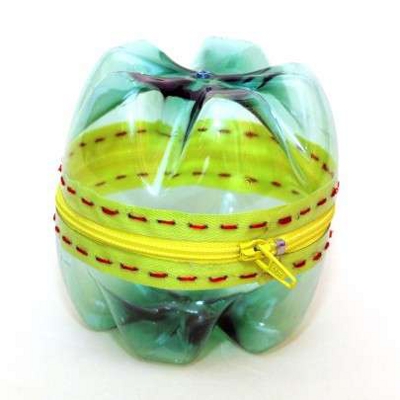
Take two bottoms from plastic bottles and glue a zipper between them with a glue gun or plastic glue. The coin purse is ready!
You can also sew zippers onto bottles.
Decorate the box with a flower, also made from a plastic bottle. We described above how to make flowers from plastic bottles.
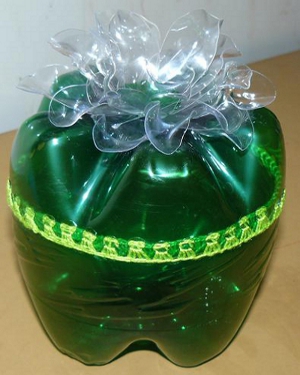
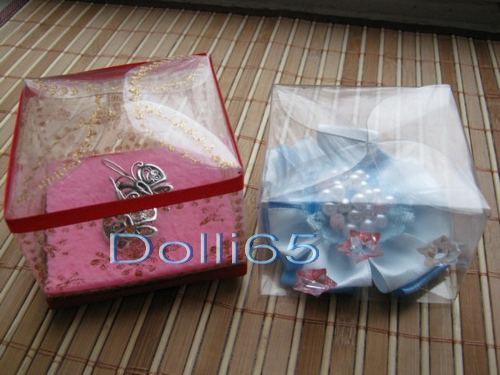
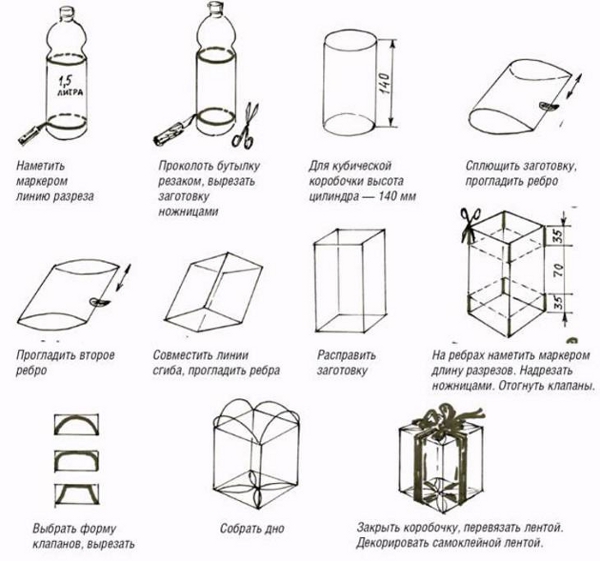
From a plastic bottle you can make a beautiful packaging box for a small gift for a loved one.
Mothers or grandmothers who know how to crochet can make convenient and practical boxes from plastic bottles for storing children's books.

Detailed instructions For making this craft from plastic bottles, see the link >>>>
Link-2 >>>>
5. Crafts from plastic bottles master class. Jewelry made from plastic bottles
Who would have thought that plastic bottles can be used to make stylish jewelry! Bright, fashionable bracelets or delicate, airy necklaces.
Bracelets made from plastic bottles
Cut a plastic ring of the thickness you need from the bottle. Wrap it with colored yarn or elastic fabric, cover it with lace or trim it with thread. Stylish, summer decoration is ready!
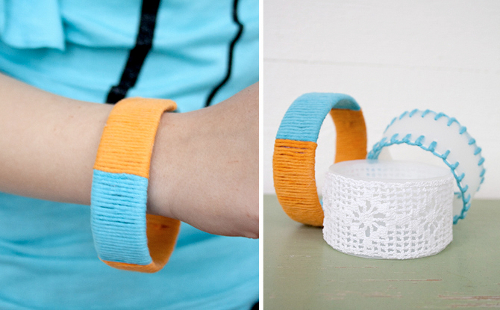
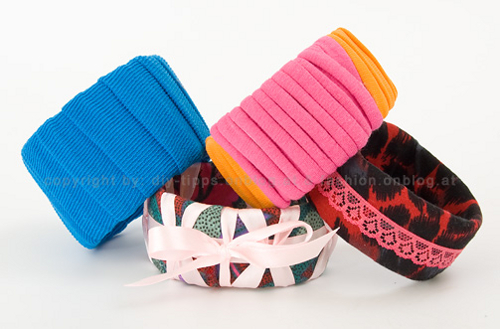
You can also buy inexpensive beads and tie them to a plastic ring with colored yarn.

For a detailed master class on making this craft from a plastic bottle, see the link >>>>
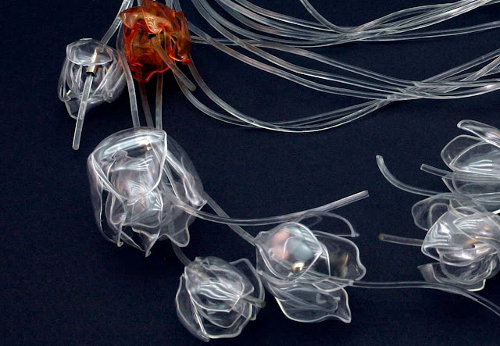
Above we talked about how to make flower stems from a plastic bottle. These beautiful spirals can also be used to make jewelry from plastic bottles.

You can make a beautiful necklace from a plastic bottle using the same principle as flowers. Cut petals and leaves from a bottle of various shapes. Hold them over the fire for a short time until they take shape. Put them on the fishing line.

And from the bottoms of plastic bottles you can make a stand for jewelry.
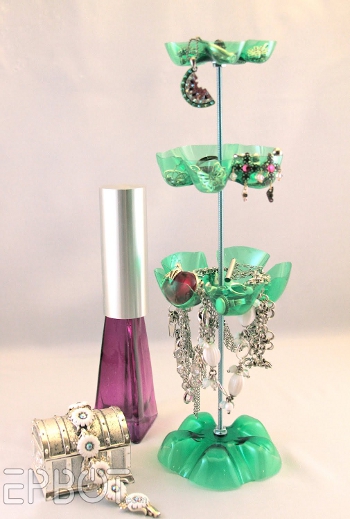
To make this craft from plastic bottles with your own hands, you will need, in addition to the bottles themselves, a threaded metal rod, as well as nuts and washers.

6. Plastic bottles crafts for the garden. Crafts from plastic bottles for the garden
Bottom plastic bottles will make beautiful decorative apples and pumpkins. To do this, you need to cut off the bottoms of two bottles and paint them acrylic paint, and then fasten them together. You can do without paint by placing corrugated paper cut into strips inside crafts made from plastic bottles. Link >>>>
For the next craft made from plastic bottles for the dacha you will need a lot a large number of bottles

To make curtains from plastic bottles for a country house, you need to cut off the bottoms of the bottles and fasten them together with fishing line or silk threads. The bottoms of the bottles need to be cut along the edges in such a way that you get flower-shaped blanks. The edges of such blanks can be slightly sanded with sandpaper or scorched over a fire so that there are no snags on the cut.
Using an awl heated over a fire, we pierce holes for threading fishing line or thread. Using knots we fix the position of the workpieces on the thread so that they do not bunch up. The work is painstaking and delicate, but such a curtain does not require financial costs.
Here's another one useful application plastic bottle in the household. 
A useful craft made from plastic bottles for the garden is a homemade broom. Broom made from plastic bottles - necessary thing in the private sector, especially during leaf fall.
7. Crafts from plastic bottles for kindergarten

Material prepared by: Anna Ponomarenko
Other publications on the topic of this article:
(20
ratings, average: 4,25
out of 5)
 Every person wants to decorate their home or personal plot. I want to spend the minimum on this Money. If you have free time, you can make some nice little things with your own hands. To make it very inexpensive, you can use affordable, waste material to make useful and pleasant things. For example, plastic bottles.
What can be made from plastic bottles?
Plastic is a universal material for making purely decorative or useful household crafts, which can be divided into types:
- furniture;
- shower at the dacha;
- greenhouses;
- paths from traffic jams to the country;
- various flower beds and decorations on them;
- children's crafts;
- boxes for seedlings, flowerpots, flower pots or vases for cut flowers;
- decorative figures for the garden;
- decorative flowers and butterflies;
- bracelets, jewelry boxes.
To make all these cute and undoubtedly necessary things you will need a little time, imagination, available materials and, of course, the desire to make a craft with your own hands. Before making crafts, bottles must be washed, labels removed and dried.
Crafts from plastic bottles for the garden
At your summer cottage, you can make a lot of useful and inexpensive things from plastic with your own hands.
DIY furniture made from plastic bottles
 In theory, you can assemble both a sofa and armchairs, but this requires a lot of time, patience, and most importantly, material. Much faster assemble the ottoman, coffee table and other small furniture. At the heart of any furniture made from plastic bottles there will be a so-called block, which consists of one whole empty bottle with a closed lid and a second bottle with the neck cut off. She puts it on the first one. The result is a design with two bottoms.
To make an ottoman, such blocks are tied into a round structure and wrapped with tape. You can finish the job here. But in order to get not only the necessary, but also a beautiful thing, you need the resulting design wrap with foam rubber and put a sewn cover on top. The soft ottoman is ready.
To make a coffee table, you will need blocks from one whole bottle and several cut ones, which are put on with the bottoms up until the desired height is achieved. The tabletop can be made of plywood, which is then covered with a tablecloth or laid out with a panel of multi-colored lids.
Shower made from plastic bottles at the dacha
If there is no water at your summer cottage, and after a hot summer day you want to douse yourself with some water and wash off the sweat of work, a shower from a 10-liter bottle may be the solution. In the bottom of the bottle you need to make a large hole for pouring water, and smaller holes for fastening. A wire or thick fishing line is threaded through these holes and secured to the required height. Holes are pierced in the lid with an awl; the more holes, the more intense the water pressure. Using the same principle, you can make a washbasin from a 5-liter bottle.
Broom for cottages and summer cottages
You need to take several empty plastic bottles, cut off the bottom and cut into small longitudinal strips, not reaching the neck by 4 centimeters. Cut the bottles lengthwise and tie them to the handle. The broom is ready.
Gallery: crafts from plastic bottles (25 photos)


What can be made from bottles for room decoration
Products made from plastic bottles in an apartment or house will look appropriate in the kitchen or children's room. If the decor allows, you can place them in the living room.
Butterflies made of plastic
You can decorate flower pots with these butterflies or make a pendant for a nursery. Even in the living room you can decorate the curtains in the desired color scheme.
 To make a butterfly, you need to draw or print it on paper insect pattern. According to the size of the template, cut a rectangle from a transparent plastic bottle and transfer the design to the plastic. Cut out the outline of the future butterfly. Paint the blank in the colors you like. The butterfly is ready. If you decorate flower pots with such a butterfly, you need to attach it to a thin, but not soft wire and install it in the pot. It will seem that they are fluttering over the flower.
DIY plastic flowers
Flowers and vases require precise markings. To make a flower you need to take colored plastic bottles. You need to draw a template, cut out blanks from plastic and burn them over a candle to give the desired bends to the petals. String several simple pieces onto a wire and form a flower. Wrap the wire stem in spirals cut from green plastic. Make leaves from it, cutting it out according to the template and making a fringe along the contour of the leaf. They are attached to the stem either by heating or by gluing.
Crafts from plastic bottles for children
For small children you can make funny figures and piggy banks. For example, penguins for the New Year. Cut two bottles at a height of 10 centimeters from the bottom and insert into each other. Take a felt-tip pen, draw a face and color the penguin, draw a scarf and a hat for him.
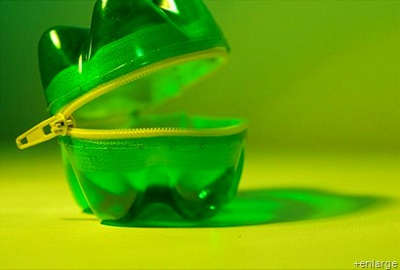
 Can be done frog candy bowls. They are made similarly to penguins, only the bottles are not inserted into each other, but a zipper is sewn or glued to the edges of the edge so that the future candy bowl can be opened and closed.
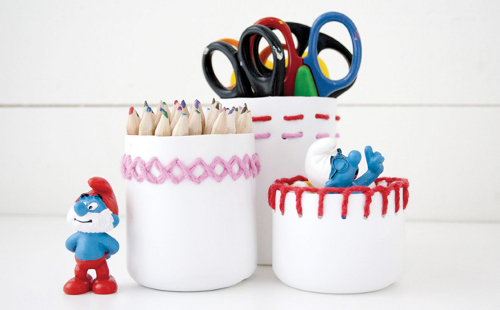
For older children, you can make boxes or bracelets. To do bracelet, you need to cut a strip of the required width, which can be tied with multi-colored threads.
Also, artistically decorated cut blanks can be used as pencil holders and cell phone holders.
Crafts from plastic bottles for the garden
The uses of plastic in the garden are almost limitless. Homemade products made from plastic bottles will organically fit into any garden landscape. Here are some possibilities for using bottle crafts in the garden:
- flowerpot;
- flower bed fencing;
- bird feeders;
- boxes for seedlings;
- decorative elements for decorating flower beds and fences.
For the manufacture of flowerpot lay the workpiece horizontally and cut out a rectangular recess, make holes in the opposite wall so that the water does not stagnate after watering, add soil and plant the plant. To decorate a flowerpot, you can glue plastic eyes on the side of the neck and you will get a hedgehog with a plant instead of needles. You can make a vertical planter by cutting the bottle to the required height. Glue on the eyes, and instead of a nose there will be a lid, you get a little man. The plant will serve as hair.
 Plastic crafts can be used as figured flowerbed. Outline the outline of the flower bed. Cut the plastic at an equal height from the bottom and dig in the blanks with the bottoms up. They can be painted in different colors.
To execute bird feeder, you need to take a 5-liter container, hang it and cut a hole so that birds can fly inside. The hole should not be too high, in which case the birds will not be able to fly out, and too low, as the food will spill out when swinging.
Can be done flowers from plastic bottles with your own hands in the flower beds. The stem is wire, painted in green color, the flower itself is a figuratively cut bottle.
Crafts made from plastic lids can become a decoration for your summer cottage. For example, you can do decorative curtains. The corks are strung on a fishing line and secured to the base.
Crafts made from plastic bottle caps are used as garden paths and as fence decorations. To create multi-colored panels, you first need to make a sketch on paper to calculate the number and position of covers of different colors. The lids are held together with cement mortar for strength, but glue can also be used.
DIY crafts from plastic bottles


